Now that you have a book written (or in progress), let’s talk about: “How to Format a Book for Self-Publishing”!
AUTHOR NOTE:
As of late 2018, Create Space is no more! Now, we can do everything for paperback and hardcover book publishing and on-demand printing through our same login with Kindle Direct Publishing (KDP) as we can for Kindle books. If you see a reference to “Create Space,” just replace it with “KDP” or “paperback”!
—
Okay, so you’ve done the hard part of actually writing a book for the first time. You’ve poured your heart and soul into it, and then you’ve edited it into something you are proud of and just what your audience needs to help them on their journeys.
The hard part’s over, right?
In a big way, yes! Congrats.
But also:
“After climbing a great hill, one only finds that there are many more hills to climb.”
– Nelson Mandela
Now we need to know how to format the book!
Your Next Become-An-Author Hill to Climb = Book Formatting
A little intense to call ‘formatting a book’ a hill? Maybe, but not really.
Writing the book was your first hill; your next hill is going to be formatting this sucker for Amazon, once for the Kindle format specifications and once for the paperback requirements (keep reading!).
It can be kind of a pain, so brace yourself and slot some time in the ‘ole schedule. But it’ll be worth it. Pinky promise!
Why Amazon Self-Publishing at all? [via Kindle Direct Publishing]
“Why Amazon?” you might ask. “Aren’t there other publishing platforms?”
Well, yes–there totally are. But as entrepreneurs, we don’t have a TON of resources to work with. Our time, money, and energy are all super limited, so we want to make sure we use our time in the smartest way possible.
Amazon itself is the largest platform by far, and it’s a BEAST of a search engine.
People pop over there every single day to search for answers to problems–and often, there are people looking for the very answers your book will provide.
Once it’s up on Amazon and you hit bestseller, you can take your sweet time getting it on other platforms that might hit more specific markets around the world and help you grow your audience (or keep the Kindle only on Amazon to take advantage of their KDP Select program).
To be clear, this article is all about HOW TO FORMAT A BOOK–it’s not about the actual process of self-publishing. Formatting is enough of a job on its own. In the next article, we’ll talk even more about self-publishing.
By the end of this definitive book formatting guide, you’ll have the tools to:
- Choose the book formats that work best for you and your audience (digital, print, and/or audio)
- Perfectly format your nonfiction book manuscript for Amazon (via KDP), so you can easily self-publish without a billion error messages
- Create a professional-looking manuscript that you can effortlessly transform into a physical book
- Design (or hire someone to design) an eye-catching book cover–on any budget
“How To Format a Book” Table of Contents
Formatting Your Non-Fiction Book — The Definitive Guide
Here’s what we’re going to talk about, in even more detail, in this guide all about how to format your book to get ready for the next step of self-publishing [a future blog post!]…
Part 1: Decide–Print, Digital, and/or Audio?
- Are you unsure whether you want a printed book, an e-book, an audiobook, or a combination?
- This section will weigh the pros and cons of print, digital, and audiobooks, and give you my personal input that helps entrepreneurs squeeze the most value out of their book releases.
Part 2: How to Format a Book for Kindle
- If you decide you want an e-book, how do you know which formatting rules you need to follow?
- This section takes the long, jargony Kindle formatting guidelines and condenses and simplifies them, so you can easily see which steps you need to take to make your book picture-perfect.
Part 3: How to Format a Book for Print
- If you’re self-publishing through KDP, how do you make sure your book has a professional appearance?
- This section walks you through KDP’s guidelines, and gives you a crash course on page numbers, fonts, margins, and line spacing.
Other ‘definitive guide’ blog posts cover on writing a book:
• how to write your nonfiction book
• book cover design
• self-publishing
• secrets of the Amazon bestseller rankings
• leveraging your book for more media, brand authority, and sales.
Want in-depth step-by-step training FOR FREE? Click the image below:
Want to keep reading?
Let’s get into it!
Part 1: Decide–Print, Digital, or Audio?
Before you get into the nitty-gritty of how to format a book, you’ll need to make some decisions.
• Do you want a physical print book?
• An e-book?
• An audiobook?
Also, this doesn’t have to be either-or (as you’ll see very soon). You can release an e-book and a print book. You can release a print book with an audio companion. None of these are mutually exclusive.
Let’s talk about the pros and cons of each format.
PROS AND CONS OF PRINT BOOKS
Pros of print books:
- They’re cool! There’s something unmistakably impressive about physically holding a book you wrote.
- If you’re in situations–like speaking engagements–where you want to bring copies of your book to give away, sell, sign, etc., you can’t really do that with an e-book. (Or at least not in the same way.)
Cons of print books:
- You can’t list the price as low as you can with e-books, which WILL make it much harder to hit Amazon Best-Seller if you launch with only a paperback book. The minimum price for physical books is around $13 (for on-demand print services like KDP offers).
- Books are paper! Paper = trees.
I’m sure we’ll eventually have a book industry that only uses recycled paper and green energy–but in the meantime, it’s worth thinking about.
PROS AND CONS OF E-BOOKS
Pros of e-books:
- Easy for friends and family to support you!
The price can be as low as $0.99. - It’s more convenient for people to buy and read immediately.
Book buyers don’t have to wait for a physical book to arrive. They can get psyched about what you’re offering and immediately jump into it!
Cons of e-books:
- The clout isn’t as immediately obvious.
There’s still something magical about holding a physical book, although having a digital copy published and live on Amazon does make it feel more official compared to an e-book on someone’s website. - Some people (your potential fans) like physical books better!
You can’t take notes in an e-book the way you can with a good old-fashioned book. You also can’t get an e-book signed–just sayin’.
PROS AND CONS OF AUDIOBOOKS
Full honesty–as of this moment, I’m still in the process of recording my own audiobook. But when I do record it, I’m going to go through ACX, and I’m planning to read it myself.
After all, I’m a podcaster, talking about podcasting. Who better to do what’s basically a long-form meta podcast than moi?
Pros of Audio
- Some authors have told me they make the MOST sales on the audiobook!
Be sure to give it some love. - People feel emotionally connected to you when they hear your voice.
This is why podcasts really form a bond between audience and listener. (Though make sure you have some personality in your audiobook if you want that connection!)
Cons of Audio
- If you voice it yourself, it’s an extra time investment.
By the time you are done writing the book, reading it aloud line-by-line with alacrity may be the last thing you want to do. - If you voice it yourself, it’s an extra equipment investment.
You’ll need a decent mic, a quiet space, and good editing software.
• I use the ATR2100 with a foam pop filter, which doesn’t break the bank and gives good sound quality.
• Audacity is great free audio editing software that I use for my Copy That Pops podcast. - If you have someone else voice it, it’s another financial investment.
That being said, having someone else voice your podcast doesn’t have to be a HUGE cost. Using ACX.com (also connected with Amazon and Audible), you can have someone else voice their book for $0 upfront! You just profit share resulting royalties with the voice over artist. Or, you can pay a rate upfront with no royalties. Whatever floats your boat.
3 STEP PLAN: MY ULTIMATE RECOMMENDATION FOR ENTREPRENEURS
But you’re not just reading this article so I can give you choices. You’re reading it so I can give you some entrepreneurial insight, yes?
Here’s my unequivocal recommendation, and it’s a three-step plan.
STEP 1: Launch first with your self-published Kindle ONLY
Everyone should do this. Period.
Why Kindle (or “KDP” which stands for Kindle Direct Publishing)?
You can price it as low as $0.99, and that low price will help you hit best-seller during your launch because friends and family will be able to support you without thinking twice about it.
If you do a print version, like we talked about above, it’ll be closer to $13+ a book, which is a little bit harder for people to justify buying on launch day unless they really really love you.
(Which, if you have a blog going with a substantial and engaged online audience, perhaps go for it! But if not, digital only, yo.)
Why Kindle only first?
Because then you can focus all your marketing efforts on one thing (instead of multiple version of the book), get it out there with less stress (than if you were trying to finish an audiobook and a print book at the same time), and hit Amazon bestseller status.
STEP 2: Re-launch with a physical book self-published inside your KDP account
This is your second “launch,” and this time, it’s with a fancy physical book, which, remember, has all those emotional pros?
It looks impressive, it’s a physical object you can give away or sign, AND–here’s the real magic–you get to remind everyone that this book hit bestseller status.
STEP 3: Relaunch again with an audiobook from ACX.com
Why the audiobook third?
Because at this point, chances are high that people have bought either your e-book or your print book–and the audiobook is a great companion to either.
No matter which version of the words they have, they still can’t listen to it on runs or during their work commute.
Plus, again, you can hammer it home that this book is a best-seller.
By trickling it out this way, you’re hitting three times the amount of people you would otherwise (and potentially making three times the sales!).

Your face after your third book launch! 🙂
An important note–all three versions should appear on the same Amazon product page. If they do not, that’s a quick call or message to Amazon’s tech support and they’ll merge them.
For example, my Kindle and print versions of Copywriting for Podcasters: How To Grow Your Podcast, Brand, and Business With Compelling Copy were showing up as different products. I emailed tech support and they got it fixed right away!
STEP 4 (Optional): Launch your book on other platforms
Like I mentioned in the intro, some publishing platforms do better with other audiences than Amazon (internationally). Or, they simply help you get more reach overall by covering all your bases.
Here’s a short list of other platforms to explore:
*Note: If you sign up for Amazon’s KDP Select, you are not allowed to publish elsewhere, but you do get extra features/tools. So, make sure to read more before deciding.
- What does it mean to publish exclusively on Kindle?
When you choose to enroll your book in KDP Select, you’re committing to make the digital format of that book available exclusively through KDP. During the period of exclusivity, you cannot distribute your book digitally anywhere else, including on your website, blogs, etc. However, you can continue to distribute your book in physical format, or in any format other than digital.
See the KDP Select Terms and Conditions for more information.
Part 2: How to Format a Book for Kindle
Okay, now that we’ve talked about the different formatting options, let’s get into the Kindle requirements.
So, if you’ve ever written a grant, you’ll know formatting can be a…uh, well, a massive pain.
I’ve done my very best here to make the guidelines for Kindle as clear and intuitive as possible, so you can fix your formatting on the front end instead of trying to correct things after endless error messages.
Again, this section focuses on Kindle–you’ll want to scroll down for paperback.
Let’s get on this formatting train!
HOW TO FORMAT A BOOK FOR KINDLE
Step 1: Build your manuscript in Google Docs (my favorite) or Microsoft Word
With all my book writing clients, we start outlining and writing the book in Google Docs because it’s a simple, easy-to-use tool and we can work simultaneously (and leave notes and comments for eachother).
For my own books, I want to give a quick shoutout to Scrivener. It’s a great writing tool that’s not super pricey–$45 USD–and it has a TON of great functionality to help you organize and format your book every step of the way. But of course, if you don’t want to buy it, Microsoft Word works too! 😉 )
Step 2: Format your book’s front matter.
Your title page is REQUIRED. In the center of the page, type your title. Underneath, write “by [Your Name Here].” Click “Insert Page Break.”
Everything else is optional, but if you include them, they should go in this order:
- Copyright Page
- Dedication
- Preface
- Prologue
Step 3: Build a Working Book Table of Contents
This is EXTREMELY important for Kindle readers!
For PC Users:
- Go to “Styles.” Highlight the chapter titles in your document and change the style to Heading 1. Then highlight the subsection titles and change the style to Heading 2.
- If you don’t want to change the font type/size/color, you can right-click in H1 or H2 (while the title is still highlighted!) and click “Modify.”
- Switch from the “Home” tab to the “References” tab, and click “Table of Contents.”
- Click “Automatic Table 1”
- Highlight the page numbers and leading dots in the table. Right-click and select “Cut.”
- Save your word file.
For Mac Users:
- Go through all the PC steps, and then you’ll need to manually hyperlink your Table of Contents.
- In the table of contents, highlight the 1st chapter heading. Right-click, and select “Insert Hyperlink”. Make sure “document” is selected.
- Click Anchor, then “locate Headlines”, then click the corresponding chapter title and select OK.
- Afterwards, click on all the titles in the Table Of Contents to make sure they’re linked to the correct chapter!
Step 4: Format the rest of your book.
Here are some Kindle-specific notes to be aware of when formatting the rest of your manuscript:
- Tabs don’t show up on Kindle! Instead, click in front of the line, click Page Layout, and then Paragraph Dialog Box Launcher, and then Indents and Spacing. Under Indentation, click “First Line” and then set the amount of space you want in the “By” box.
- Use default fonts–no headers, footers, or special fonts!
- To insert pictures, click “Insert” and then “Picture.” Make sure it’s center alignment!
- Don’t add page numbers. In Kindle, page numbering is automatic. Page numbers in the manuscript will mess everything up.
- If you need a table, click “Insert Table.”
- Insert page breaks at the end of every chapter (“Insert” “Page Break”) to keep the lines from running together.
Step 5: Format your book’s back pages.
Back pages are things like your bibliography, appendix, notes, and glossaries.
All of these are optional, and you can put them in any order you want to.
The only hard-and-fast rule: Don’t add an index (because there are no page numbers to go back to for the digital Kindle version).
Step 6: Save your document for Kindle!
Once you’ve inserted page breaks and you’re confident with the layout of your book, save as web page, filtered (*htm & *html) for PC, or web page (.htm) for Mac.
This will remove all images in the Word file, store them in a separate folder, and reinsert them correctly.
Part 3: How to Format a Book for Print
Woo! You made it through the Kindle Formatting section!
These guidelines take the paperback formatting requirements and (hopefully!) make them a little easier to follow. If you’re formatting a print book, follow along!
Step 1: Build and format your book in Microsoft Word
Just like with Kindle. Save the book periodically as a .DOC or .DOCX file, but this time, remember that you’ll save the final version as a PDF.
(Also, Scrivener, again! Scrivener is still a valid software option. It’s my favorite!)
Step 2: Change the page size to your ideal trim size
“Trim size” is the final cut-size of your book in width by height–the trim is where the page gets cut.
You’re basically telling the book printers how big you want the rectangles of your book to be.
Make sure you use an industry standard trim size because they can be sold on Amazon.com, your eStore, AND all other distribution outlets in the Expanded Distribution Channel (EDC).
If you use a custom size, they can’t be sold through the EDC.
My suggestion: Go with 5.5”x8.5” or 6”x9” because they offer the most printing options.
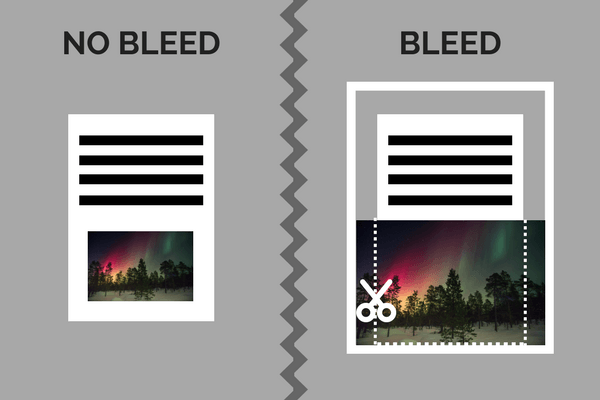
Also, you might not need a bleed, but if you want images to extend beyond the edges of the page, here’s how to make that happen.
For books without bleed:
Stick with the standard 5.5”x8.5” or 6”x9”. That’s the actual size of the actual pages on the inside of the book.
For books with bleed:
If you want your images to bleed to the edges of your book, the images will need to extend 0.125” beyond the final trim size from the top, bottom, and outer edges. Your PDF will need to be 0.25” higher and 0.125” wider than your selected trim size.
Why?
Because there’s variation in printers, and when they’re cutting the pages, you don’t want there to be an accidental white space around your images.
So for example, if your selected trim size is 5.5”x8.5”, you will set the page size to 5.625”x8.75”. If your selected trim size is 6”x9”, you’ll set it to 6.125”x9.25”.
Step 3: Edit your fonts and line spacing
When it comes to fonts, everyone and their momma gots an opinion. And the opinions vary hugely even within the publishing community.
Traditional publishers and old-school book nerds have one opinion…but then savvy digital natives have another.
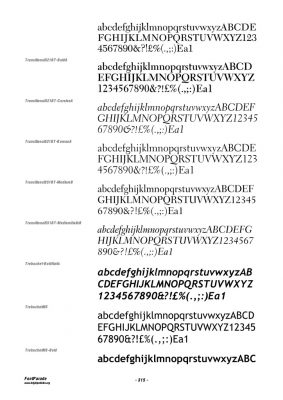
Your main decision is whether you want a serif or a sans-serif font. (Serifs are the little flags on the end of a letter.)
Traditionally, most book fonts are serif fonts, which is also why so many serif fonts have names like “Bookman Antiqua.”
(Personally, I HATE serif fonts and refuse to use them–at least for body copy. Some people say this is book treason! But hey, I’m still a best-seller, right?)
Ultimately, you just want to make sure it’s LEGIBLE–and from there, it’s your choice. I hereby grant thee permission to do as you please with your fonts, as long as it doesn’t make it harder for the reader to, y’know, READ it.
ThoughtCo has a great roundup of classic serif fonts, and, if you’re feelin’ it, classic sans-serif fonts.
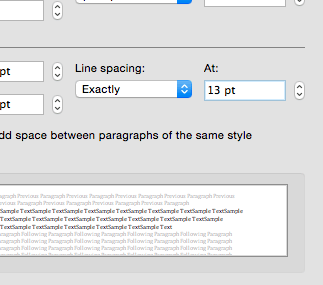
As far as line spacing goes, avoid single space in most instances–the lines look too tightly packed, and it gets difficult to read.
1.5 might be the way to go, but play around with it–somewhere between 1 and 1.5 is your ideal sweet spot for your particular font.
Step 4: Edit your margins
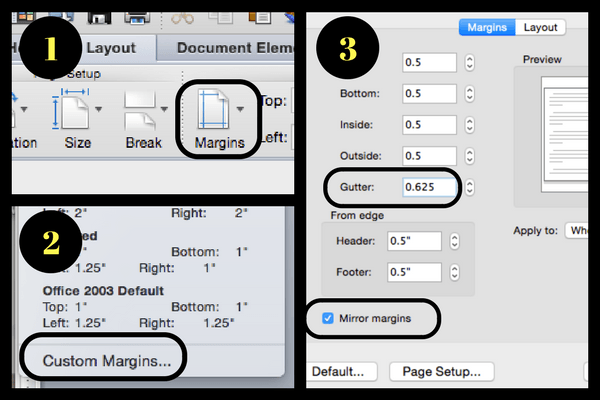
In Word, you can manually edit your margins.
Gutter margins (aka “Inside Margins”) are the margins closest to the binding on the inside. For thicker books, you want a wider inside margin, so the words don’t fall into the center.
Outside margins are all the other edges. All live text (i.e. the content in the “safe zone” that’s always seen on the page) needs a margin of at least 0.5”.
Here’s a handy table so you know how big your margins need to be! Also–this is why you format your margins AFTER you’ve changed your page size. Page size affects page count.
| Page Count | Inside Margin | Outside Margins |
| 24 to 150 pages | .375″ | at least .25″ |
| 151 to 300 pages | .5″ | at least .25″ |
| 301 to 500 pages | .625″ | at least .25″ |
| 501 to 700 pages | .75″ | at least .25″ |
| 701 to 828 pages | .875″ | at least .25″ |
Step 5: Add your front matter and your back pages
Just like we saw in ‘How to Format a Book for Kindle’ above, you’ll want to add your front matter (title page, dedication, etc.) and your back pages (if you want them).
Step 6: Format your images
Your images can be in CMYK or RGB format. Save them as a JPEG, at the exact size you want them to be shown, at a minimum resolution of 300 DPI.
This is also where your fancy bleed settings come to fruition! Make sure you account for the bleed when you’re sizing your images.
If the image is too small, DON’T STRETCH IT TO MAKE IT BIGGER. This will make it print pixelated. Instead, go back into the original file and re-save it.
Step 7: Page numbers and misc
Add page numbers! You need them, and they must be sequential. It’s your choice where you want them placed–in the center, or on the edge.
Make sure no text is cut off or overlapping–otherwise, KDP won’t accept the book. They’ll turn it away at the gates.
And if you reference “supplemental media” in your files or paperback description (like, for example, an audio book, online course, or related blog post) then you have to include the URL.
Step 8: Prepare to Print!
Now it’s time to export your file as a print-ready PDF!
- Click File-> Export-> PDF
- Name your PDF, choose a file to save it in, and click “OK”
- Check the PDF settings that will be used to create your PDF file. If available, select “PDF/X-1a,” “High-Quality Print” or “Press Quality” from the list of presets. DOUBLE CHECK to make sure that all of these settings are turned on (they should be the default in most cases, but still, make sure):
- Fonts and images are embedded.
- Bookmarks, annotations, and comments are disabled.
- Document security (any type) is not used.
- PDF/X format is used. PDF/X is preferred, but if you are submitting non-PDF/X files (for example, PDF/A), any comments, forms, or other non-printing objects could be removed during our review process.
- Transparent objects are flattened.
- Spreads and printer’s marks are disabled. (Print as a single PDF page!)
- Downsampling, or decreasing resolution, of images is disabled.
- Bleeds are enabled (if applicable).
- Click “Export” or “OK.”
- Open the PDF file to make sure everything looks the way you want it. If something’s in the wrong spot, fix it and re-save.
- Make sure that your file size is 400MB or smaller. If it’s too large, try removing some images, or seeing if the images are at too high of a resolution–remember, you just need them to be 300 DPI!
Congratulations! You made it through this monster of a formatting post. 😉
Let’s review the main points of our how to format your book definitive guide:
Part 1: Decide–Print, Digital, and/or Audio?
- Launch first with Kindle, and put all your marketing efforts towards that initial launch.
- Then, when you hit best-seller, relaunch with a print book.
- After that, relaunch AGAIN with an audiobook from ACX.
- And–potentially–relaunch a third time on some of the other publishing platforms out there!
Part 2: How to Format a Book for Kindle
- Make sure you’re building in Microsoft Word–or Scrivener, if you want extra functionality, and you have the extra cash!
- Don’t worry about line spacing, fonts, margins, or page numbers, because Kindle does all of that automatically.
- You’ll have to make a live table of contents–either with Microsoft Word’s Table of Contents tool on a PC, or by manually hyperlinking your titles on a Mac.
- Save as an .HTM or an .HTML file.
Part 3: How to Format a Book for Print
- Figure out the trim size you want (I suggest 5.5”x8.5” or 6”x9”!), and decide whether or not you need to add bleed to your trim size.
- Pick a simple font you love (that’s readable!), and edit the line spacing so it’s somewhere between single-space and 1.5 spacing.
- Calculate your gutter margins–also known as your inside margins–with a handy table.
- Save your images as 300DPI at a minimum, and make sure they’re saved as the exact size you want them to be.
- Add page numbers.
- Save as a print-ready PDF.
Great! What should you do now?
1. HOMEWORK: Take 20 minutes and think about which release formats (digital, print, audio) are right for you and your goals. Then get to formatting!
2. WANT HELP WITH YOUR BOOK COVER DESIGN?
- To get the size of your cover, calculate the spine size, and then use that to calculate the full cover size.
- Should you put yourself on the cover? If you want to be a speaker and/or a camera personality, yes! Otherwise, maybe not. Ultimately, it’s your decision–consider your goals as you decide.
- Use social proof (testimonials, quotes, and big-name interviews) to demonstrate the value of your book.
- If you DIY your book cover–download a free template that matches your trim size, and upload it to the (free!) design program of your choice.
- Outsource it with a freelancer from Upwork, Fiverr, FreeeUp, and Thumbtack
Read More Here!
Want More?
1. Awesome Facebook Community:
• Best Selling Author Group
• 100% free. Support & accountability through your book writing, publishing, and leveraging journey!
2. FREE Training:
• How to Write a Best-Selling Biz Book As a 1st-Time Author, In Under 8 Weeks, & $0 in Ads
• Once you’re ready for more inspiration and a full step-by-step!
—
I’m so excited for you!
And of course, if you have questions or stories from your book-formatting process, please feel free to drop me a line–always.
💕 LaptopLaura
Photo Credit: tarrytown//David Sifry//Aaron Yoo//Epicantus//James Cridland//Mike McCune//

