P2: Pen
Time to write a great book and design your eye-catching book cover.
4 Helpful Book Writing Tools
As you jump in to write, edit, format, prep your file, and get a cover designed (head's up you ONLY need the front cover for your Kindle launch -- the spine and back can wait), I want to draw your attention to a few tools...
Tool #1:
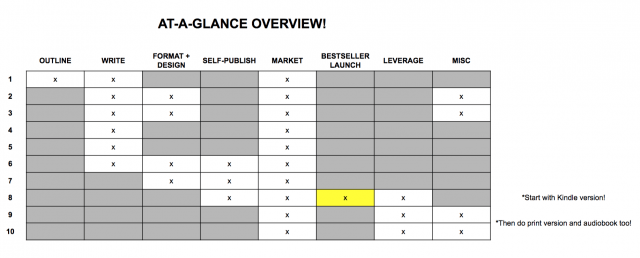
8-Week Action Plan -- Full Overview
To give you a full bird's eye view, this shows what actions you need to take each week of an '8 Week Plan" from 'no idea' to 'bestseller.' Of course, you can speed up or slow down the pacing to fit your goals and schedule.
LEVEL 1 covers outlining, writing, formatting, and design.
LEVEL 2 covers self-publishing, marketing, and the bestseller launch.
LEVEL 3 is about leveraging your books for more income, influence, and impact.
Tool #2:
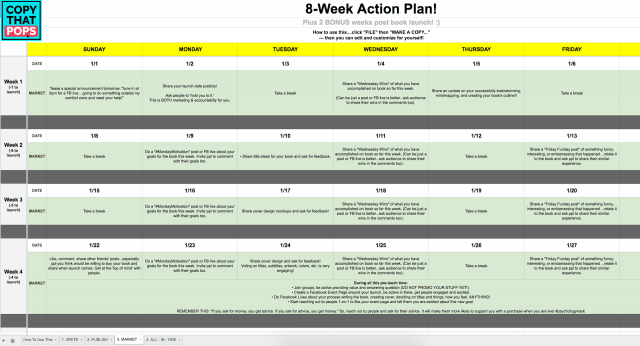
The "8 Week Action Plan" Day-by-Day Calendar
NOTE: This lesson is repeated inside LEVEL 2 for easy reference there as well. I referenced it earlier too, but wanted to explain it more...
THE 8-WEEK ACTION PLAN [click]
This is a day-by-day editable 'calendar' built in a Google Spreadsheet with tabs for:
1. writing
2. self-publishing
3. marketing
4. all the three tabs elements in one view
How to use it:
1. Watch the overview video on the front tab
2. Click File, then “Make a copy…” and rename and save it anywhere you like in your files so you can edit it.
3. You will find 4 main tabs
4. You can edit the dates on TAB 1 and they will automatically update on TAB 2, 3, & 4
5. You can edit the CONTENT in TAB 1, 2, 3 and it will automatically update on TAB 4
6. Use to help yourself write, publish, and market a best-seller! 🙂
Tool #3:
The "8 Week Action Plan" Week-by-Week Checklist
Some have found the day-by-day too detailed/overwhelming.
(As a nerd, I love spreadsheets!)
So, I also turned it into a more digestible week-by-week at-a-glance checklist [click]
Like the 8 Week Action Plan day-by-day calendar, this covers WRITING [covered in this program], SELF-PUBLISHING [covered in LEVEL 2], and MARKETING [covered in LEVEL 2]!
Even though the majority of your efforts right now will be around creating your book and its contents, rely on the 8 Week Action Plan to remind you to:
1. Market, as you work!
2. Look out for tasks for Self-Publishing that need to start being completed
And just because this for 8 weeks, doesn't mean you have to stick to that timeline.
- you could do 2 weeks at a time and cut the plan into 4 weeks!
- you could take 2 weeks per week on the plan and take 16 weeks!
- you get to decide, but hopefully, this plan helps get you started
Tool #4:
Write Your Book Checklist [editable resource]
This is another version of a writing checklist to help you focus on the step by steps as we progress!
Next up, a lot of your burning questions will be answered!...
Book Launch "Crunch Time" Calendar and Must Do's Overview
NOTE: This lesson is repeated inside LEVEL 2 for easy reference there as well.
Watch this video below for an important overview of the 2 weeks leading up to your public launch day and the critical things to get into place for a #1 bestseller launch.
We go through items in more detail later in the lessons inside LEVEL 2's P4 and P5, but this is a great bird's eye view of the most important things to have at the top of mind!
[Recorded June 2020 in a live bestselling group program run with Allison Melody, also a former #1 bestselling author client!]Click "File" and "Save a copy" to make a copy for yourself that you can edit the dates and tasks!
Okay, great! Now, let's get working on your book! : )
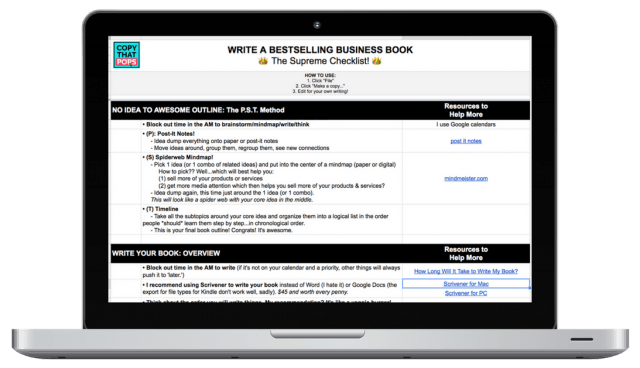
Outlining: How To Go From 'No Idea' to Awesome Outline with the P.S.T. Method
Writing isn't so hard if you have a killer, clear outline! So, if you don't have one yet, let's get it DONE in the next hour or two!
INTRODUCTION
When I first decided to write a book, I felt excited...
...and then completely overwhelmed.
1. Reframe

For one, I had the title "book author" elevated in my head like it was a term only used by the most special among us. 😉
But I didn't feel that same way about the title "blog writer."
And that got me thinking...'what IS the difference between writing a book and writing great blogs?'
Ummm....nothing?
I realized that a non-fiction book (on a topic in your niche) as an entrepreneur can truly be thought of as a series of kick-ass blog posts with a core theme, organized in a logical way, with an intro and outro attached.
Once I reframed "write a book" (which felt daunting) as "write a bunch of great blogs that are cohesive and add intro and outro stuff to make it feel like a book," I felt a huge weight on my shoulders lift up and away.
My book Copywriting for Podcasters (which hit #1 best-seller in the U.S. and Canada the day I launched it as a first-time author) has 15 chapters in the 'meat' of the book.
Each one of those chapters I treated like a terrific blog post. So, I didn't write a book, I wrote 15 blogs!
[You don't need that many, btw.]That's still work...but it doesn't feel as hard.
And psychologically, that makes a big difference...for me, and I'm guessing you too! 🙂
2. How Do You Eat an Elephant?

When I was a kid and teen.... and got really stressed out...
(which I often did because I was an overachiever in school wanting to get the best grades while juggling a billion extracurriculars -- sounds like normal life today actually! Just with "grades" being "business success" haha)
...my dad would ask me to take a breath and tell me to answer the question, "How do you eat an elephant?"
The first time I heard that, I thought he was crazy to ask such a question! So I just looked at him dumbfounded and maybe said something like, "I'd never do that, Dad" missing the point completely. 😉 #teenagers
To which he just smiled and revealed the correct answer:
"One bite at a time."
That made me laugh and his point hit home immediately.
If you want to take on a big, monumental task, the only way you will achieve it successfully is if you take one step, after the next. One baby step at a time.
We cannot get so overwhelmed by the elephant.
We must break things down, reverse engineer our goal, and take a step forward.
That's it!
Action begets action.
Action builds momentum and gives clarity.
So, if you feel overwhelmed by "writing a book" and don't know where to start, remember that it all starts with one bite. 🙂
And I'll help you know where to place those chompers!
3. Multi-Tasking is Actually Multi-Switching

I like to claim that I'm a great multi-tasker. I wash the dishes while listening to podcasts and planning out my next book idea.
But research actually proves that we humans are not truly able to do multiple things that require our focus at once.
One time when I was on the Podcast Cruise (where I presented on repurposing your podcast content!) I participated on stage in an experiment the organizers did to demonstrate that we actually CANNOT multi-task...
I stood in the middle. Another gal stood on my left and a guy on my right. We were all facing the audience.
The organizers told the gal and guy to each think of a story from their lives and get ready to tell it to me.
Go!
They both began telling me their story at the same time -- one in one ear and one in the other.
I tried SO HARD to listen to both!
I wanted to perform well and show off my multi-tasking skillz. 🙂 (Remember the overachiever thing? ;))
What I found myself doing was listening to the gal for 5 seconds...and then listening to the guy for 5 seconds, then back to the gal, then back to the guy. I tried to process what they were saying and fill in gaps I must have missed in between.
It didn't take long for me to start laughing and shaking my head. I was losing track completely and could feel it!
After a minute or two, the organizers had the stories stop and it was my job to report back to the audience what each storyteller had shared.
My report was incomplete, mixed up, and pretty entertaining for the viewers.
I truly could not recall the full story of either person. I don't think I even got 25% right of either!
Why do I tell this story now?...
Well, when you commit to writing your book, you will need to sit down and do some tasks that will require your undivided focus.
If you sit down to write a chapter and have Facebook messages dinging, your significant other walking by asking you questions about weekend plans, and the T.V. playing in the background, you are not giving yourself (or your brain) the time, space, and focus it needs to do your job well.
You will not be "multi-tasking" but "multi-switching" and you've seen the decrease in quality that comes from switching back and forth!
It's stressful, tiring, and counterproductive.
So, I want you to commit to me and commit to yourself that you will block and batch your writing work. You will not have a billion things going on at once.
I like to set a timer and have NOTHING ELSE open or going on. As I write this very lesson, I have all other browser windows closed, my phone on airplane mode, and am sitting in a hotel room alone before heading out to a podcasting conference.
Allow yourself to 'get in the groove' or into 'flow' and create great work without distractions or fatiguing yourself trying to do a bunch at once. It doesn't work that way! 🙂
Okay...so remember "Block and Batch."
We'll talk about that more in-depth when we get to the actual 'writing the book' stage.
But first...let's dive into how you can get all those ideas OUT of your head and into a killer outline...a roadmap...that will make the writing part easy.
THE P.S.T. METHOD - OVERVIEW
The P.S.T. Method is near and dear to my heart for two reasons...
1. It's simple, but effective in taking you from 'no idea' and overwhelm to clarity and an awesome outline for your book, so the writing part becomes a cinch!
2. I am a SoCal girl and "PST" reminds me of "Pacific Standard Time"! 😉
We'll dive into what the letters actually stand for in a moment, but to be ready for this activity you will need:
Prep Materials Needed [5 minutes]:
1. Post-it Notes (Sticky notes)
Alternatives:
• Scraps of paper cut into squares
• A Word doc or Excel spreadsheet to pour out ideas
2. A mind-mapping tool like MindMeister (free up to 3 mindmaps)
Alternatives:
• Another online tool of choice
• Paper and a pen!
3. Word document or Google Doc
Note:
• I personally use only Google Docs in day-to-day business life because I hate attachments and love being able to collaborate real-time on editing the document (with, say, a book editor!), but know going in that Google Docs are a stripped-down version of what Word can do, so do not kill yourself perfecting the format in Docs...you will need to redo it or make it perfect a second time when you head over to Word.
4. Past business-related writing you have done
• Books, eBooks, blogs, guest posts, podcast episodes, etc.
------
Once you have your materials prepared, it's time to block out 1 hour for ONLY this P.S.T. Method.
For example, I suggest:
• block out 1 hour first thing in the morning
• take a break from this and get other work done
• look back at it with fresh eyes later in the day or the next morning (15 minutes)
• done!
THE GOAL OF THE P.S.T. METHOD:
Go from 'no idea' and overwhelm to clarity and an awesome outline for your book, so the writing part becomes a cinch!
P = POST-IT NOTE BRAIN DUMP [20 min]

"P" is for "post-it notes."
As you saw in the materials list above, you do not have to use post-its for this step, but I LOVE them!
It feels fun and productive to brain dump all conceivable ideas onto the little pieces of paper and be able to quickly and easily move them around, group them, ungroup them, etc.
I love using digital technology for everything, but there's something almost therapeutic about writing out ideas with pen and paper (well, post-its!).
So, for this first step...
GOAL: Get all ideas, thoughts, and notes out of our head
The goal at this stage is NOT to have the book outline done. We still need to decide WHAT the book will be about!
When I sat down to write my first book Copywriting for Podcasters: How to Grow Your Podcast, Brand, and Business with Compelling Copy, I did not instantly know that would be my topic!
I wrote out a ton of ideas...
...psychology?
...writing for sales pages?
...podcasting how-to?
...education?
...how a teacher became an entrepreneur?
...digital nomad / working abroad while traveling?
This step, the "P" in our Method, is just for getting everything out of your head and the stress off of your shoulders.
Keeping ideas in your brain tends to stress us out and fear forgetting something or feel complete overwhelm and analysis paralysis.
So, give yourself uninterrupted space to jot down every thought, idea, and possibility! It will be fun!
Don't edit.
Don't worry about 'the book' yet.
Don't hold back.
Just get out all of your ideas.
And reference back to things you've already created (blogs, books, podcasts) for ideas, inspiration, and potential sources to jump-start chapter writing later on.
 Set a timer for 20 minutes and GO!
S = SELECT + SPIDERWEB MINDMAP [20 min]

"S" is for Select + Spiderweb Mindmap.
In this step, we will move from a billion ideas that could turn into a book to the ONE idea that will turn into our book.
SELECT
As my dad always says to me, "Laura, you can have it all. But not all of it at once, right now."
I hate it, but it's true.
Same goes for your book writing. After our "P" activity above, you will have tens, if not hundreds of viable ideas!
But, you can't write about all of them...at least not right now or all in your current book you are working on.
How to pick?
• Look at your Post-It Notes and see where you have lots of great sub-ideas that could clump together under one bigger idea.
• What do you emotionally feel most excited about writing?
• What do you want to MOST be known for in your business?
• Pull up Amazon.com and search for your topic(s)...where is there some 'white space' in the market? What niche or combination of ideas hasn't been covered yet?
Case Study:
When I looked at my Post-Its, I came up with the combination of writing and podcasting and realized that NO ONE had ever written a book on copywriting for podcasters!
What, in your business world, can be combined to give you the ability to claim that you wrote *the* book on XYZ?
And remember, you can always write more books! So, know that all your awesome ideas are still there at your disposal when you are ready. But, you must pick ONE (or a combination of just a few) to move forward on.
SPIDERWEB MINDMAP
Okay, once you drill down into your topic (or a unique combination of a few topics like I did), it's time to move forward even more!
Here are the steps:
1. Open up MindMeister (or an equivalent tool)
2. Put the ONE (or a combo) idea in the center of your spiderweb
3. Map out the subtopics to your ONE idea as legs on your spider
4. Map out subideas to the subtopics of your spider legs!
These can be quotes, phrases, misc. words to help remind you of things you could cover in that subtopic.
5. Give yourself 20 minutes to write in anything and everything that could go inside this spiderweb mindmap!
(Note: If you need to 'sleep on it' and add or edit it with fresh eyes, go ahead -- but do not let perfectionism make you think this needs to take days, weeks, months, or years!)
Completing this before stressing about 'writing' will help you be sure you won't leave anything out and get rid of that analysis paralysis!
Set a timer for 20 minutes and GO!
T = TIMELINE FOR LOGICAL OUTLINE [20 min]

"T" = Timeline (which will turn into your best-selling book's outline!)
Once you have your Spiderweb MindMap, the next step is turning that into your book's outline!
In your mindmap, you have spider legs jutting out every which way.
But, in a book, you need to follow a linear and logical progression of one idea to the next.
I recommend that you think like an ideal client...what does this person need to know and in what order?
What is a logical "timeline" for learning the information you will be teaching in your book?
There is no right or wrong answer necessarily, but if you think like a newbie or an ideal client who is considering whether to hire you or not (your book will be a helpful tool for this!), then think about the order someone would consume the information best in.
Think about a logical "timeline" and put each spider web leg in order from top to bottom in that order.
This...is your book's outline!
Now that you have a logical outline and great ideas and subtopics flushed out, now it's time to block out time and start writing your book!
Set a timer for 20 minutes and GO!
Final Step: Review with Fresh Eyes
Take a mental break (whether that is 25 minutes to stretch and have a snack, or a night's sleep) and come back to it with fresh eyes for one final review before you are ready to start writing your book! 🙂
When you are ready to review things, set a timer for 15 minutes and GO!
Add or edit with fresh eyes. But do it quickly...trust your gut. You've got this.
-------
RECAP:
• 5 minutes: prep materials needed
• 20 minutes: "P"
• 20 minutes: "S"
• 20 minutes: "T"
--take a break (at least 25 minutes for a snack and stretch)--
• 15 minutes: review your Timeline with fresh eyes
TOTAL: 1 hour, 20 minutes
(or 1 hour, 45 minutes with a break included)
Push yourself to spend a short amount of concentrated effort on this and you will have a detailed, awesome outline fast!
Then, after a mental break, come back to it with fresh eyes for one final review before you are ready to start writing your book! 🙂
But Remember:
All tasks expand or retract to the time you give it. If you want to think that this 'should' take you 1 year, it will take you 1 year. If you choose to believe you can do it in 1 hour (the three 20-minute blocks), you can do it in 1 hour.
Quality does not = quantity of time you belabor things.
[If you want even more insights into the P.S.T. Method, watch the bonus video in the next lesson!]ACTION STEP:
Take a screenshot and come over to our bestselling author group and share your TIMELINE with us!Outlining: Diving Deeper into the P.S.T. Method
If you need a bit more help working through the P.S.T. Method, then watch this live training video above. [But if you are plugging along, feel free to skip this lesson!]
Here were the links to the things we mentioned:
• Podcast that has the "voice to text" Google doc hack that Tim mentioned! "3 Google Docs Hacks for Faster, Better Writing"
copythatpops.com/037
• $15 per audio hour for transcription
Trint.com
• Scrivener for Mac (regular) $45
copythatpops.com/SMac
• Scrivener for Mac (education discount) $38.50
copythatpops.com/SMacTeacher
• Scrivener for PC (regular) $45
copythatpops.com/SPC
• Scrivener for PC (education discount) $38.50
copythatpops.com/SPCTeacher
ACTION STEP:
Take a screenshot and come over to the group and share your TIMELINE with us!
Outlining: Book Topic Ideas + Rough Outline Guide - [printable](alternative to P.S.T. Method)

P.S.T. Method not workin' for you?
Or you want to look at your book's outline from another angle?
Here is a second tool to help you come up with a great outline for your book! Even if you are starting at "I have no idea!" 🙂
1. Click over to this guide: Book Topic Ideas + Rough Outline Guide
2. Click "File" and "Make a copy..."
3. Answer the questions and start your outline work!
ACTION STEP:
Take a screenshot and come over to the group and share your OUTLINE with us!
Repurposing: The Lego Strategy to Writing Your Book Without Stress [in 5 Steps]

LEGOS IN CHILDHOOD
Legos are one of my favorite toys from childhood because the possibilities with them were endless.
I remember getting a big tub of legos as a kid and letting my imagination loose to build a house, a village, or a spaceship!
After my brother and I would build cool things with our legos, we’d enjoy them in their shape for a few days.
But then, we’d want to do something new.
Do you think we just threw the legos away and bought a new set of legos?
Heck no!
[We weren't spoiled brats 😉 or wasteful Dennis-the-Menaces].We just broke the current forms down and started afresh building something new with the same core pieces.
LEGOS FOR BUSINESS
Why can’t we think like this in our businesses?
• We spend ungodly hours writing blogs, creating podcasts, and filming video tutorials.
• We put blood, sweat, and some tears into creating content to stay relevant in today’s digital landscape and to connect with our growing audiences.
• Once we decide to write a book and become a published author, we get overwhelmed.
Why?
Because we get analysis paralysis. And we mistakenly believe we have to start at square 1.
But do we?
What if we thought of all our content as lego pieces?
We could assemble all that we’ve built and put the pieces into new piles, new configurations...we could create a new piece of work off the back of what we already have.
And the best part is that ‘breaking down’ a “lego spaceship” of podcast episodes does not destroy the original work! We are able to reuse the ‘lego pieces’ infinitely many times without destroying the original creation.
And, we are allowed to add brand new pieces to the build where we want. But, it’s so much easier because we have an amazing foundation.
Goodbye stress, overwhelm, confusion, and ‘recreating the wheel.’
So, here are the steps to reworking your content like legos for your very own book.
STEP 1: Collect all your legos and put them in one pile in the center of your room

That just means to go dig up all the content you have created for your business.
• Blog articles (published, in draft form, or even just ideas for future ones)
• Podcast episodes
• Vlogs or video tutorials
• Long emails to clients/customers
• FAQs on your website or internal documentation
Feel free to borrow the sticky-notes from our P.S.T. Method in this step!
STEP 2: Think about new combinations that you could build

Likely there will be a LOT of new configurations possible. That’s great!
But just pick one.
You can write more books later. But to start, pick a topic that you most want to be known better for (first)...what you want to speak more on...where you want to get more clients for.
Decide on one core topic that solves one problem for your audience.
Borrow the "S" in the P.S.T. Method here if you want to visually map out new ideas digitally or on a sheet of paper.
STEP 3: Arrange the lego pieces in the right order to create your next structure

Collate all the pieces already written (and/or transcribe the audio or video content not yet in writing) and catalog all you have.
This will become your outline of chapters and subchapters for your book.
Refer to the "T" in the P.S.T. Method for more ideas here.
STEP 4: “Buy” new pieces to fill in any gaps in your creation

Fill in any missing content by writing or even speaking out (and then transcribing) what you need to flesh out the rest of your book’s content.
Check out Trint.com and Rev.com for decent pricing on transcription.
STEP 5: Finishing touches!

Now you are ready to get help with editing and formatting so you can publish your book and use it as an incredible multi-purpose marketing tool that it is.
Next Steps:
Just block out time on your calendar and finish writing your book! You already are 80% done!
ACTION STEP:
Writing in Microsoft Word: Book Format Templates
Here is how you can get a template for free and edit it to suit your needs directly from KDP (Kindle Direct Publishing).
Note:
• I personally hate Word and do not use it.
• I adore Google docs, but it's not robust enough to export a good looking file for Kindle publishing as an EPUB file.
• I use Scrivener, and we will cover that more in-depth next.
Although we will launch with just the Kindle version (.EPUB file format) of the book first (which does not have page numbers, a gutter, footnotes, or other specialty formatting), we wanted to share this upfront in case you wanted to write your book directly into the file format you plan to use for export to print (PDF).
FOLLOW THESE STEPS:
1. Go to: kdp.amazon.com/en_US/help/topic/G201834230
2. Click to expand "Blank templates" and "Templates with sample content."
3. Choose your book dimensions.
We cover this more later, but I usually go with:
• 6" x 9"
or
• 5.5" x 8.5"
3. Save it to your desktop, or wherever you are managing your files.
4. Open the file. And it's best to name it and save it right away too.
5. From here, adjust your margins and gutter to make sure it's how you like it.
• Click "Layout"
• Click "Margins"
• Click "Custom Margins"
• But make sure the Apply to dropdown says: "Whole document"
• Click "OK"
After you apply changes, it may throw off what is there slightly, so go through and spot check.


6. You can also mess with the font and header styles and apply changes to the rest of the document with just a few clicks.
-----
Now you have a document ready for you to type directly into...or to copy and paste in what you've written elsewhere.
But, if you copy and paste content in, watch out that it doesn't mess with the current settings for fonts and spacing. For this reason, it's a good idea to import the meat of your book, clear the formatting, and THEN apply your fonts, sizes, and things to make sure it's all in there and updated once.
And, no matter what, expect that the formatting will take some time. Be patient with yourself and make sure you set aside time for formatting in your overall plan. 🙂 Or...if you can, outsource it. It's a giant pain. 🙂 #tobehonest
PS: If you hate Microsoft Word (I do), check out Scrivener. Especially if you have a Mac.
**It's $45 one-time and totally worth it.
**Plus, you can try it out for 30 days of use (use it every other day and it lasts for 60 calendar days).
**There is a learning curve with it, however, so don't jump ship if you are happy with Word.
ACTION STEP:
Writing: The Best Tool for Writing Books - Scrivener
(Head's Up: Scrivener is Better for Mac Than PC)
As I mentioned in the last section, there is an alternative to Microsoft Word.
To be honest, I hate Word.
I never use it EVER. If I need to write a 'document,' I only use Google Docs. I own a Mac and got rid of my Microsoft Office suite long ago. But, unfortunately, Google Docs isn't a robust enough application to export a good looking EPUB file for Kindle book publishing.
So, if you start in Google docs -- that's okay -- just know you will need to format it in another platform so do not spend hours and hours making everything perfect.
That's part of what was such a headache for me with my first book Copywriting for Podcasters. I didn't have Word on my computer and had to get help (free and then paid) with the formatting from people who did (and love minute details of sometimes-buggy Word formatting).
After I was finished with the book, I recalled a tool called Scrivener that I had done the free trial years ago and forgot all about! (Sadly).
I then used Scrivener for my own Book #2 Permission to Write a Brand Building Book and also for many private clients' books.
So, check out Scrivener!
Short video showing you how to download a free trial and what it looks like inside
It's $45 one-time and worth it (cheaper if you are a student or teacher).
Check it out here if you use a Mac.
Check it out here if you use a PC.
Warning: Some past clients have found that the PC version of Scrivener is limited in what they can do. If you really like Word and have a PC, there is a strong argument not to switch over and try something new.
If, however, you are like me in that you have a Mac and don't like Word, then I can say that I love Scrivener...even with the learning curve of a new platform.
Plus, you can try it out for 30 days of use (for example: use it every other day and it lasts for 60 calendar days or use it every 3 days and it lasts for 90 calendar days).
At first glance, it may look like Scrivener is only for fiction novelists, but that's not true! It's great for any long work of writing because it's far easier to keep track of your work in a clear, organized way.
Here are some more of its features.
Getting Started
Once you have Scrivener downloaded on your computer, I recommend starting with their "Non-Fiction" template.
With that loaded up, at the top left-hand side, you will see an item called "Non-Fiction Format" (see image with pink arrows below).
Click on it and then read the text that appears describing the template and how to use it. This is a great overview to get you acquainted.
Then, also looking at the photo below, in orange you can see how I have my 2nd book set up.
For me, I used 'folders' for Chapters and 'pages' for the actual content inside each chapter, broken down by the sub-sections that I wanted to cover.
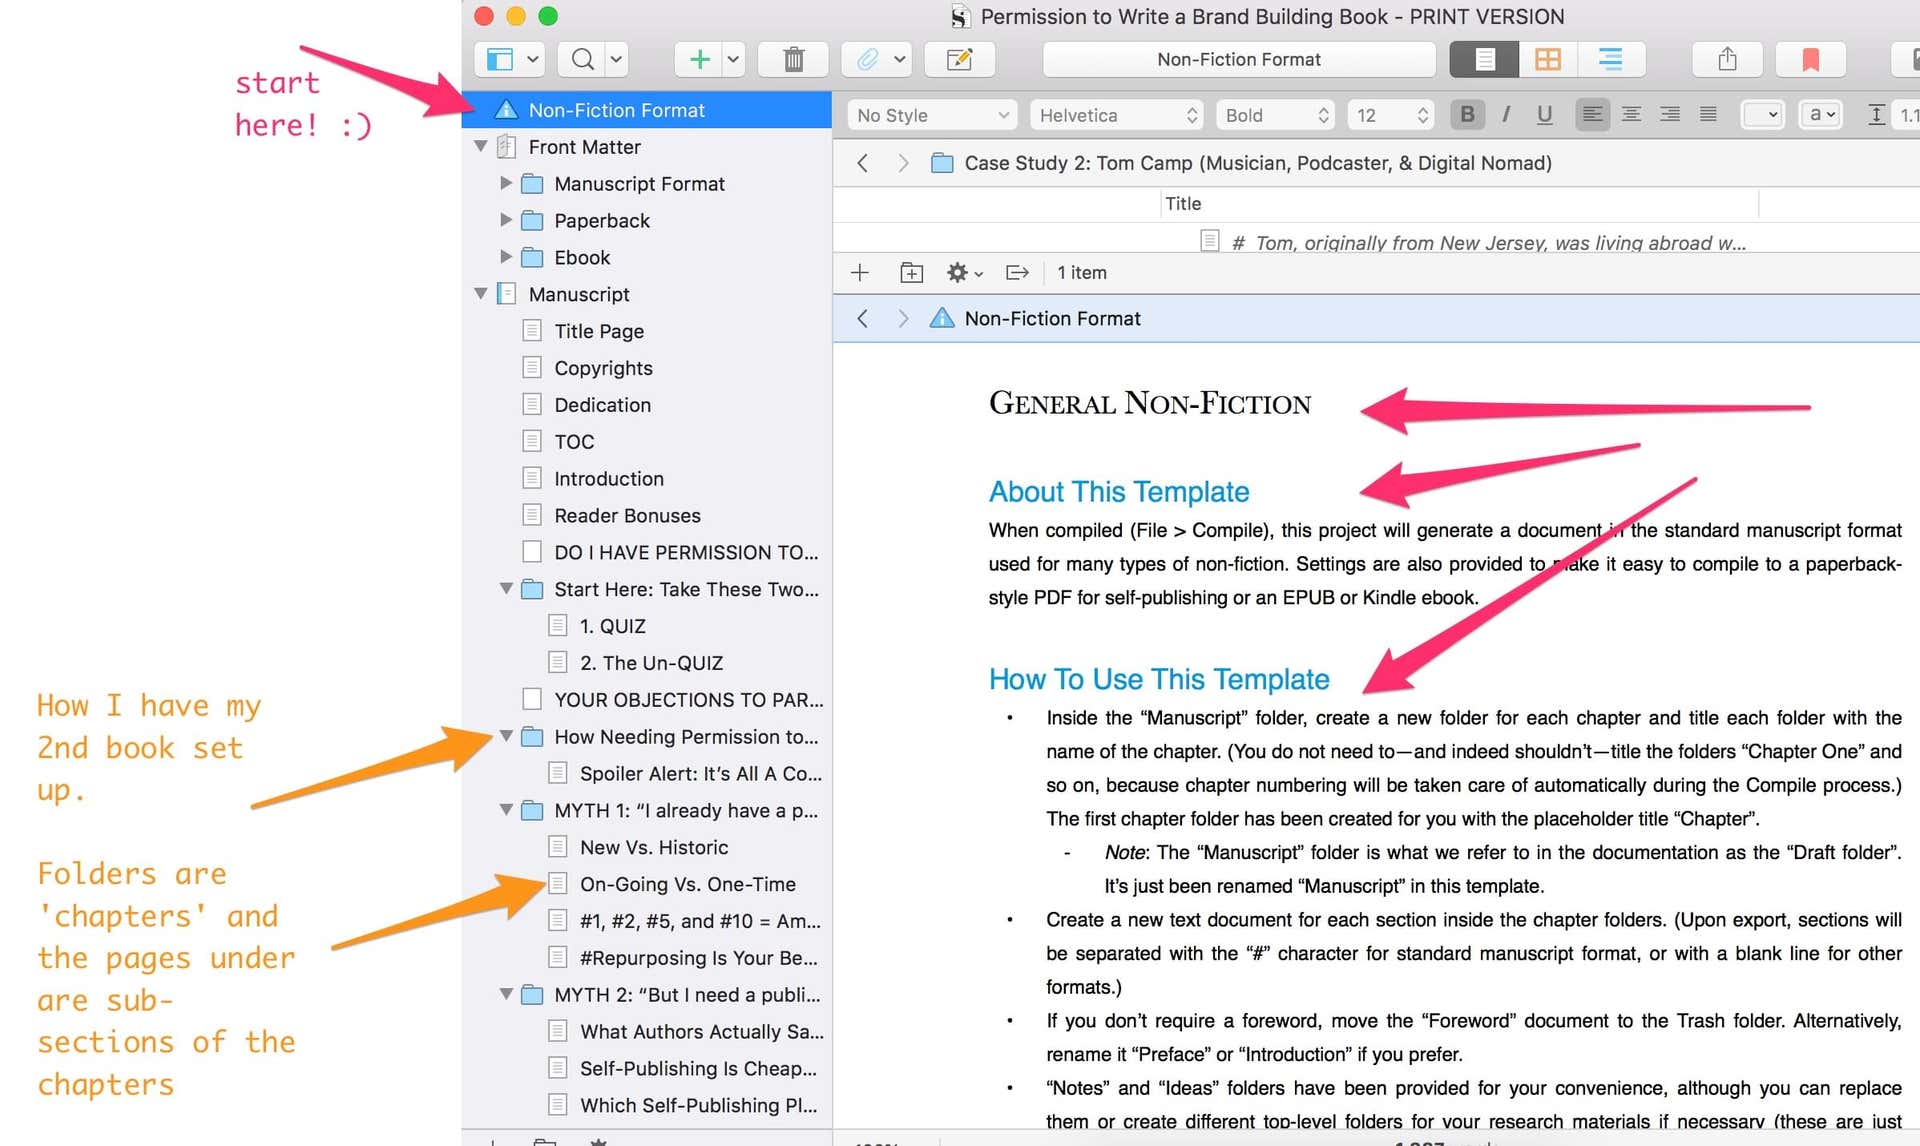
This is NOT the only way to do it! 🙂
It's just the way that made sense in my head -- so, I hope it's a great quick start for you!
ACTION STEP:
Start with a free trial, if you still aren't sure about Scrivener, and let us know what other questions you have so we can keep adding resources to help you!
Writing in PressBooks: Access Online from Any Device [$19-$99/book]

Like I said in the last section if you start writing in Google docs -- that's okay -- just know you will need to format it in another platform so do not spend hours and hours making everything perfect.
This next writing platform option was recommended to me by a *superstar* student who went through this very training...Kelsey Henry!
While writing her first book Growing Up Roadschooled, she used PressBooks for keeping her chapters organized and then exporting the right file types was a cinch, she reported.
I have not tried it yet but plan to for my next book to see if it's even more user-friendly than Scrivener is.
I like that it's usable on any device and you can access it from anywhere since it lives online instead of on your hard drive.
Getting Started + Cost
The good thing about PressBooks is that you can get started and use it for free to get a feel for things before deciding if it's worth it to buy a 'plan' for your book.
Start by setting up a free account here.
[But if it can do what I hope it can do, $99 for the eBook and print book is totally worth it!]
And they do have some user support, tutorials, and guides available to get you started.

I'll add more updates as I try this out too!
ACTION STEP:
Start with a free trial if you want to try PressBooks also.
Writing: How to Write Your Book Like a Veggie Burger: 2, 1, Then 3
If you sit down to write your book from start to finish, literally, you will get overwhelmed, confused, frustrated, and ...you may even give up.
So, let's break down a better way!
The Parts of a Book
Part 1: "The Top Bun"
• All the intro stuff
Part 2: "The Veggie Patty" (I'm vegan :))
• The main contents of your book...all your chapters
Part 3: "The Bottom Bun"
• All the conclusion, wrap up stuff
Once you have your awesome outline (that we created earlier in this course), then the next step is to start writing...but NOT with Part 1!
Order of Operations
STEP 1: Write all of Part 2 first{the veggie patty}
• Put your Awesome Outline into Scrivener (or Word) and pick a chapter to write!
You do NOT have to write in order...start where there is the least resistance to get momentum, and there is no 'right' number of chapters, words, or pages. [But if you want a goal to shoot for, grab a few of your favorite books off the shelf, look at their dimensions and page numbers...shoot for that.
Add or subtract from below based on your book's content.
• Chapter 1
• Chapter 2
• Chapter 3
• Chapter 4
• Chapter 5
• Chapter 6
• Chapter 7
• Chapter 8
• Chapter 9
After you have some solid momentum writing the content in your chapters, then you can also:
• Decide on a Title (think of something short, catchy, and compelling)
• Decide on a Subtitle (keep keywords in mind that your audience may be searching)
STEP 2: Write all of Part 1 next {the top bun}
• Title Page
• Copyrights Page
• Table of Contents (if you use Scrivener, there are ways to generate it!)
• Dedication (optional)
• Foreword (from 'big name' in your field - optional)
• Introduction / What Will the Reader Get From This Book
• Reader Only Bonuses (recommended...to grow your email list)
STEP 3: Write all of Part 3 last {the bottom bun}
• Conclusion / Recap / Summary
• What's Next? (share how to connect with you further, your reader only bonuses, CTAs)
• About the Author (add links, contact info, social media handles, etc. so people can connect)
ACTION STEP:
Come and let us know what other questions you have so you never get stuck!
Writing: How to Write a Book Without Writing
Many clients come to me saying that they feel more comfortable 'speaking' than 'writing.' If that's you, use it to your advantage!
Talk out your book!
Tech Tools to Help
• Use the text-to-speech function in Google Docs or on your phone, so it transcribes while you talk (free, instant turnaround, but not perfectly accurate and you must be using Google Chrome browser)
Or record your audio and get it transcribed:
• IBM Watson’s Speech-to-Text service (free for 30 days, instant turnaround, accurate but needs clean up)
• Trint.com ($12-$15/hour)
• Rev.com ($1/minute)
• Jennifer Peterson (no relation). Email one.of.jennifer@gmail.com and ask for the "Copy That Pops Friends & Family" rate.
• Thumbtack (find local help for writing, editing, transcribing, etc.)
ACTION STEP:
Come and let us know what other questions you have so you never get stuck!
Writing: Copy Inception Secrets to Sell Your Biz & Grow Your Email List in Your Book
Your book is a TOOL, so let's use it as much as possible!
Let's apply psychology to your book!
If: You are using your book to GROW your personal brand, business brand, and leads into your business for more authority, media attention, and sales...
Then: You want to make sure you don't just 'write a book' but use the book as a marketing tool to accomplish these goals!
And the good news is that you can do it without feeling like a slimy used car salesman.
I personally love applying principles of psychology to my writing, but I never take it so far that it feels über pushy or over-promises and under-delivers.
With that in mind, here are some of my "copy inception secrets":
• as you are writing (if you are still working on the book)
or
• for when you go back to update your book and want to weave these in! (if you are done)
COPY INCEPTION SECRET #1: Social Proof
We've all heard "monkey see, monkey do."
I'm not meaning to say we are all just monkeys, but our brains are BOMBARDED with information non-stop. And increasingly more so!
We don't have time to research, vet, and truly get to know each person we encounter.
Therefore, we look to social proof for shortcuts.
• Have they been featured on TV? Credibility.
• Do they have testimonials? Social proof.
• Are they trusted by 'public figures'? Sweet, I can trust them too!
This principle is very, very important for all areas of business. So think of how you can apply this copy secret to your website, social media profiles, business proposals, and more.
But, specifically, with your book...here are some ways to apply it!
1. Get testimonials about the book and about you as a person or service provider.
• Include them in the book's description on Amazon.
• Include them in "Part 1" of your book ...the intro sections before you get into the teaching parts in the meat of the book that I refer to as "Part 2."
• Subtly mention them in Part 2 without seeming like a name-dropper. For example, you could talk about a client case study to illustrate a point you are teaching and mention what they said about your methodology.
• Put one from a recognizable name, if you have one, on the back of the book.
2. Ask industry influencers or celebrities to contribute a blurb into the book.
• By "industry influencer' it doesn't have to be Gary Vaynerchuk or Barbara Corcoran. It could just be anyone well-known in your niche or community. Let their star-power shine a bit on you!
• A way to make this EASY on the influencer is to do what I did for my book Copywriting for Podcasters!...
Step 1:
Reach out to the influencer and tell them that you respect their work and want to do a quick 5-10 minute interview of them with targeted questions.
Step 2:
Record the interview (just audio or even video could be better) and share that interview on YouTube, your podcast (if you have one), your Facebook page, your website, etc. This step gives the influencer public exposure even before your book is out (they will like that!) and it can be a great way for you to tease the release of your book too!
Step 3:
Transcribe your conversation and drop the entire thing or snippets that you like right into your book! [Trint.com and Rev.com are fast ways to get this done at reasonable costs].
Step 4:
Shout out how this influencer/celebrity contributed content to your book everywhere! In your marketing, in your book's description, in Part 1's intro sections to the book, etc.!
Step 5:
Send a copy of your book (signed) with another small little gift as a thank you to the influencer. Chances are this rapport and relationship will build to even BIGGER things than you can anticipate!
3. Get reviews for your book.
Having a lot of reviews (they don't all have to be 5-star, by the way) is great social proof to "cold traffic" discovering your book on Amazon without knowing you at all.
A lot of reviews are also an authority builder in the eyes of anyone who visits, even people who know you already.
So, start by getting low-hanging fruit:
STEP 1:
Ask family, friends, business buddies to buy your book and leave an honest review (they can get it as cheap as $0.99 during your launch and count as an "Amazon verified purchaser" which carries more weight than someone leaving a review without having bought the book through Amazon)
STEP 2:
Follow up with anyone who said they bought the book during your launch and ask them their thoughts and would they mind leaving a review to help the book be found by others.
Then, you can do other things that take a bit more effort but can be worth it.
STEP 3:
Run a contest for something valuable that will go to a random winner who emails you with proof of having left a review (do not require a certain star level though...that isn't ethical).
You can also shout out reviewers on Facebook Lives, your email list, a podcast, or other platforms you have to entice more reviews (people with think, "cool, I want to be shouted out also!").
STEP 4:
You can submit your book to websites/platforms that are looking for books to review...
NOTE: Some of these are not free and I have not tested them out myself, but I wanted to let you know that it exists in case you want to try it!
• selfpublishingreview.com/get-reviewed
• moviesandmanuscripts.blogspot.com/p/blog-page_9.html [free but a long waitlist...you can pay to get to the head of the line]
• bookbloggerlist.com/category/non-fiction Here are some book bloggers. Develop a relationship with them and you could get reviews and even a blog write up!
• storycartel.com For as low as $25, you can submit your book for a review launch.
• amazon.com/review/top-reviewers This is Amazon's ranking of top reviewers.
COPY INCEPTION SECRET #2: Build Your Email List
Why not use your book -- immediately -- as a tool to build your email list so that you have more people (a.k.a. leads) to follow up with!?
How can you do that?
One GREAT way is to put an attractive freebie "lead magnet" offer in your book to entice readers over to your site to trade their email for something of value they will truly want.
Here's how to pull it off...
STEP 1: Create a free lead magnet that will directly help the reader implement all/part of what you teach in the book.
This can be one thing, or several things.
Just make sure it's so attractive to the ideal reader that they will be motivated to go get it and exchange their email for it!
Lead Magnet Ideas:
• Cheatsheet or Fillable Worksheet or Spreadsheet
• Resource List (e.g. recommended mics to buy for a new podcaster)
• Free Consultation with you
• Free Trial of something you sell
• Coupon Code for great savings on something you sell
• Group Hot Seat or Coaching Call
• Report with updated stats
These days everyone and their mom is giving away free opt-ins...so you may need to offer several items to make it really attractive.
But if you already have something really working well in your business, make sure to offer it in the book too! (we'll talk about where below!)
STEP 2: Mention the free offer in several places throughout the book.
#1: Front of book, early on! I like to put it really far upfront so that even people who preview the book and don't buy it can see the offer and go opt-in!
In my book, I first mention it on page 8...
See here:

Word it in a way to make it feel special and valuable! 🙂 I call it "A Free Gift to My Readers"!
And you'll notice that I include several goodies in there to make it really attractive.
#2: Throughout the book, where relevant.
Because I have a few goodies in my lead magnet offer, I reference each tool individually as they come up as helpful throughout the book.
So, when I teach in my book about shownotes, I mention the Free Gift again and remind people that I have a Shownotes Template inside they can steal and use for themselves!
This means that I can mention my free gift multiple times throughout the book in a natural, helpful way. It won't feel salesy or pushy because I'm truly trying to help them more with something that's more dynamic than just text on a page.
See here on page 188 for an example!

Remember that we all need to see and hear things multiple times before taking action! Reminding readers throughout the book will increase your opt-ins!
#3: At the end of the book!
Be sure to remind readers at the end (Part 3 for me is all the wrap-up, conclusion type stuff) with your offer as a "CTA" or "call to action."
If someone gets to the end of the book, they know you. They like you. They see that you are knowledgeable and are that much closer to wanting to work with you more.
Make sure they know how! 🙂
I like to include my social media profiles to connect further and the lead magnet offer one last time!
See here on page 343 for my example:

STEP 3: Make sure you deliver and follow-up!
Just to wrap up this inception secret, make sure that when people go to your free gift URL that there is an email optin.
They share their email, you give them access to the goodies!
Then, make sure to double-check that delivery works and that you are collecting their emails and can follow-up with them. [I always ask a few biz buds to optin to test it for me and troubleshoot any issues I may have missed building the email follow-up. Plus, they can give you feedback on the copy you use in the emails and on the landing page]
These are hot leads! 🙂
ACTION STEP:
Come and tell us about the Copy Inception Secrets you are implementing in the free accountability group!
Q: How Long Should My Book Be?
On a Zoom workshop call, Brook asked a great question about 'how long my book should be?' and 'how long should chapters be?'
Here above is my reply in a quick 3.5-minute video that I believe EVERYONE needs to hear. 🙂
It will hopefully inspire, motivate, and lift some stress off your shoulders.
But, to add a bit more specifics:
• 24 pages minimum (to print it through KDP on demand)
• 100 pages minimum (to have text on the spine)
• 776 or 828 maximum (depending on the paper color and ink color)
My first book is about 364 pages, 8.5"x5.5" and I find that too big and heavy to want to carry copies around to give away.
My second book is about 176 pages, 9"x6" and I find it to be perfectly sized and weighted. It "feels" legit but isn't too heavy.
If you shoot for the 150-250 page range, I think you will be very happy with the feel of it. BUT, this is just a general 'guideline.' Do NOT misinterpret this as a law.
...If you want a 50-page booklet, go for it!
...If you want a 555-page anthology, you do you!
ACTION STEP:
Come and let us know how many pages your book is going to be!
Q: How Do I Pick a Title and Subtitle?
Deciding how to name your book may come easily to you, as if by magic!
If you read that first sentence and thought, "Is she insane!?!? It's so hard!" -- then do not fear...these tips are for you.
Tip #1: Write your title -- or at least finalize it -- after you finish writing the book's full draft!
For most people, a book takes on a bit of a life of its own as you make progress and build momentum on the writing of it. Therefore, it often ends up a bit (or a lot) different that you thought it would when you began.
This is okay!
But, that also means you do not have to stress so much about the book's title before it is written.
My recommendation:
• jot down ideas in a notebook or on a "Notes" app tab on your phone
• share title ideas with your friends, family, fans, etc. to get feedback and ideas (but do remember to weigh the input of people for whom the book is actually written over others...so if your mom thinks a title isn't great but your target audience adores it, ignore mama)
• decide on your title after the book is more fully-formed
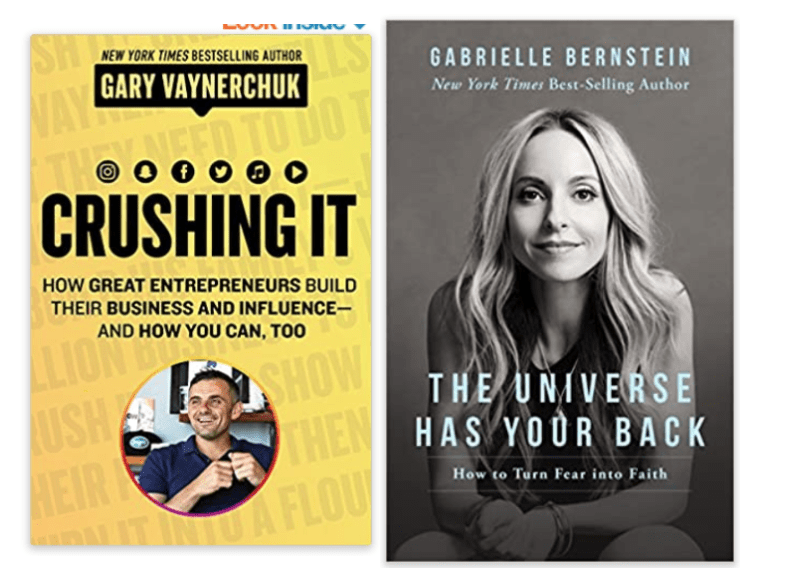
Tip #2: A common recipe to get you started
Title: 2-3 words that are not necessarily clear in what the is about
For example:
- Crushing It! by Gary Vaynerchuk could be about recycling soda cans
- The Universe Has Your Back by Gabby Bernstein could possibly be about the cosmos and Science supporting physical life
Subtitle: A longer string of words that gives more clarity what the book is about and for whom it is written
For example:
- How Great Entrepreneurs Build Their Business and Influence—and How You Can, Too by Gary Vaynerchuk now makes it clear and enticing
- How to Turn Fear into Faith by Gabby Bernstein now makes it more clear for whom this book will resonate
Tip #3: Do not repeat words
Avoid repeating words in the title and/or subtitle. Use synonyms or rephrase things so it does not feel redundant.
Tip #4: Use the Oxford comma for clarity
This tip holds true for everything you write. I am a staunch supporter of the Oxford comma (also called "the serial comma") because it is more clear.
For example:
• Less Clear -- "How to Cook Fast Meals, Vegetables and Pies"
• More Clear -- "How to Cook Fast Meals, Vegetables, and Pies"
In the less clear example, are we implying that "vegetables and pies" are two "fast meals"? Or are we naming three things someone will learn to cook?
Tip #5: Think "big" in size for the cover design
Remember that your book will appear as a small thumbnail on Amazon's site and other online retailers, so you don't want the title to be so teeny that it's illegible (see my first book Copywriting for Podcasters as a *bad* example of this that I learned my lesson from!).

Some More Examples
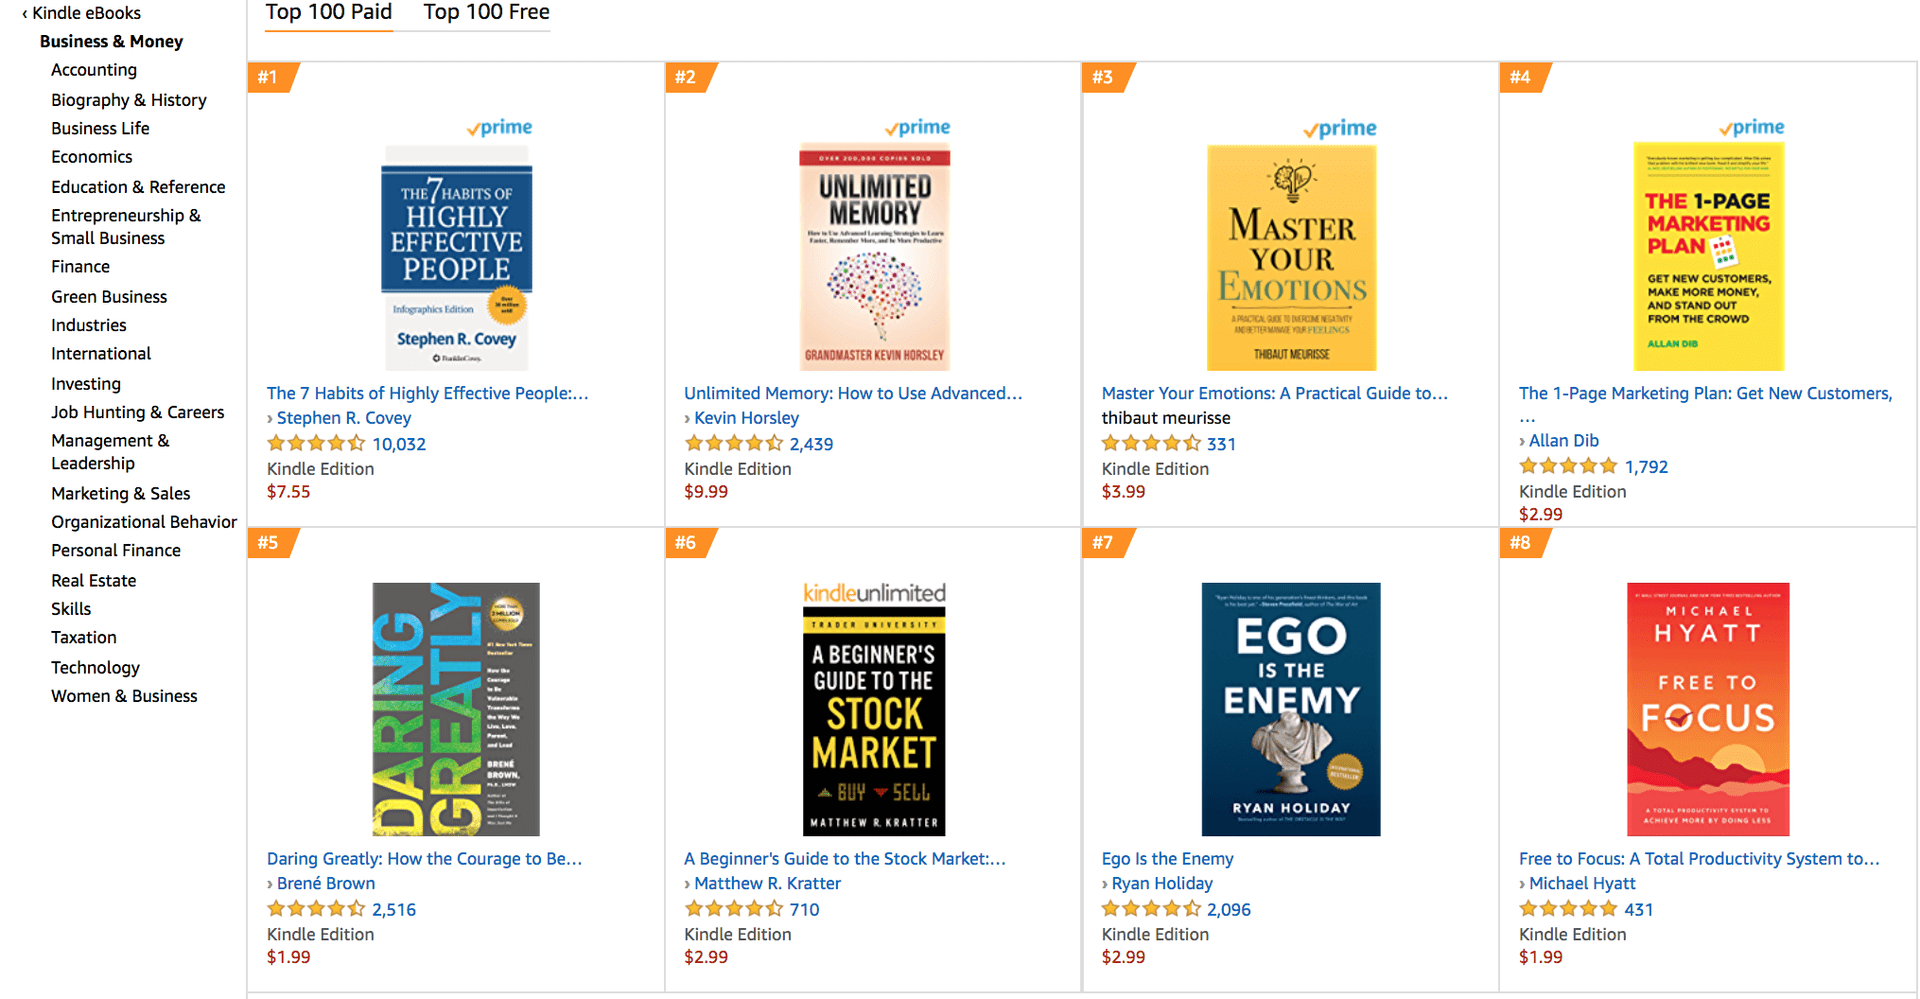
Here below is a screenshot from bestsellers in Kindle Business & Money as of May 16, 2020.
Take a look and notice that most of these books all have short titles with longer subtitles.
And the titles pop off the page in a legible way!
---
Okay, good luck writing your title and subtitle!
You've got this! 🙂
And remember to bounce ideas around on social media to get feedback AND pre-market your book. People love being a part of the journey.
Bonus: 5-Email Nurture Swipe Copy [for Reader Bonus Opt-ins!]
What is a Reader Bonus Opt-in?
Something free of value to help your readers even more, in addition to the book.
It helps the reader AND it helps you to grow your email list (where you can nurture them more and turn leads into clients and customers).
Create an easy to remember and type URL to a landing page where readers can request your freebies. Mention the link in the beginning, middle, and end of your book.
Pro Tip:
Don't act too pushy or salesy about the reader bonus or it will smell like a sales pitch, even though it's free. Keep it casual and focus on how it benefits the reader to apply what they are learning.
Why is it Important to Offer Something Free of Value?
There is a lot of competition and noise out there. So, by offering readers something for free, they come further into your world, see you have a lot of knowledge to offer, and will be more likely (by the rule of reciprocity) to want to work with you when they need more help -- if you gave them something valuable upfront.
So, think of something to offer your readers as a free bonus. Something that helps them implement what they read or go a step further.
Pro Tip:
Think of how you can repurpose or repackage things you already have created instead of reinventing the wheel.
Can I Share a Product, Service, or Affiliate Link?
No. It is against Amazon's terms of service to link out with affiliate links to products or pitch paid products and services directly from your book.
You can offer something for free though.
And, once they are in your ecosystem, they will find your paid products and services to work with you more!
----------
Okay, Time to Nurture Your New Leads!
Once you have people opting in, you want to deliver the freebie to them and nurture them a bit further. To get you off to a great start without stress, here is a 5-email series that you can customize and use for yourself!
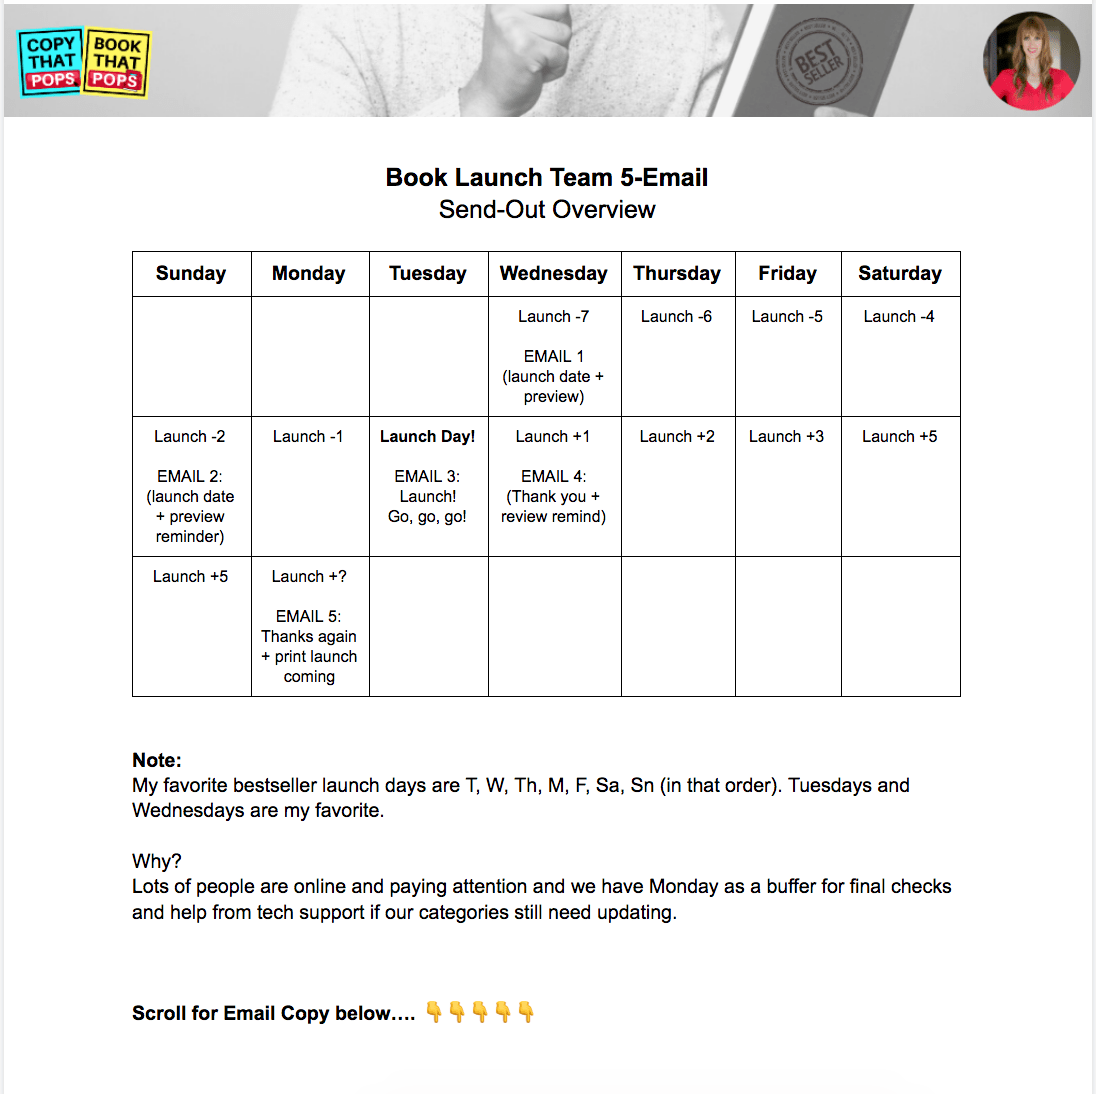
![Bonus: 5-Email Nurture Swipe Copy [for Reader Bonus Opt-ins!]](https://www.copythatpops.com/wp-content/uploads/2021/12/Bonus-5-Email-Nurture-Swipe-Copy-for-Reader-Bonus-Opt-ins-2.png)
Swipe This Copy!
Step 1: Click on this link here (preview is shown in photos above)
Step 2: Click "File," then "Make a copy..."
This lets you save a copy for yourself to edit. I *cannot* grant you edit access or it would change it for everyone. Save a copy for yourself, and then you can edit it to customize it!
Step 3: Edit the swipe copy to match your brand, offer, tone, and style.
Step 4: Copy and paste the emails to send out to your launch team...automated in a sequence in your CRM (like Active Campaign, Infusionsoft, or Convert Kit) or manually
Step 5: Get more sales by others promoting you and your book!
xo
Laura
PS: If you have any questions about how you can make the most out of this resource after downloading it, please don't hesitate to send me an email Laura@CopyThatPops.com anytime!
Cover Design: Design Tips, DIY or Designer?, and Bonus Resources
Cover Design Overview
There are technically three parts to the cover design:
• front
• spine
• back
You only need the front cover for your Kindle launch to start. But, if you get help from a designer and know you want to release the print version too, have them also design the spine and back cover at the same time.
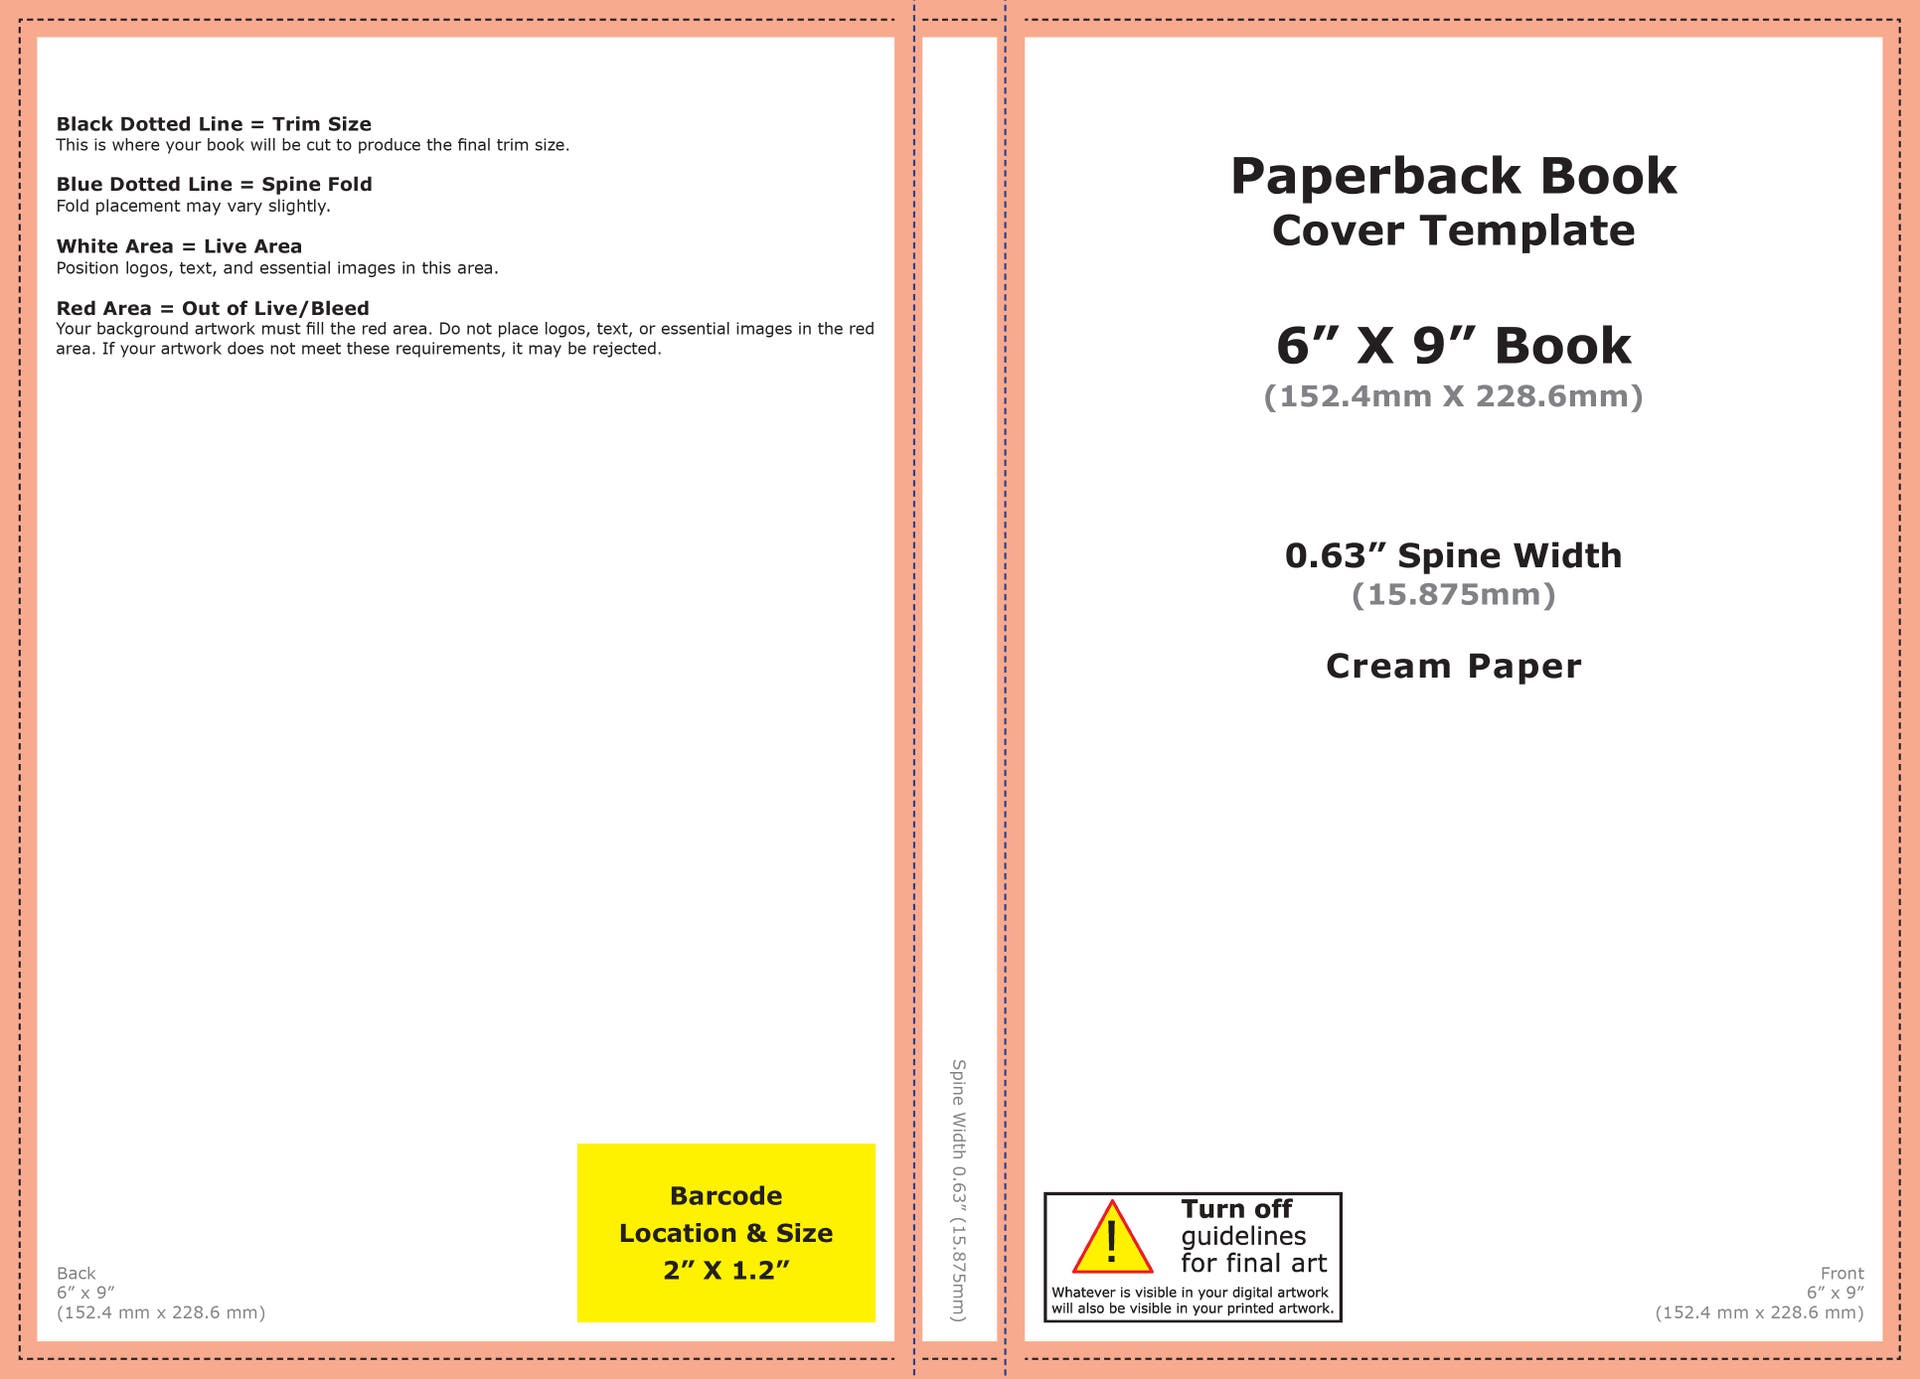
Here's where you can, for free, create a paperback cover template for yourself or your designer with an approximate page count to get them started.
For example, if you input 6"x9", 175 pages, cream paper, and hit "Download cover template," it will generate this for you:
When Should I Have My Cover Designed?
Some may suggest you do your book cover right away and post it where you can see it each day to really help keep you on track to finish.
You can definitely do that if you have already decided on your title, subtitle, topic, and the 'feel' you want for the book's design.
But, for some people, full clarity only comes during the writing itself.
So, if you want to print something out as a motivator, but aren't 100% clear yet, you could make a mockup for free on Canva.com -- just spend 15 minutes on it and print it out.
Pro tip:
This would also be a fun social media share. Show your mockup to inspire you and the final design done later, side by side!
At the latest though, you must have the front design for your Kindle bestseller launch done about 1 week before your public launch date. So, plan accordingly depending on who is doing the design (we will give you lots of ideas and examples in this lesson and the following few lessons as well).
Tips for Elements of Good Design
In truth, every design situation is a little different. Instead of a rote checklist, this is more “Here are some design possibilities to consider.”
1. Don't overload the page
Think "less is more" as much as you can. Your design should be enticing and clear, even at a fast glance.
Want to test it? Do the "2 Second Test"!
1. Take your book's cover design and show it to a friend or family member for just 2 seconds.
- Make sure to NOT tell them any details about the nature of your book
- Explain to them that you want gut reactions and happy with all feedback no matter what it is
2. Ask them for their gut reaction to answer these questions:
- "What do you think the book is about?"
- "Who do you think the book is written for?"
- "What emotions came to mind when you saw the book?"
- "Did the cover seem clear or complex?"
3. Thank them genuinely and do not take any 'negative' feedback personally. Be happy you identified potential obstacles to your book being well-received before going to print!
2. Leave 'white space' but don't make the background white.
White space is space for the elements in the design to breathe. For example, make sure the title, subtitle, and author name don't look like they are about to hit the edge of the book, unless that's a purposeful stylistic choice.
I recommend NOT having a solid white background for your book because the background of Amazon and other book retailers is white, so it is unclear where your book ends and the sales page begins.
3. Use high contrast for a visual 'pop'!
If everything in your book's design is varying shades of blue and black, you could make one key element or word be in a bold red or orange so that it pops out from the rest of the cover. Or if it's all black and white, any bold color will pop off the page. Contrasting visuals catch the human eye and engage it longer!
4. Avoid fiction-looking covers
A lot of fiction books -- think fantasy and sci-fi -- have covers with multiple images overlaying each other, like a picture in a picture full of mystery and intrigue. I recommend avoiding that so your book isn't written off as 'not being helpful for me to achieve my goals because it must be a story about vampires or something.'
Instead, the background color could be solid or a gradient...but more on the simple and 'clean' side than many fiction works.
5. Title vs. Subtitle
A great tactic for nonfiction titling is to use something catchy and short for the title (even if it's something that wouldn't make you ever think about your topic) and then follow it with a keyword clear subtitle.
Never keyword stuff, but use the subtitle as a longer space to really clarify what the book is about and the reader will learn inside.
6. Should I put my face on the front cover?
This is certainly something many have strong beliefs about on either side. My feelings are ALWAYS 'do what you want'... aka 'print your own shirt,' but let's look at some pros and cons.
At the end of the day, like many other book-formatting steps, this is your decision.
The super watered-down advice you’ll hear over and over again is, “Well, unless you’re Oprah, or some other superstar, your face isn’t going to help sell books.”
This is true.
But consider the following...
• Are you trying to build a brand as a speaker?
• Do you ultimately want to make videos, a TV show, and regularly be in front of a camera?
• Are you comfortable in front of a camera?
Have people said things like these to you?
• “Oh my god, you’re such a ham!”
• “Wow, you’re always so photogenic.”
• “You just always look so professional/put-together!”
Why are you writing this book in the first place? (Remember the goals we defined earlier). It's likely not to instantly sell a million books. You wrote it to further your own goals and to build your credibility in your niche.
If your goals are to be in front of a camera and/or crowd in the not-too-distant future, then having your face on your book (provided it’s a good picture and a well-designed cover) will ultimately make you more recognizable.
If your goals are more behind-the-camera oriented – like, you’re writing this book to check off a bucket list item and to give you more clout when you’re pitching projects to new clients, then a photo of you on the cover won’t make as much of a difference. It doesn’t align with your goals in the same way.
So, consider your goals, chose one, and move forward.
There is no 'wrong' choice other than making none and getting stuck in analysis paralysis again. 🙂
PS: What about for me?
• Book 1: small photo of me on the front
• Book 2: small/medium photo of me on the back
• Book 3: medium photo of me on the back (I loved a typography-focused design so much, as you'll see in a future lesson, that I went without a photo of me on the front)
• Book 4: I plan to put my face on the front more prominently to build my personal brand and face-recognition!
Design It Yourself
1. Kindle's Cover Creator
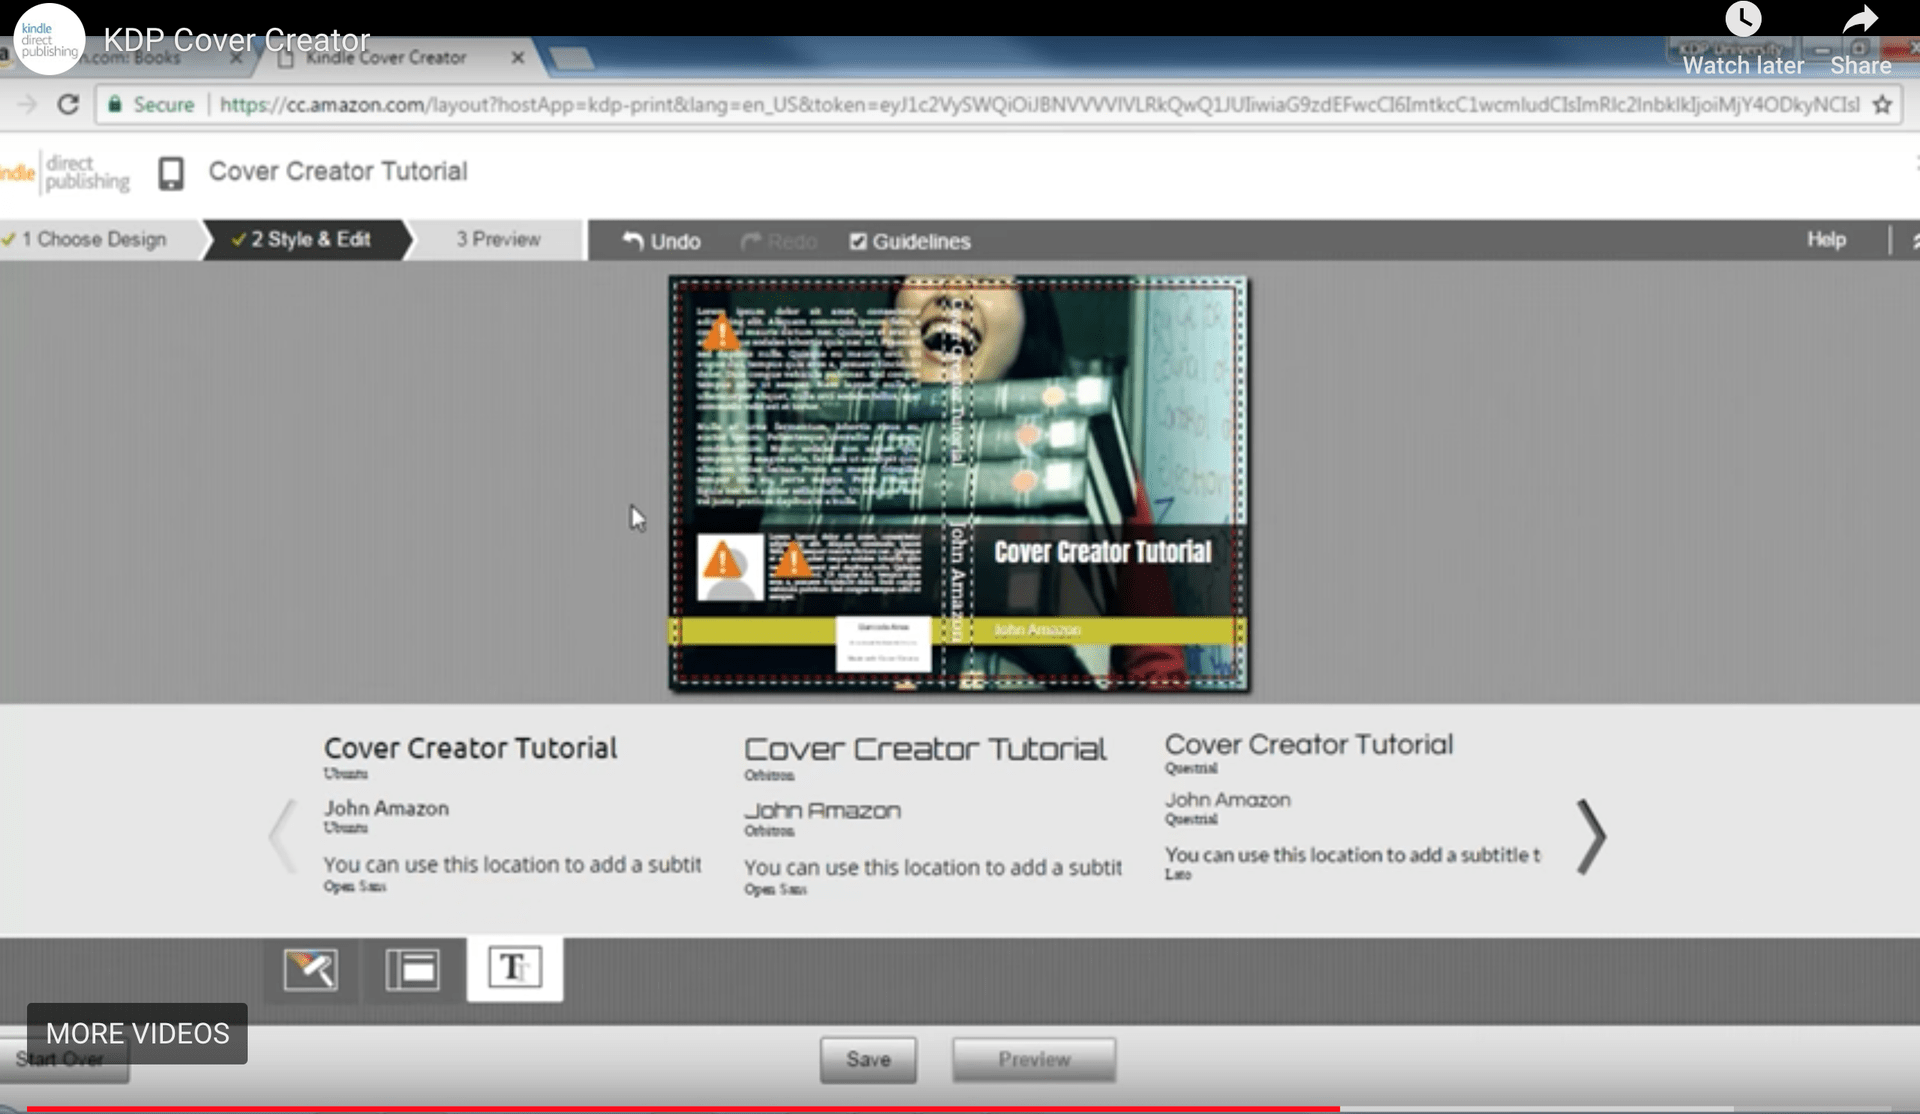
Click here, or inside your KDP account you can also access their Cover Creator tool (on the second tab once you begin a book file) and pick from *some* free photos, fonts, color schemes, etc. It's a free way to get a solid start but in my opinion, they don't look amazing (yet).
2. Canva
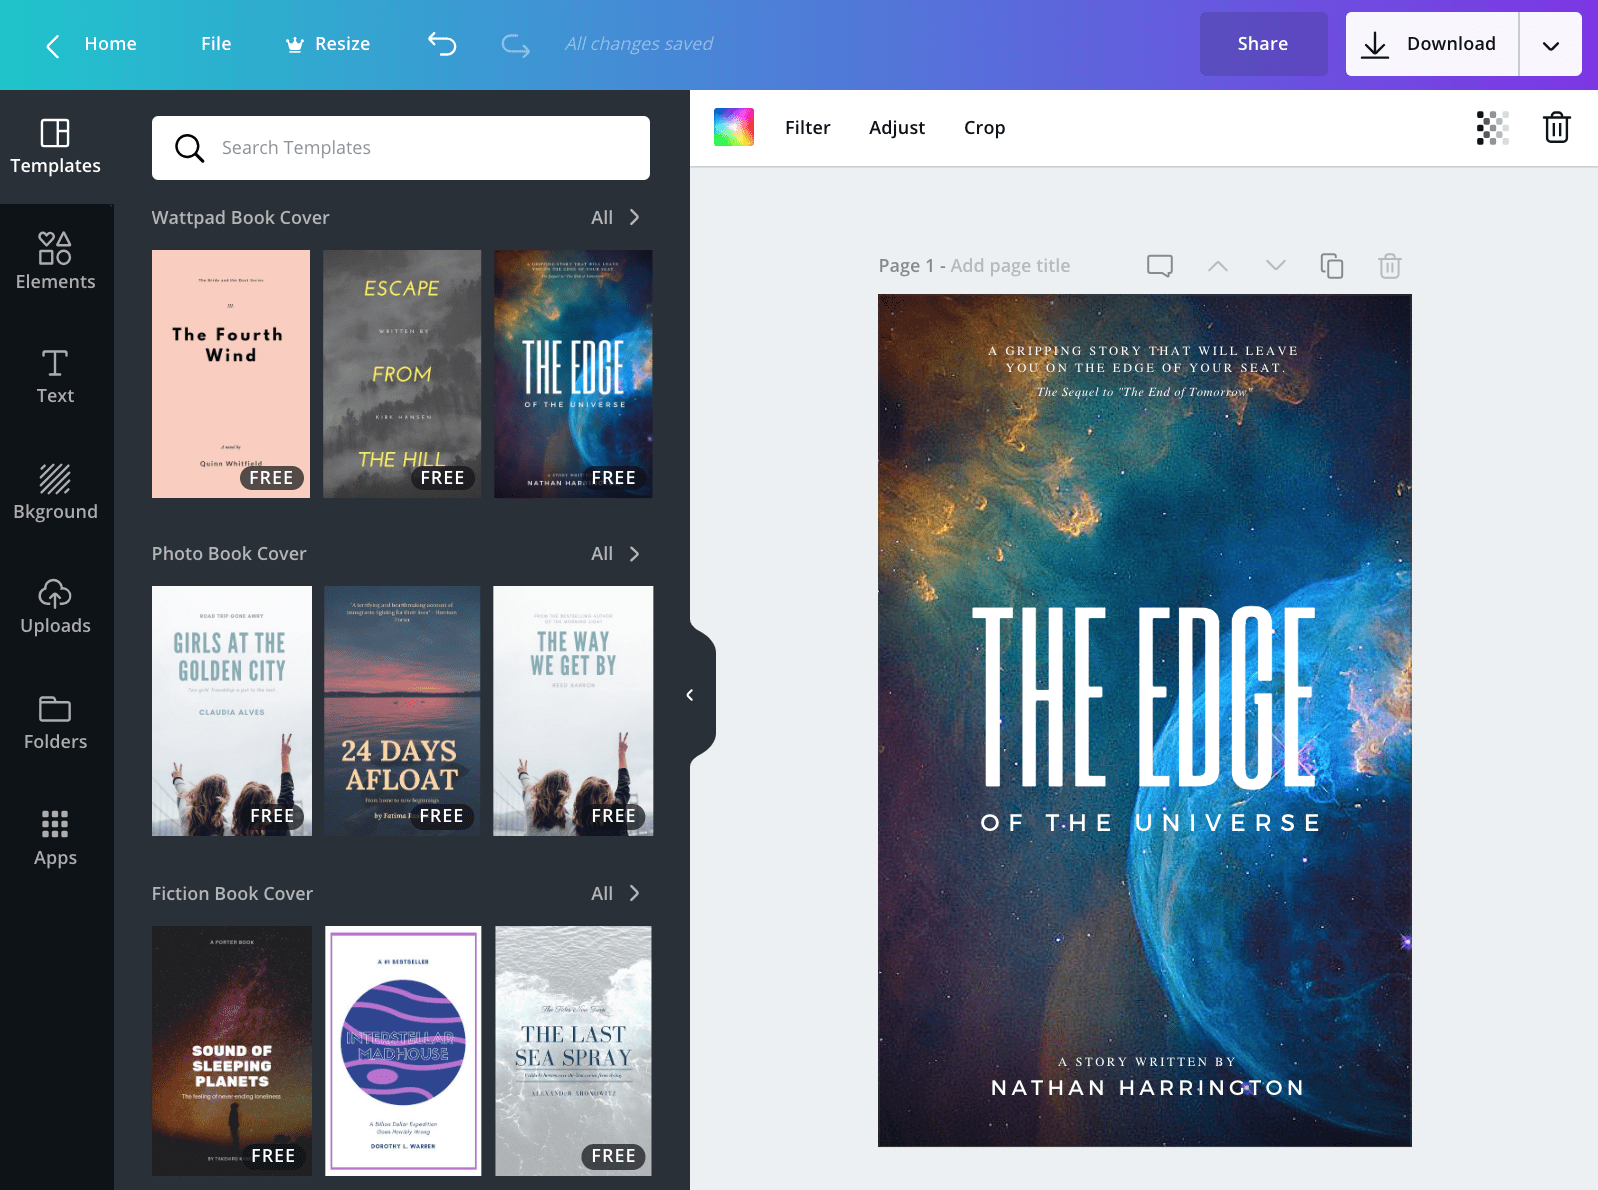
• Book design template (front only) 1410px x 2250px
• Book design template (front only) 512px x 800px (I don't recommend this one unless you pay for Canva's upgraded service so you can resize it and make it bigger dimension for clearer quality)
• You can also use your own custom dimensions and start designing! (If you plan to make a 6"x9" book, for example, set the dimensions to be 12"x18" in Canva so that what you export is extra crisp)
3. Top Tools
• Photoshop
• Illustrator
These tools are the best for creating a full cover design. But, both have a big learning curve if you haven't used them yet.
4. Free CC0 Stockphotos
• Pixabay
• Pexels
• Unsplash
• Gratisography
• FancyCrave
Not free, but amazing: BigStockPhoto.com
5. Other Photo Editing Resources
• PicMonkey
• LunaPic (use this to remove the background from a photo)
Work with a Designer
Before you worry that you will have to spend thousands of dollars on a great design, take note! There are tons of great options!
1. Free or Barter
Someone looking for more experience may do it for free, for barter, or for really cheap to build their portfolio and get a great testimonial
2. Ask for Referrals
Ask your network or post on social media: "Looking for a graphic designer with experience in nonfiction books. Who do you recommend?" -- You may be surprised at the great options!
3. Good Priced Options
Use a reasonably priced service. Here are some we recommend after trying ourselves:
• Fiverr (more on this in the next lesson)
• UpWork
• FreeeUp
• 99Designs (more on this in a future lesson because I love it so much)
• ThumbTack
Designers will want:
1. Book dimensions
According to KDP:
The ideal size of your eBook cover art is a height/width ratio of 1.6:1. This means that for every 1,000 pixels in width, the image should be 1,600 pixels in height. To ensure the best quality for your image, particularly on high definition devices, the height of the image should be at least 2,500 pixels. Ideal dimensions for cover files are 2,560 x 1,600 pixels.
Note: The minimum image size allowed is 1,000 x 625 pixels. The maximum image size allowed is 10,000 x 10,000 pixels.
I recommend just making it the same size as what your print book's dimensions will be. My favorite options are 6"x9" or 5.5"x8.5"
2. Image quality recommendations
• File Size
Your cover image must be smaller than 50MB. And avoid compressing your files because that can affect the quality of your cover when displayed on reading devices.
• Resolution
For the best results, images should have a minimum resolution of 300 PPI (pixels per inch).
• Color Mode
Also, images display on the Amazon website using the RGB (red, green, blue) color mode or profile. RGB is the color mode native to the web and many color screen displays. Displayed at varying levels of intensity, these three colors create over 16 million colors. When saving and uploading your cover image file, save your file as RGB (not CMYK or sRGB) for the color profile. Look for this option in the File saving dialog of image editing programs like Photoshop.
Some programs may also refer to RGB color as "True Color." If in doubt, try opening a JPG inside Internet Explorer, Firefox, or Safari. If a JPG opens fine inside a web browser, it's probably okay to use as a cover image.
Make sure to save your image without color separation. This is usually a pre-press or color palette option. Use your image editing program or image analysis tool (some are available free online) to verify that your image file doesn't have color separation.
When uploading your final cover file to KDP, you will see an error occur if there is an issue with color mode or size.
Use color images whenever possible and relevant. In addition to the Kindle black and white E Ink reading devices, customers can read your books on full color Fire devices and free Kindle reading apps for iPhone, iPad, Android, PC, or Mac.
3. Spine size
This is essentially how 'fat' the book is -- you will not know it until your book is finished and formatted for print, so I recommend that you negotiate your designer doing a fast edit on the design once you know the final page count.
4. Photo of you
Most authors put a photo of themselves on the back cover, though this is NOT required...and you absolutely can feature it on the front or not at all.
5. Barcode
If you have purchased and ISBN number and barcode (will show you in a section in LEVEL 2), then your designer will want this as well. However, NEITHER is necessary if you only plan to publish on Amazon and use their expanded distribution.
Don't let this hold you up from at least doing your bestseller Kindle launch!
Make sure to ask your designer for:
1. Bleed around the edges
When you upload your print version's cover, KDP wants to have a 'bleed' or extra buffer space for it's printing and cutting so that the book looks great when finished --- so ask your designer to include a bleed of about 0.25" or 6.4mm.
(This is only necessary for the full cover design for print -- unnecessary for Kindle.)
Pro Tip:
Create a Paperback Cover Template for your designer with an approximate page count to get them started. (e.g. 6x9, 175 pages, cream paper)
2. Cover design as a JPG/JPEG or TIF/TIFF
What you will upload into KDP for Kindle.
Note:
Amazon applies additional compression to images when displaying them on the website. For the best results, upload your images with minimal compression.
3. Cover design as a PDF
What you will upload into KDP for print.
Note:
All images for printing inside and outside the book should be at least 300dpi (dots per inch).
4. Cover design original source file
This is not required, but I ALWAYS negotiate the original source file into any work with a designer so that I can make updates later or pay another designer to make updates. Usually, they are made in Photoshop (PSD file) or Illustrator (AI file).
As soon as they deliver it to you, open it up (or have a friend with Photoshop or Illustrator do this for you) and check that each element is still editable (and that it is not 'flattened' which prevents editing the individual parts).
You should also ask them to send you special fonts they used.
BONUS: Mock-Up of Your Book for Sharing
• Multiple Hardcover Book MockUps (Photoshop PSD Files - free download)
• Hardcover Book MockUp (Photoshop PSD File - free download)
ACTION STEP:
Share with us where you are on your journey around book cover design!
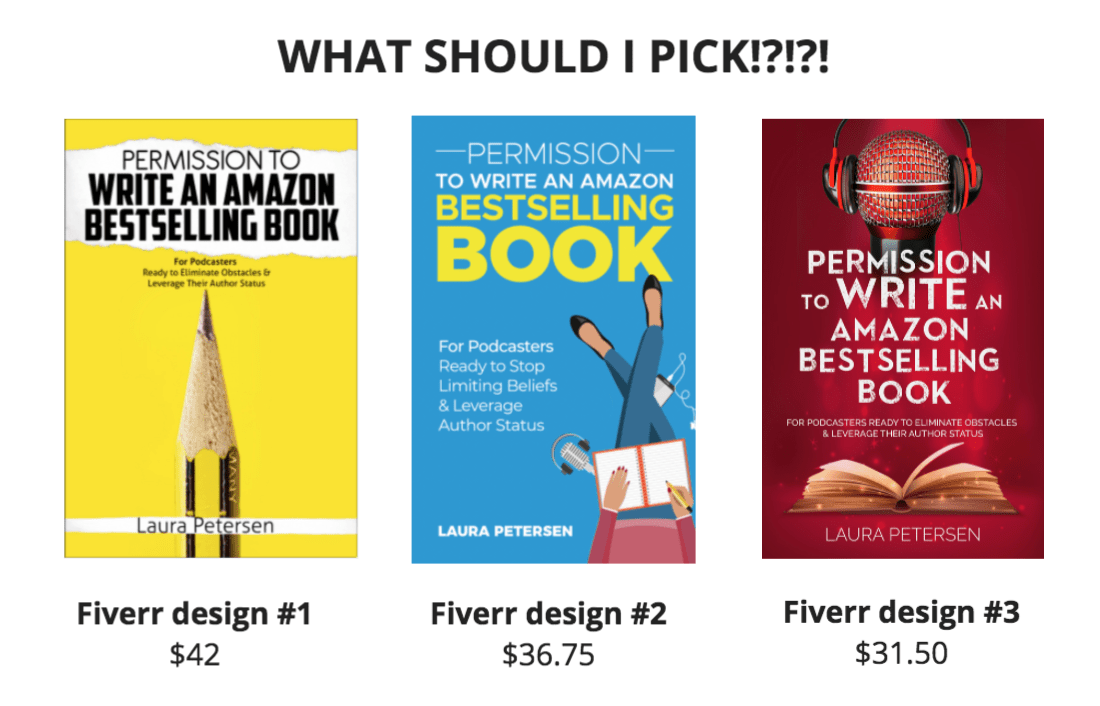
Cover Design: How to Use Fiverr for a Great Book Cover Design (for as low as $31.50)
Using Fiverr
For my second book, I hired 3 different Fiverr people and had my friends, family, and audience pick the cover they liked best and give feedback!
[Great "A" Attraction-Based Marketing like you will learn more about in Level 2!]Here is more info on them!
The 3 Designers I Used
#1: $42
fiverr.com/leahdesign/design-professional-book-cover-7a41604d-7479-4416-98f9-1ff6ea10715e
#2: $36.75
fiverr.com/mohamedmusthafa/design-a-book-cover?funnel=db4b3c1b-d894-4a93-b055-4a2ce5b56245
#3: $31.50
fiverr.com/deniz_creationz/design-elegant-ebook-or-book-cover?gig_id=109328042
*Note that some of these designers may no longer be available on the platform.
In terms of working with them, overall I enjoyed #2 the most.
#1: Seemed a bit rushed and annoyed at revision requests. She wrote back "I don't understand" a lot. And essentially refused to incorporate something to do with podcasting with the pencil. I think she just gave up.
#3: Didn't deliver the original design within 24 hours as described in gig purchase. But, the quality seemed worth the wait! And his design is what I ended up going with! [Note: the link above is to his wife's account...he said to use that now but same quality work]
I still would recommend them all, but #2 was my favorite for the working relationship aspect. #3 next! #1 last, but I could still consider working with her again.
Things to Consider When Hiring
• I paid for the "source file" as a .PSD (Photoshop file) or whatever they use so that I could edit it myself later!
• Your directions have to be crystal clear or they will not understand. For this low price, make sure to be ready to explain your vision and clearly ask for revisions.
• Look at other books for samples to 'see' what you like and share those with the designer from the beginning so he/she can understand what you like.
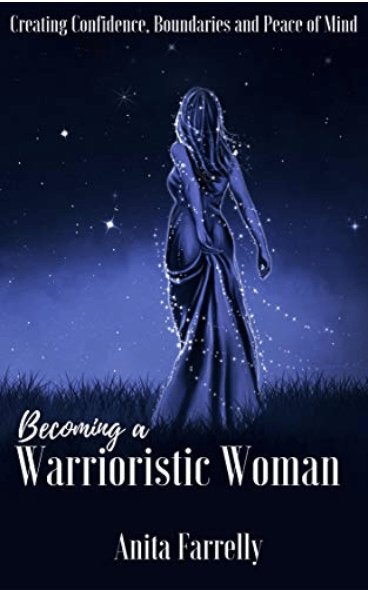
4th Designer Option
Another option from bestselling success story Anita Farrelly! She used this designer here "priyanika" and recommended her!
She spent about $40.
One More Fiverr Recommendation
I also used this designer "mary_ross" to create a piece of art for inside my book. Not sure if she can do full book cover designs, but if you have other graphic artwork to do for inside the book, you can consider working with her.
I spent $15 + $1 Fiverr fee and she created this tree image based on my sketch (I then added words around the tree myself).

ACTION STEP:
Come and show and tell your book cover design!
Cover Design: How to Use 99 Designs for a Great Book Cover Design Contest (for $299+)
Watch the video above to see more inside 99 Designs for book cover designing.
Using 99 Designs
For a private client, I decided to run a book cover design contest on 99 Designs.
The video above shows a behind-the-scenes look at 'how to use it' and what to pick for a design contest...plus, what the backend looked like for my private client!
Go to: CopyThatPops.com/99designs -- my aff link, full disclosure
• I paid $299 for the contest
• I also tested out the $99 boost for more exposure/designs (optional)
TOTAL: $398
And we got about 100 designs!
I'm very happy with how it is working and will definitely use it again.
December 2019 Update
I'm still using 99 Designs for private clients' books and did a potential book #3 cover! Here are just a few images that are my favorites from stage one. I can't wait to pick the final design! But it's so hard because I have so many great options to pick from.

These are 8 of the TONS of designs I have received from the contest! And, if I don't like any I can get a full refund before going to the final step.
Which would you pick???
January 2020 Update:
See the next lesson to see what I picked and how to share design options for marketing exposure and feedback in a fun way.
-----
People really do judge a book by its cover. Let others be a part of your journey in picking the best one!
ACTION STEP:
Come and show and tell your book cover design!
Cover Design: Use Your Design Options as Book Pre-Marketing (And Get More Engagement Than Any Other Posts!)
The value of getting multiple designers working on your book (as described in the last lesson about 99 Designs) is not ONLY for generating an awesome cover.
It's also a great way to have highly visual things to share with your audience (big or small) and get engagement, feedback, and emotional buy-in to your book even before it's live.
People who vote on which cover you should choose, write feedback about why they like one cover over another, or even just click "like" on a cover design contest post are MORE LIKELY to be willing to buy, review, and share your book in the future.
Plus, you may get great insights into the look and feel of your book that you never would have thought of on your own.
How to Share Effectively?
Here is a video walking you through the steps in detail...
Basic Steps Written Out:
STEP 1: Take screenshots of the books like you best (I recommend 2 to 6).
STEP 2: Go to Canva.com and create a free account.
STEP 3: Pick any dimensions you like best, but tall ones take up more space in Facebook, in particular, so people have more time to see it as they scroll.
STEP 4: Drop the screenshots in and label them to make it easy for people to pick their favorite
STEP 5: Share the image on your social platforms and ask for votes and feedback. Prepare for lots and lots of comments!
Two Examples:
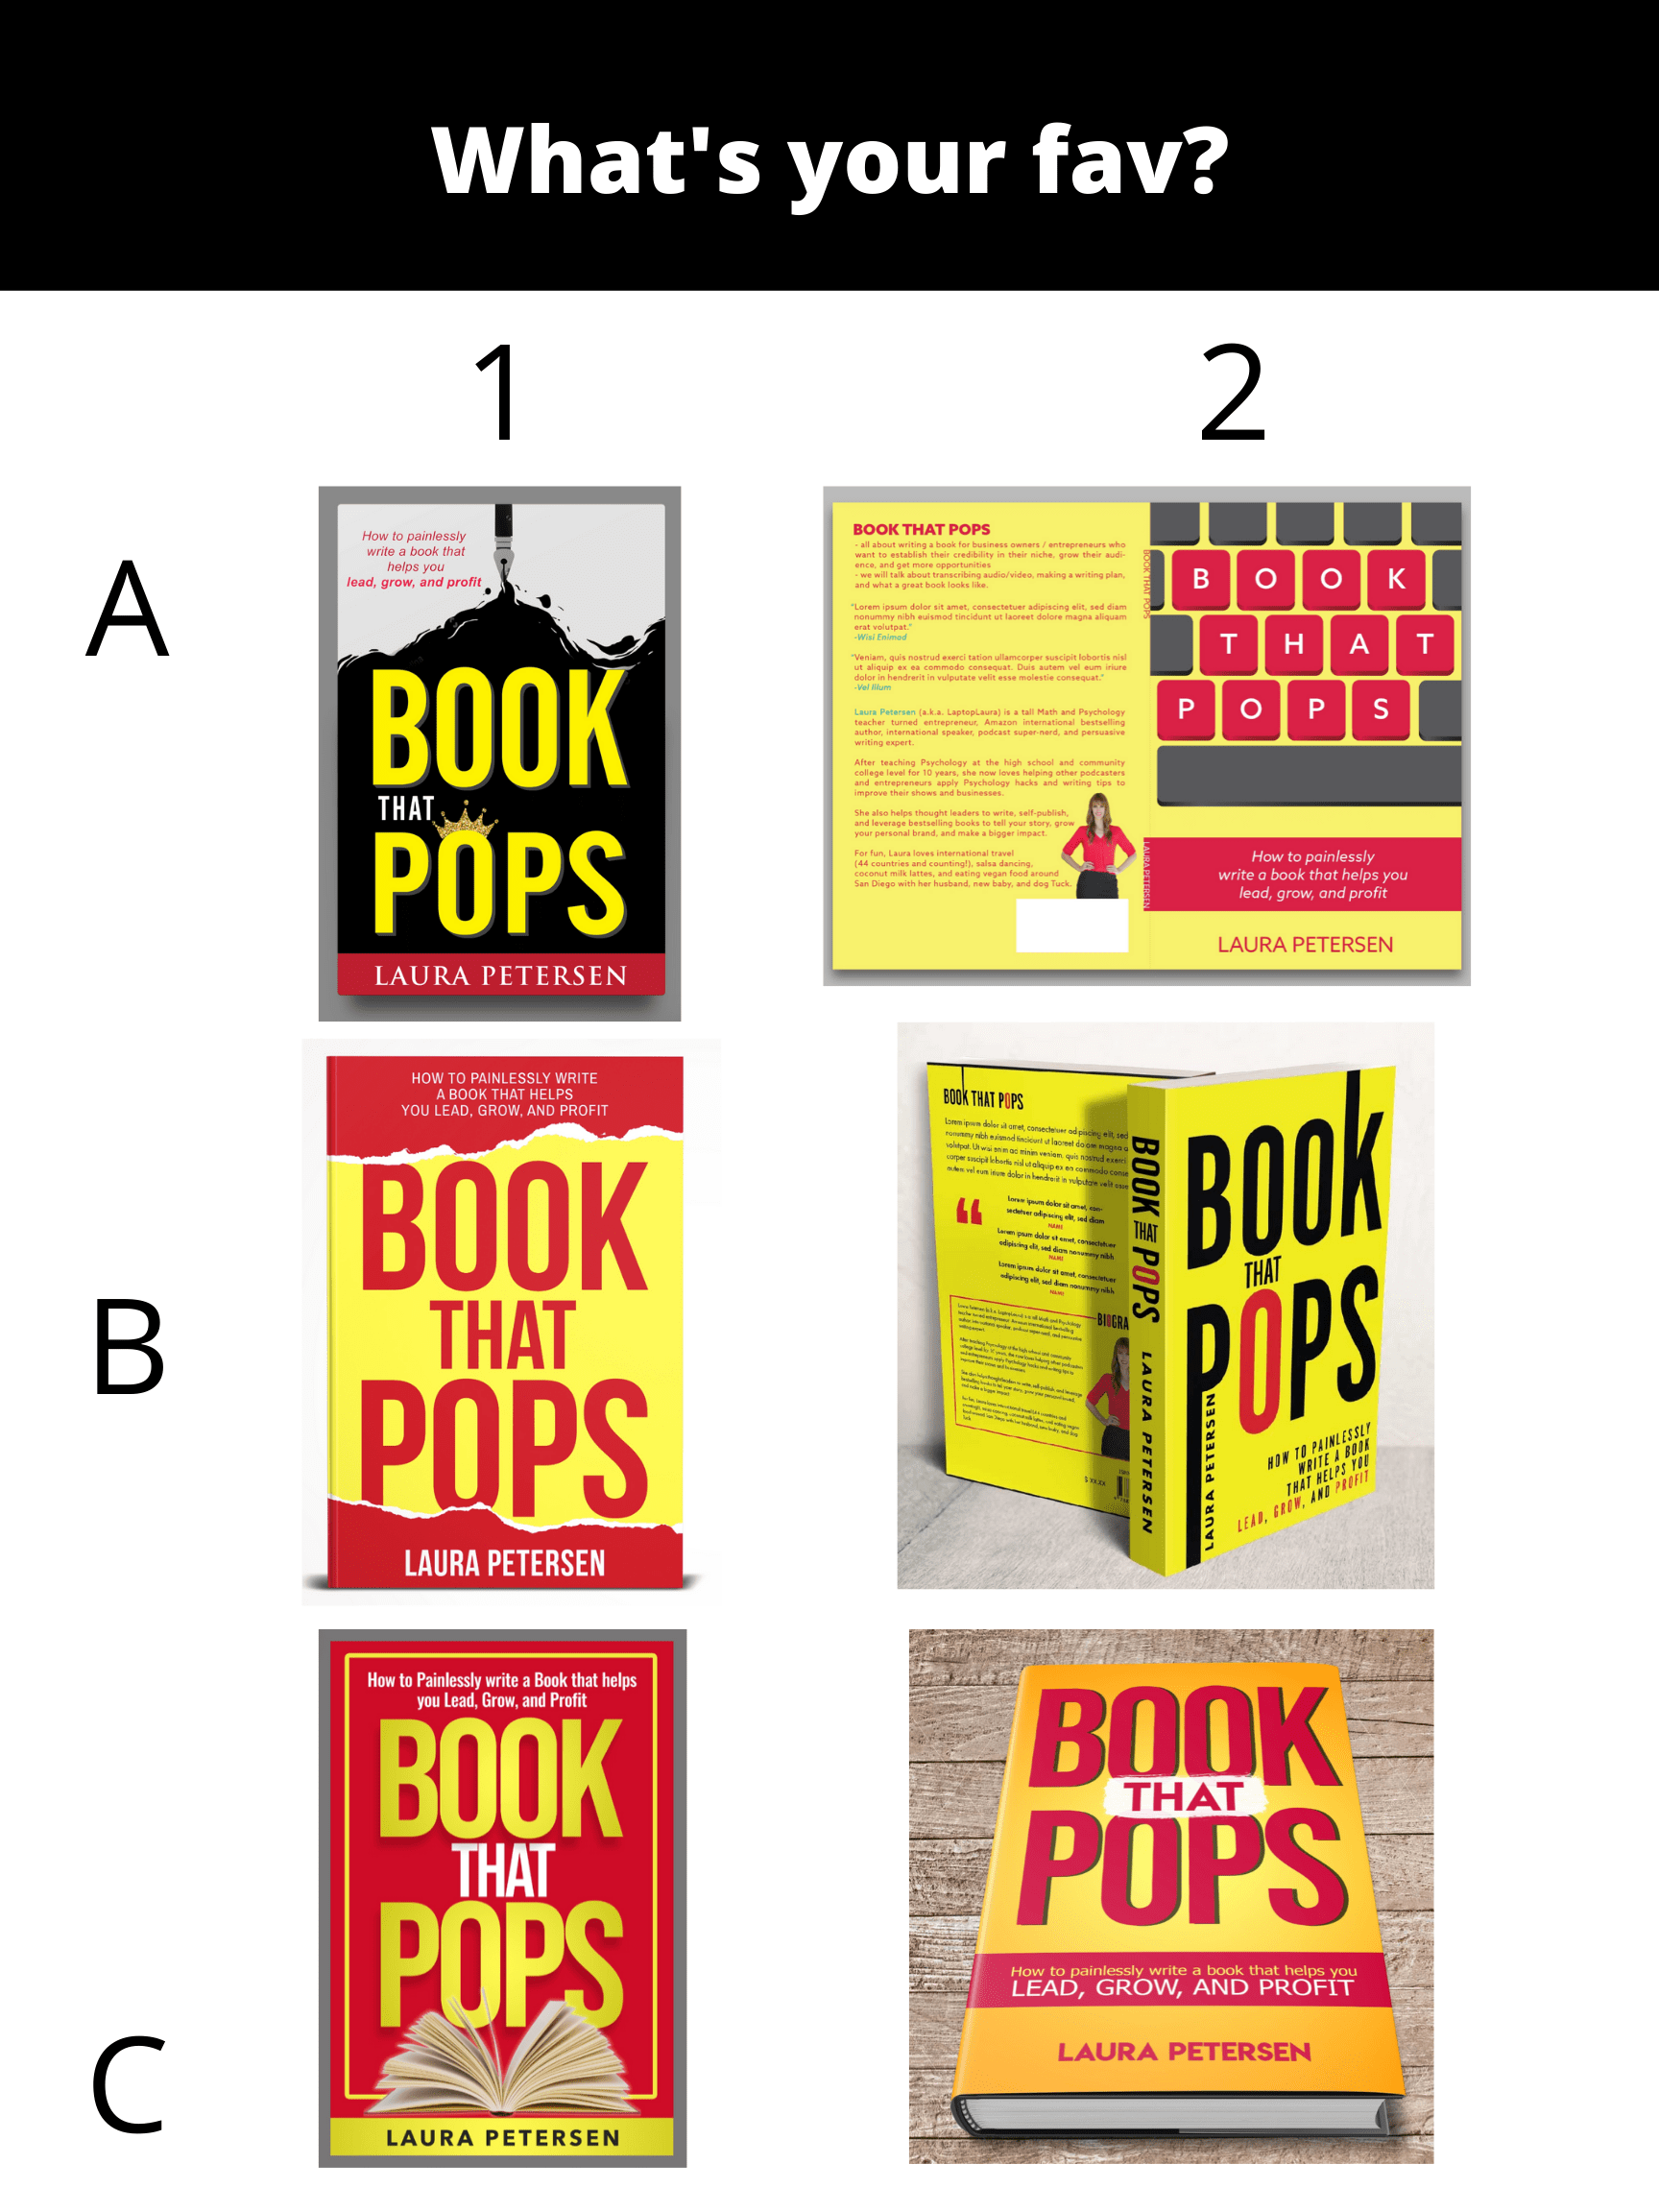
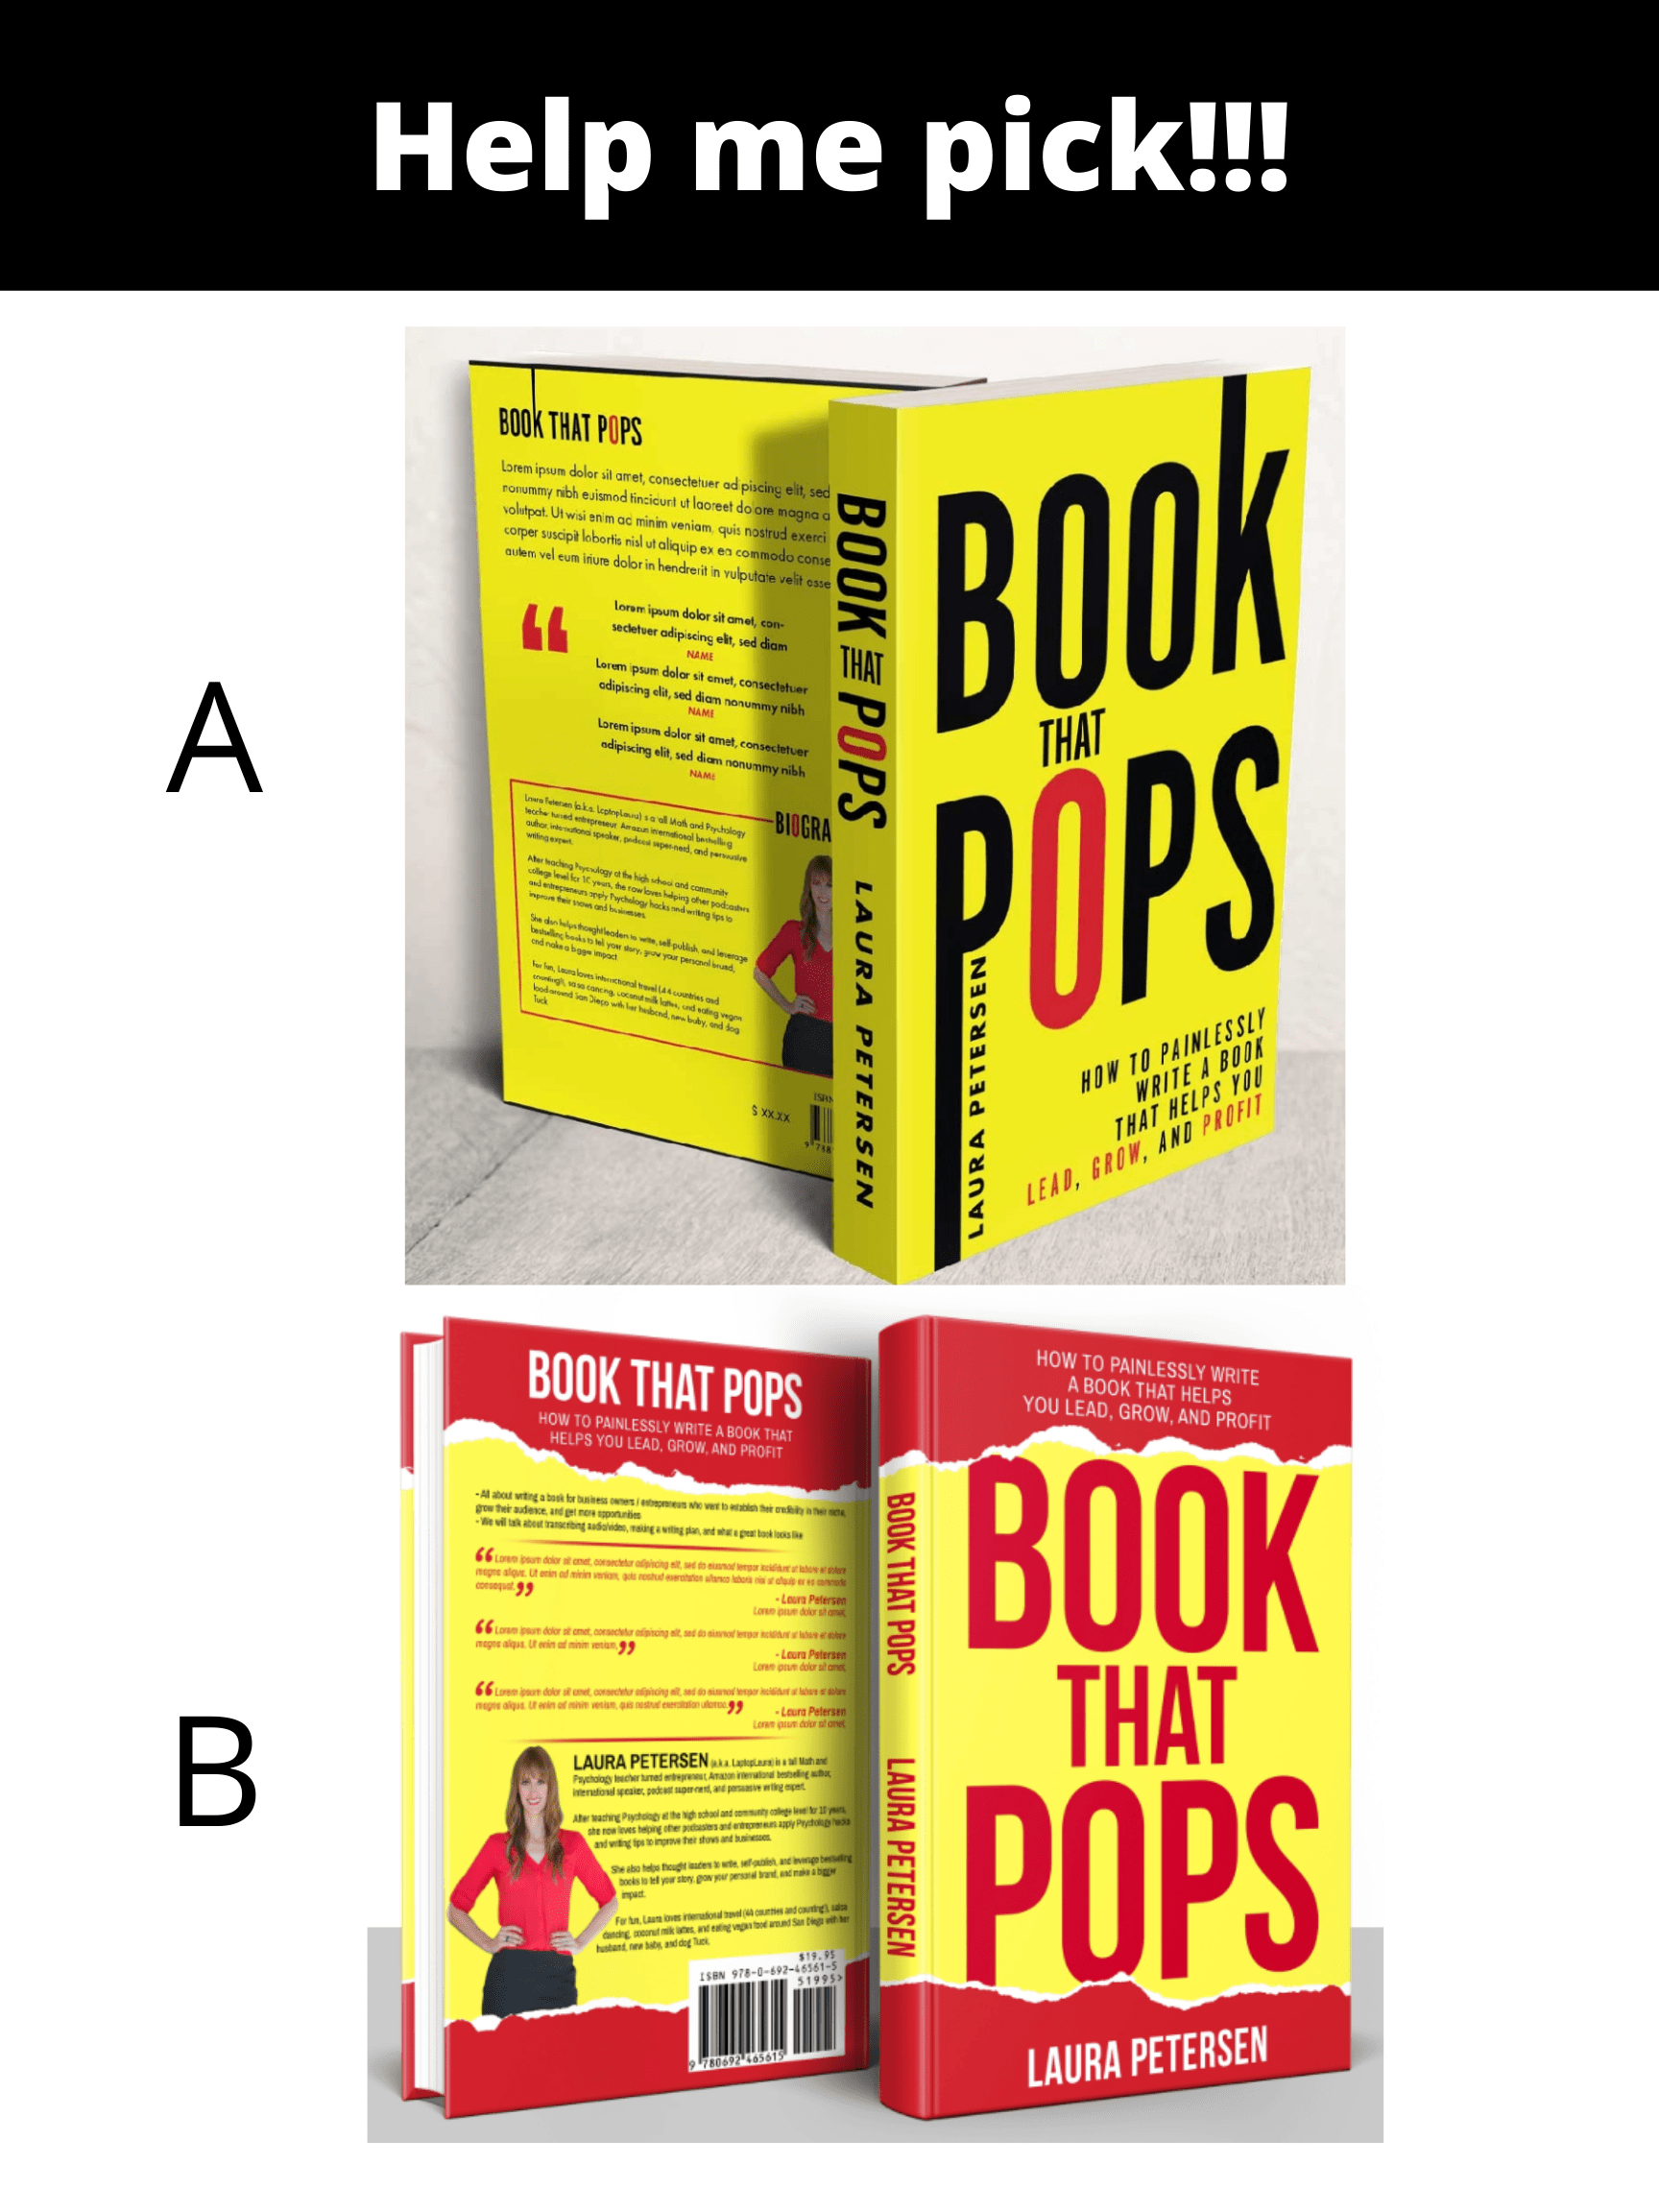
Bonus:
Lots of engagement on these voting posts tell the social media platform (like Facebook) that you are posting great content and it will show your future posts more often too.
PS: I picked "A" from the last photo just above! I really love the typography of that design.
ACTION STEP:
Come and show and tell your book cover design!