P3: Polish
Now it's time to get your book ready for publication!
Editing: How to Edit Your Book for Free or with Hired Help

FREE: Ask a talented and/or nerdy friend for help
When I wrote my first book, I didn't want to spend the money to hire a professional editor (liiiike, that's what I do 🙃). But luckily for me, my talented lawyer BFF Emily Hickok offered to help me catch small errors I may have overlooked for free.
If you have any friends who:
• Are total writing and grammar nerds
• Love you and want to see you succeed
• Have some extra time on their hands (not to say that Emily did...she was very kind to help!)
...then it’s definitely worth approaching them to see if they might want to edit your book. Or even design your cover if they are talented with graphics.
My personal suggestion, so it doesn’t come across as “Hey, will you work for me for free?” is to offer them something non-monetary in exchange.
Book Editing Bribe Ideas
1. Do a professional work exchange.
• Is there any work you could do for your friend?
• Do they need help optimizing their email list?
• If you’re a photographer, maybe you could do a free photoshoot.
2. Put aside a weekend to help them with a big household chore.
• Have they been putting off painting their living room?
• Is there a closet of forgotten sweaters that desperately needs organizing?
• Could they use some babysitting so they can get something done for themselves?
• Help take something off their shoulders.
3. Take them out for Starbucks or to a nice meal after all their hard work.
• Or cook them a delicious meal even!
• A gift card to their favorite store/spa/class/etc. would be well received.
I love nerdy friends!
DIY: Do It Yourself
Of course, you can edit it yourself, if you already consider yourself a strong writer. And there are a ton of great resources for editing books on your own.
Here’s a link to National Novel Writing Month’s free revision resources--as you can guess from the name, they’re skewed towards novel-writing, but the same principles apply.
One of my favorite tips for editing any giant chunk of words is to do it from big picture to small picture.
In other words, don’t get caught up editing the grammar for a section of the book you might cut entirely [Tip: Install the Grammarly plugin for free to catch errors as you write -- upgrades available for more features].
Here’s the scoop...
Three Rounds of Editing
1. 1st Round Of Edits: Does the book, as a whole, make sense?
The first time you go through the manuscript, you’re looking to make the tightest book possible.
• Does everything make sense where it is?
• Are there chapters out of order?
• Are there chapters or sections that don’t actually serve the book?
• Are you missing chapters?
These are the problems to iron out first. This is your continuity edit.
2. 2nd Round of Edits: Could the writing be clearer (and/or more clever)?
On your next pass-through, edit the writing.
• Are there areas where things are badly explained?
• Sentences you think could be funnier?
• Stories that could be tightened up to be more impactful?
Circle those and fix.
This is your personality edit.
3. 3rd Round of Edits: Spell-check and grammar
Your last pass-through is your spell-check and grammar edit.
Ideally, at this point, you’re not moving around your chapters or deleting entire sentences/paragraphs anymore, so you’re not wasting time spell-checking words that will go away completely.
• My advice is to run it through a few different spell-checkers, including Grammarly.
This is your small details edit.
---
The biggest downside to doing it yourself is it’s going to take a LOT more time--especially because you’re going to need breaks from looking at your own work.
You know that feeling where you’re making something, and after hours and hours of the same thing, you’re thinking, “I can’t even tell if this is good anymore”?
That’s when you put your manuscript in a drawer, focus on other things for 3-5 days, and then come back to it with a fresher eye.
But I did it for my 2nd book...it can be done DIY.
Pay Someone to Help
• Fiverr
• UpWork
• FreeeUp
• Thumbtack
• "Gee" Gertrude Nonterah: gertrude.oppong@gmail.com
Types of editing you can hire:
Ghostwriting
This is when a person writes your book for you. But you are still involved! Usually, the ghostwriter interviews you about your vision for the book overall, prepares targeted questions, and then interviews you again to get the content. They record the interviews so that they can play things back and make sure to convey your tone and style in the written form.
Substantive (Developmental) Editing
The most intensive form of editing. The document is evaluated as a whole and problems of structure, organization, coherence, and logical consistency are corrected. Sentences may be removed or added. Paragraphs may be rewritten, condensed, or expanded. Blocks of text may be moved from one section to another.
Copy Editing
The editor corrects problems of grammar, style, repetition, word usage, and jargon. Copy editing includes one revision at no additional charge.
Proofreading
The lightest form of editing. Minor errors are corrected. Grammar and style (e.g., verb tense, units, use of numerals and words such as “5” or “five”) capitalization, punctuation (e.g., the use of commas, semicolons, colons, periods, dashes, apostrophes), spelling, and word usage (e.g., to/too, affect/effect).
ACTION STEP:
Come and let us know what other questions you have so you never get stuck!
Formatting: How to Format Your Book for Free or with Hired Help
FREE: Ask a talented and/or nerdy friend for help
Like we talked about in getting editing help, there is a chance you have a detail-oriented friend or colleague in your network who has experience with formatting and may be willing to help for free, barter, or cheap.
DIY: Do It Yourself
ScrivenerThis is my specialty, so we have -- and will keep adding -- how-to tutorials for formatting your book inside of Scrivener. But for so quick start help, check out these resources from Scrivener:
• Video Tutorials
• User Manuals
• User forums/community support
• Support + knowledge base
This is not my specialty because I hate Word, but KDP has good detailed instructions on how to format your book. We've compiled some good resources here to help you streamline the process!
Ebook/Kindle• eBook Manuscript Formatting Guide
• Kindle Create tool (free)
• Kindle Kids’ Book Creator: turn your illustrated children’s books into great-looking Kindle books
• Paperback Manuscript Templates
• Format a Paperback Manuscript
• Create a Table of Contents in Word
• WEBINAR: How to Format Your Paperback
Pay Someone to Help
• Fiverr
• UpWork
• FreeeUp
• Thumbtack
Come and let us know what other questions you have so you never get stuck!
Formatting: Style Guide Recommendations Checklist (for a Printed Book)
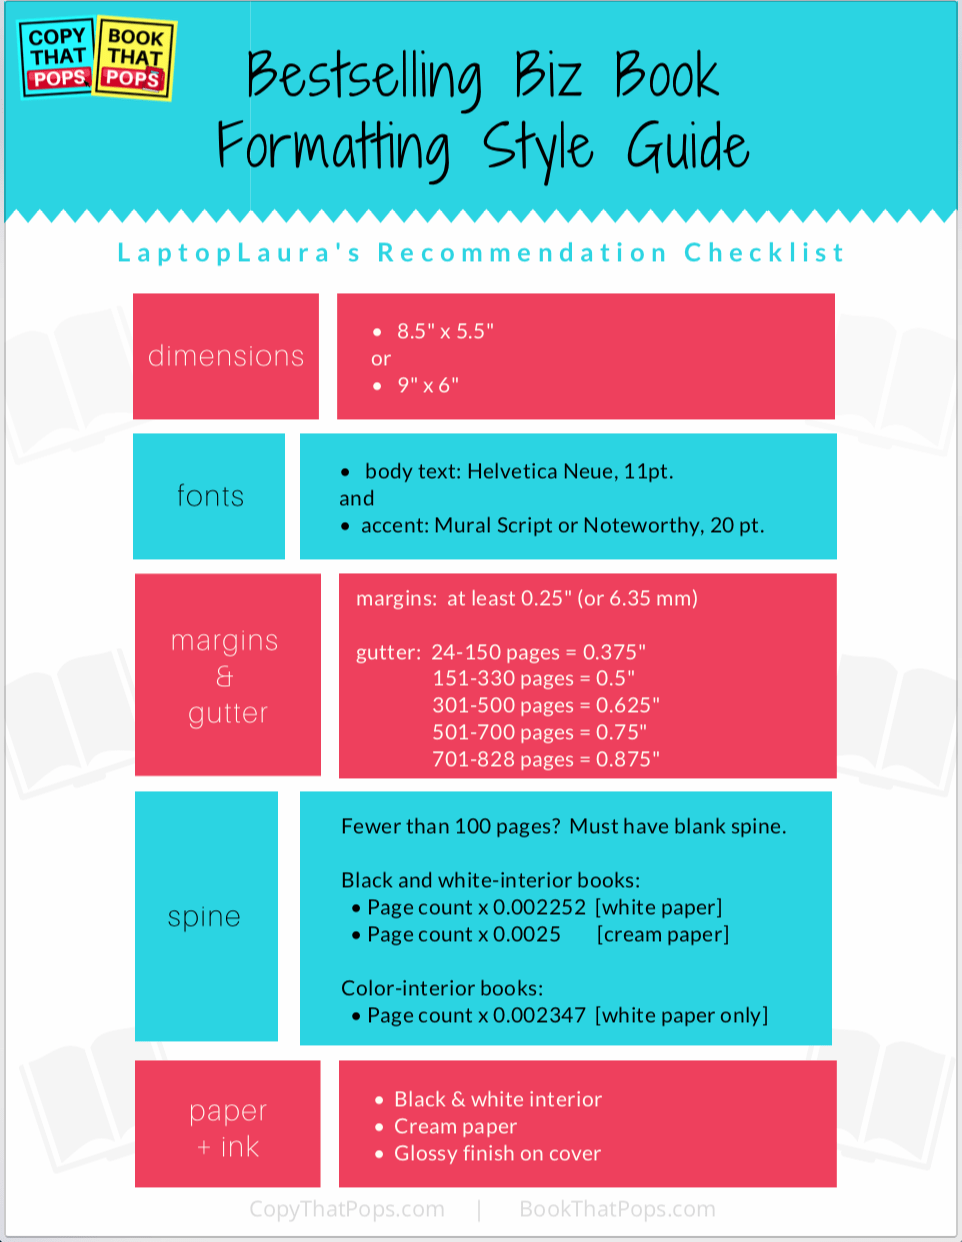
Click here (or on the image above) to view and save the PDF version of the style guide.
Note 1:
These are by no means the only way to style your book! They are just what I like to use. I hope this helps you reduce decision fatigue or be a jumping-off point! 🙂
Note 2:
Formatting your Kindle book does not have as many things to decide!
There are no 'dimensions' (other than the cover), no margins or gutter to worry about, no spine size, and no paper type! Each person's digital device is slightly different, so your Kindle formatting has to be 'loose' to fit and flow on any screen size.
Therefore, these style suggestions above are just for the print book! 🙂
xo
Laura
PS: If you have any questions about how you can make the most out of this resource after downloading it, please don't hesitate to send me an email Laura@CopyThatPops.com anytime!
Formatting: Book Dimensions for Print (front, spine, back, bleed)
Remember to first decide your dimensions FOR PRINT before anything, so that your ebook cover dimensions are the same size as you use for print and you only need that created once.
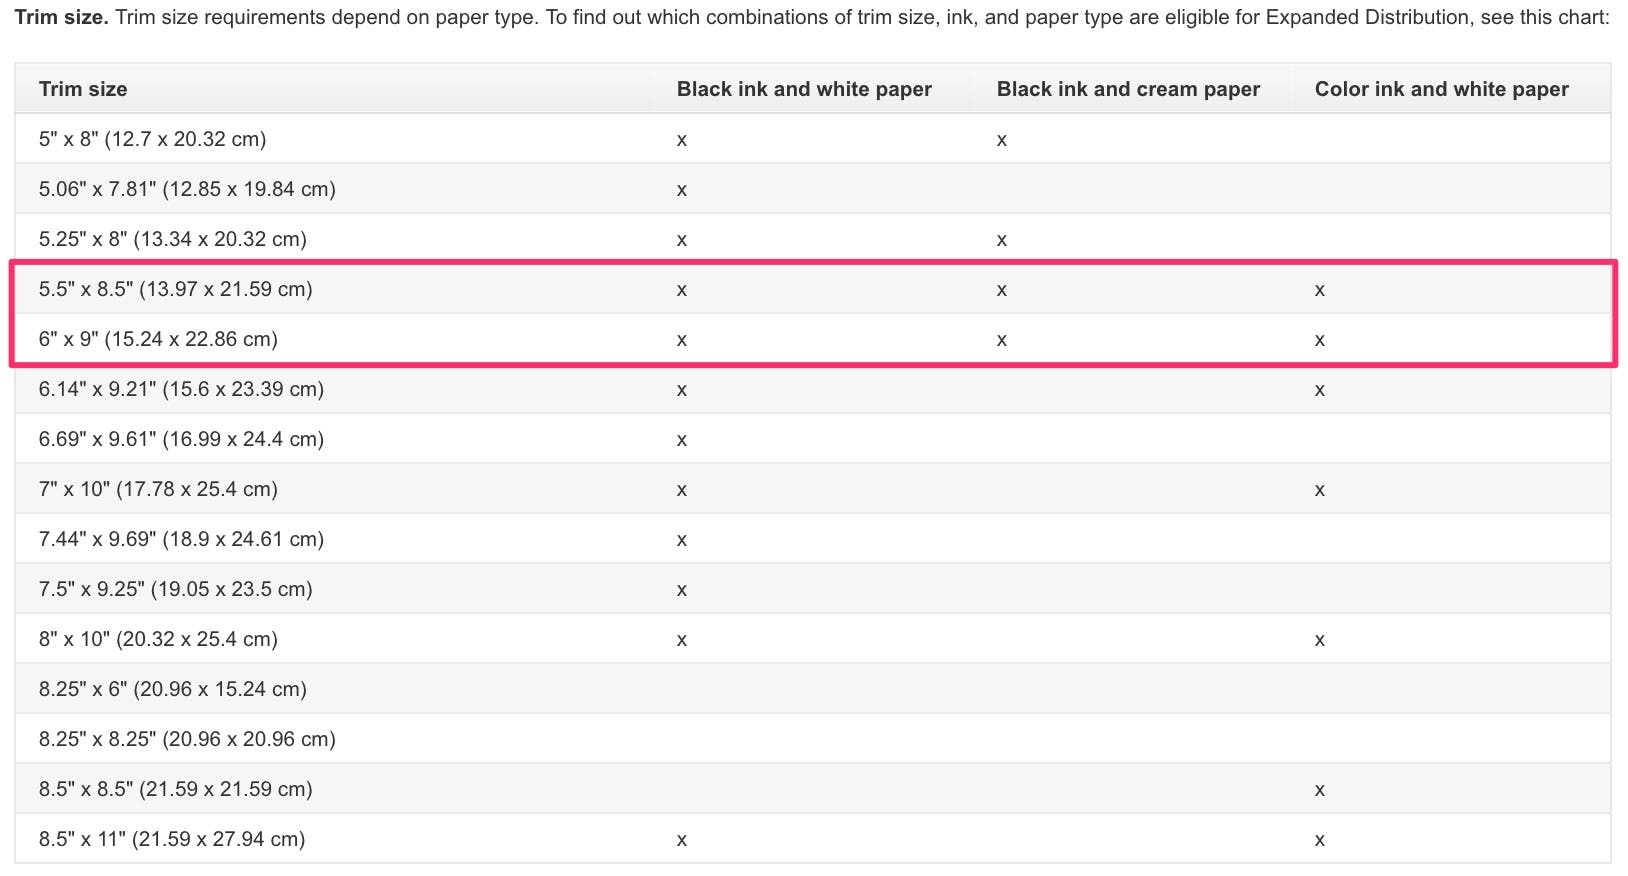
Although there are other options, I usually recommend:
• 6" x 9" (15.24cm x 22.86cm)
• 5.5 x 8.5" (13.97cm x 21.59 cm)
These two are most widely accepted and used and available for "Expanded Distribution" in Amazon in both white and cream-colored paper AND whether your book is black & white or in color on the inside.
See image below taken from KDP's extra info on this site here:
Then, as we discussed earlier, for your full cover (front, spine, and back), you'll want to make sure to calculate the spine dimensions and add a 'bleed' on the edges.
• Calculate spine and bleed + make a full cover template {free}
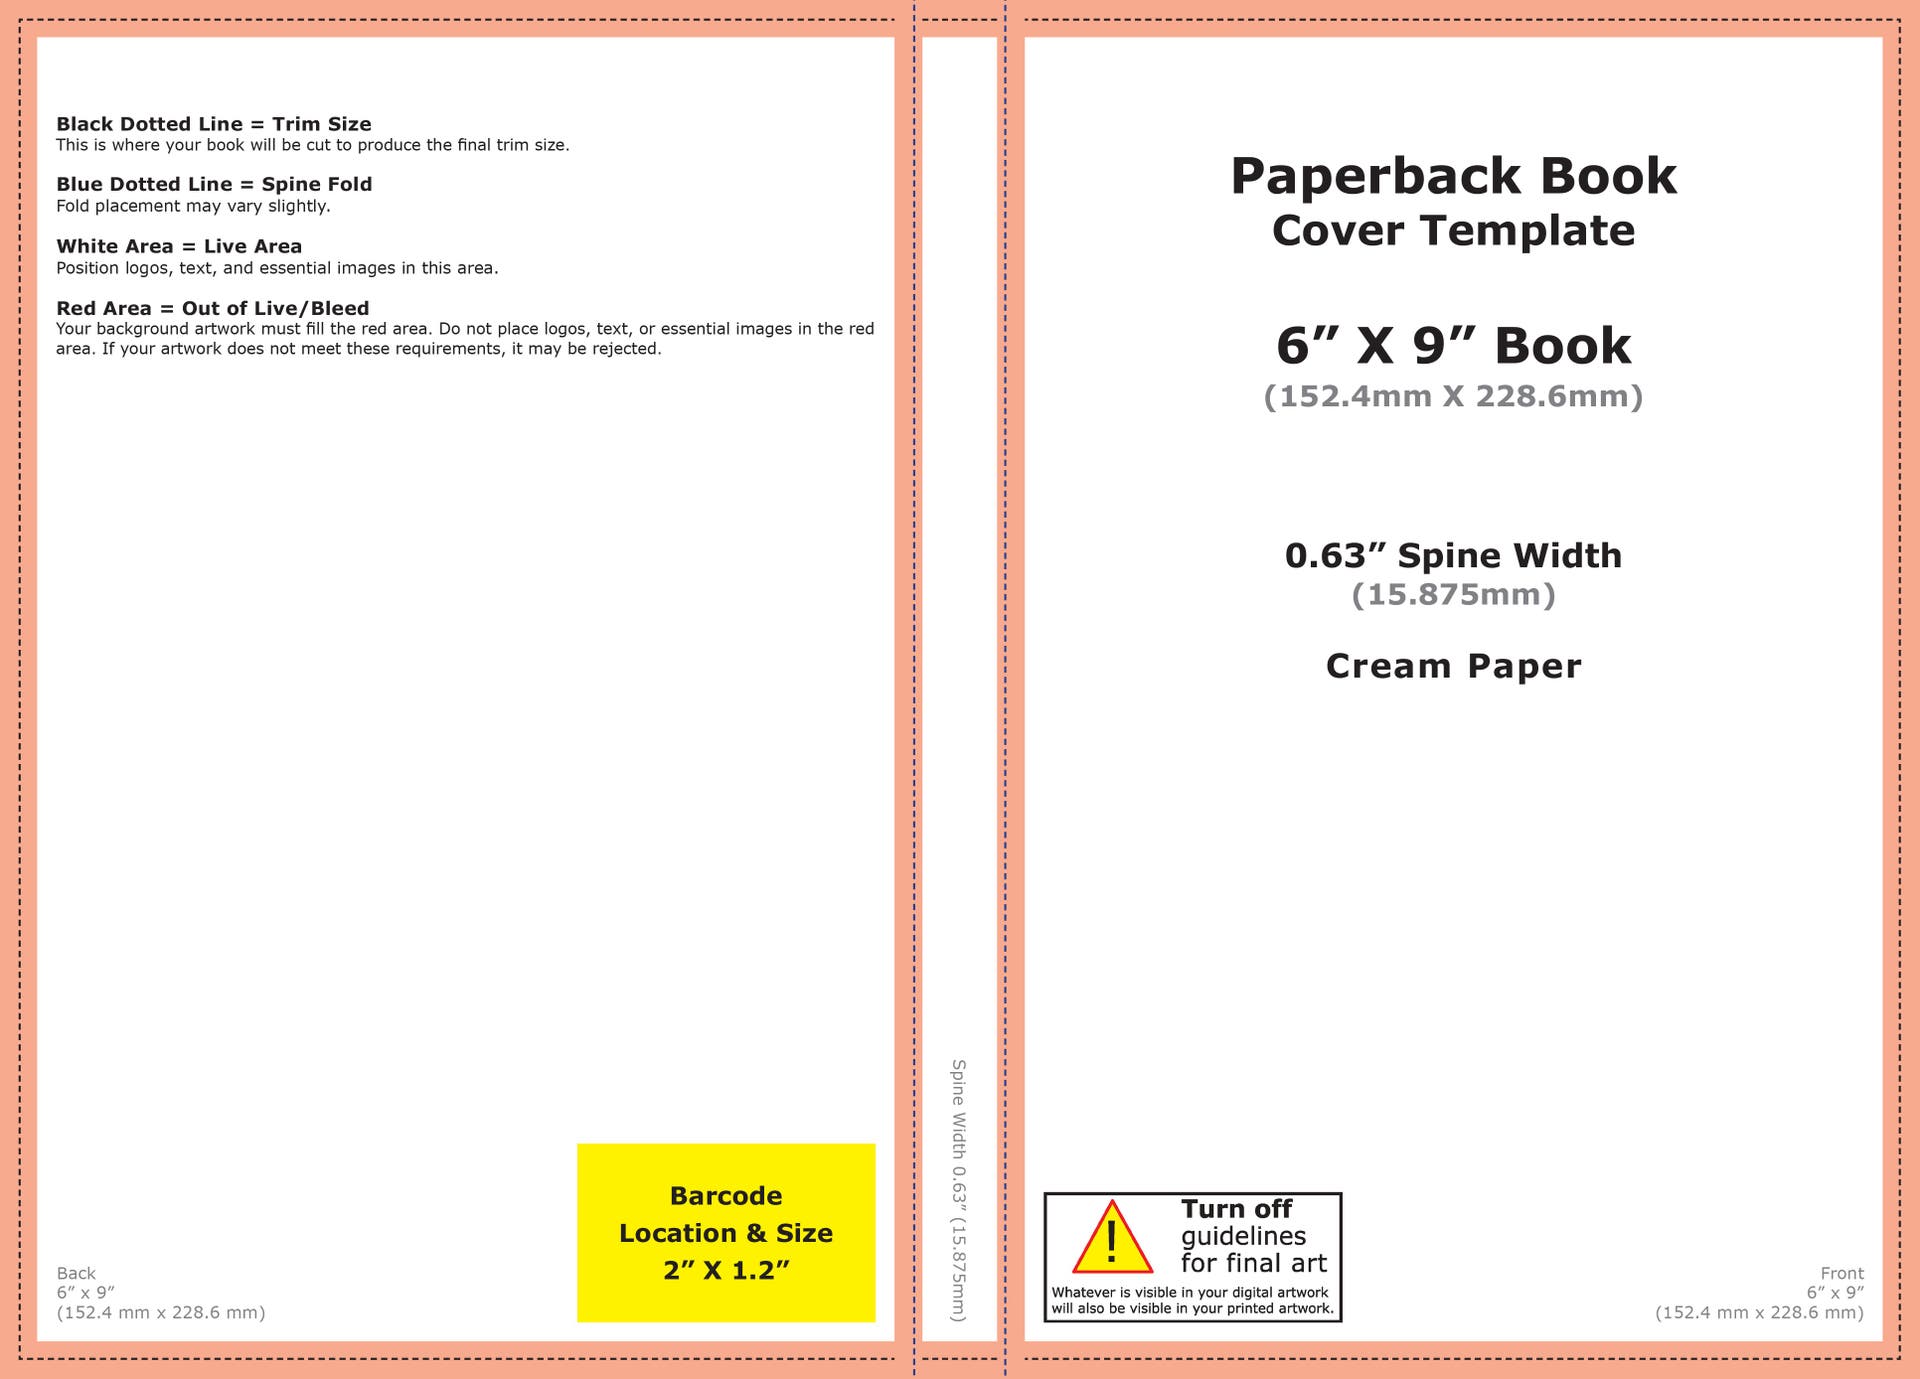
The spine only needs to be calculated if you are doing an in-print book (not needed for Kindle only).
And the thickness depends on the final page count for-print at the dimensions you choose.
For black and white-interior books:
• White paper: multiply page count by 0.002252
• Cream paper: multiply page count by 0.0025
Example of spine width calculation for a 60-page black and white book printed on white paper:
60 x 0.002252 = 0.135"
For color-interior books:
Multiply page count by 0.002347
Example of spine width calculation for a 60-page color book:
60 x 0.002347 = 0.141"
MY FIRST BOOK, FOR EXAMPLE:
• 369 pages
• black and white inside
• cream color paper
369 x 0.0025 = 0.9225" for spine
Important Note:
Every book will vary slightly when bound. Allow for 0.0625" variance on either side of the fold lines for your cover. For example, if your spine width is 1", your text should be no wider than 0.875". Because of this variance, avoid hard edges or lines that end on the fold line.
For books with 130 pages or fewer, they strongly recommend a blank spine. Blank spines are required for books with fewer than 100 pages.
Formatting: File Types (Quick Overview)
Manuscript
Kindle: .EPUB
* if your Scrivener gives you an option, pick epub3 because it's the most updated and dynamic version
• you can also use .mobi
• Amazon does support other file types as well if you don't want to go with my recommendation. Read more here.
Print: .PDF
• just remember that I recommend doing your Kindle all the way through to bestseller launch before worrying about the interior print formatting
Cover
Kindle: .JPG / .JPEG or .TIF / .TIFF
(you only need the front cover)
Print: .PDF
(front, spine, and back designed all in one file)
ACTION STEP: Come and let us know what other questions you have so you never get stuck!
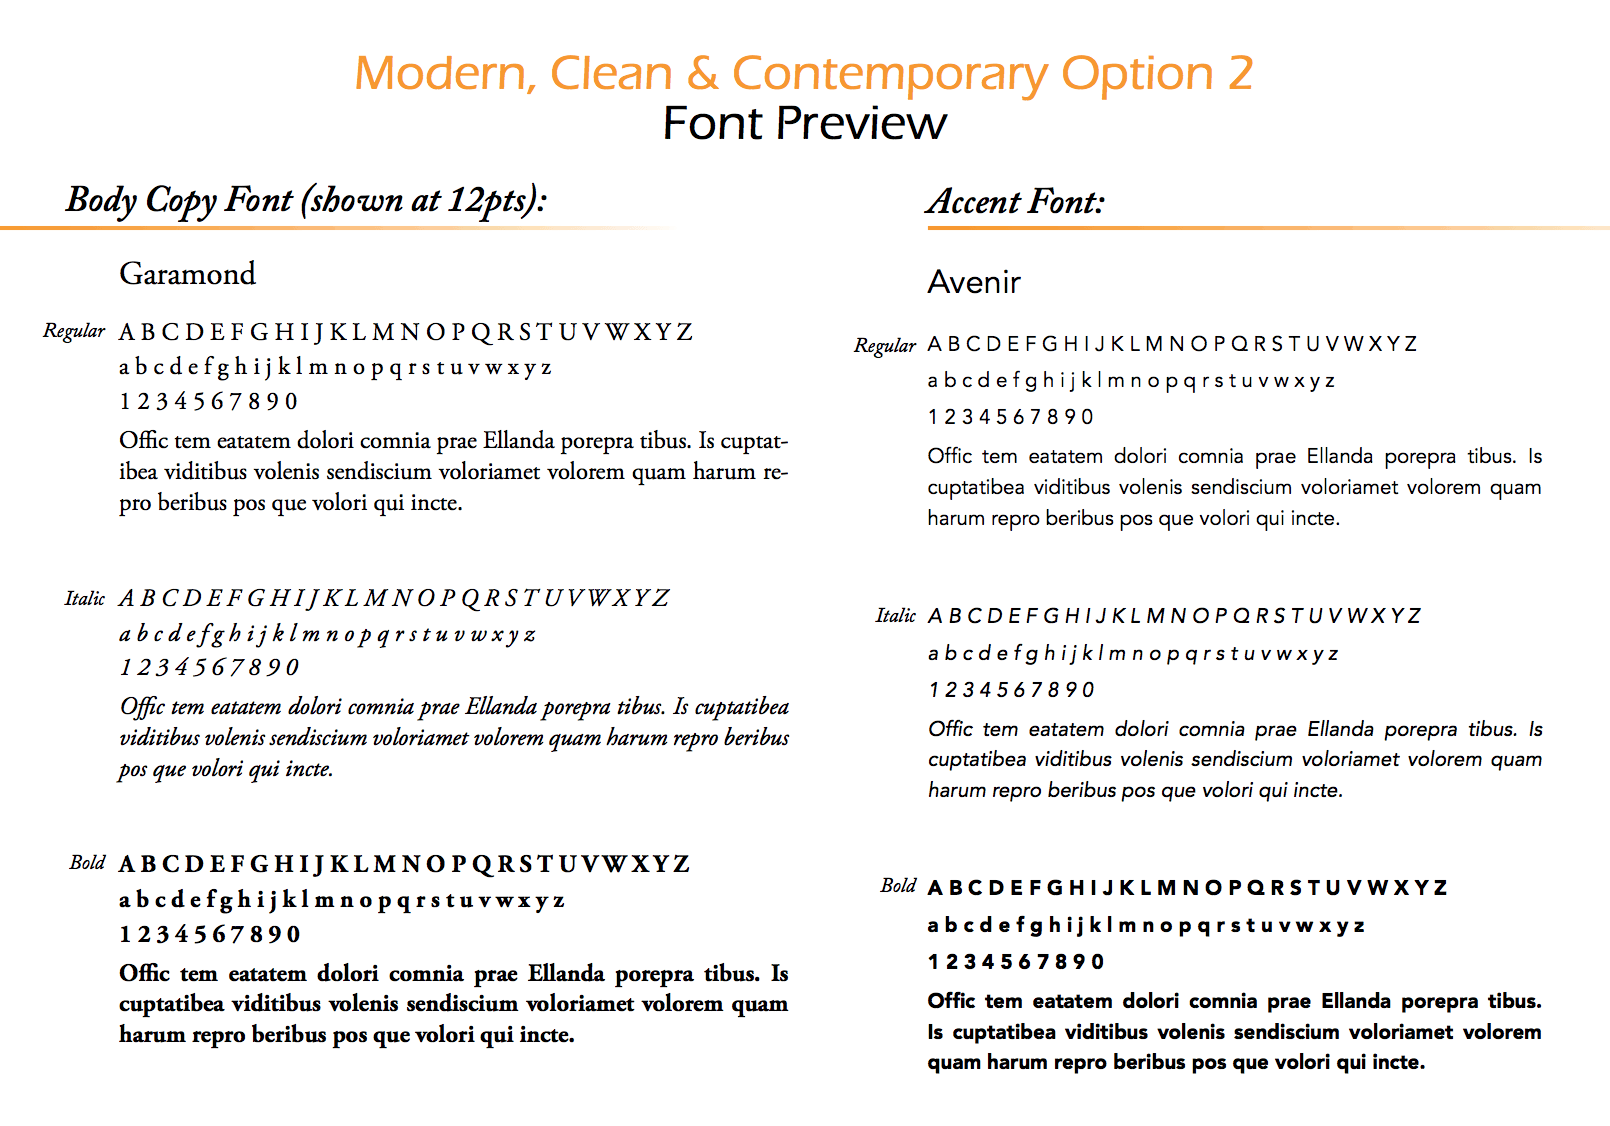
Formatting: Fonts and Font Sizes
Minimum Font Size
7 pt font, so it's legible
What Font to Pick?
Fonts are a tough one to recommend because they do depend on the theme or mood of your book. And your personal taste.
But, assuming that you are an entrepreneur writing a non-fiction book on a topic in your niche, I recommend going for a "clean, modern" look.
That is my favorite! 🙂
Full Disclosure:
I personally hate serif fonts (with tails) and always pick a sans-serif font for the main body font. Not all agree with me. You do you.
Here are 3 style options to get you going!
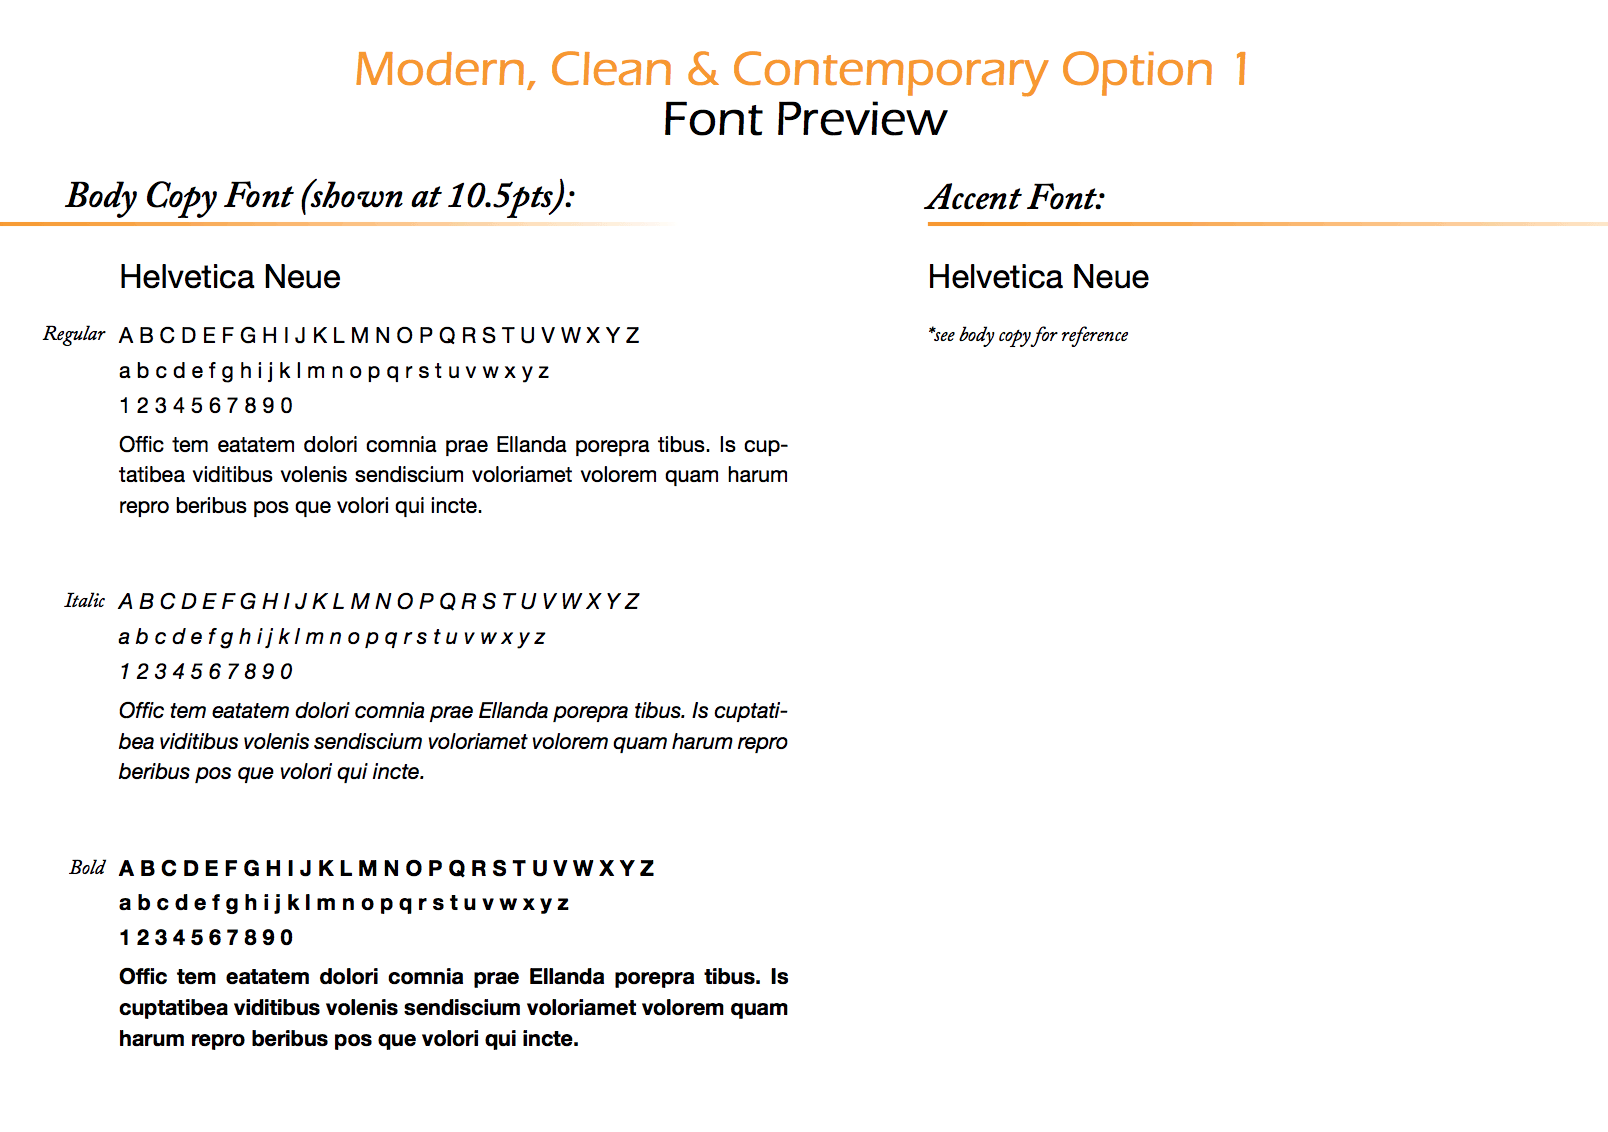

I love Helvetica Neue, so I think I'll go with that in future books with Ubuntu as an accent.
Or, you could use something more cursive-y for an accent like this below.
"Mural Script" is really fun!
My final picks:
• body text: Helvetica Neue, 11pt. to 12pt.
• accent font: Mural Script, 20 pt.
Note:
If 'Mural Script' isn't available, you can download and install it or just go with something already built-in... 'Noteworthy' looks clean but fun, for example.
Want something more traditional?
These are popular:
• Times New Roman
• Arial
Or try:
• Baskerville Old Face
• Bookman Old Style
• Centaur Garamond
• Goudy Old Style
• Hightower Text
• Palatino Linotype
• or anything else that catches your eye
Do All My Fancy Fonts Show Up on Kindle?
No. Because people are reading Kindle books on all sorts of devices, new and old, not all fonts show up on Kindle.
So do not be discouraged if your fancy fonts aren't showing for your ebook. They will be fancy in all their glory in your print book!
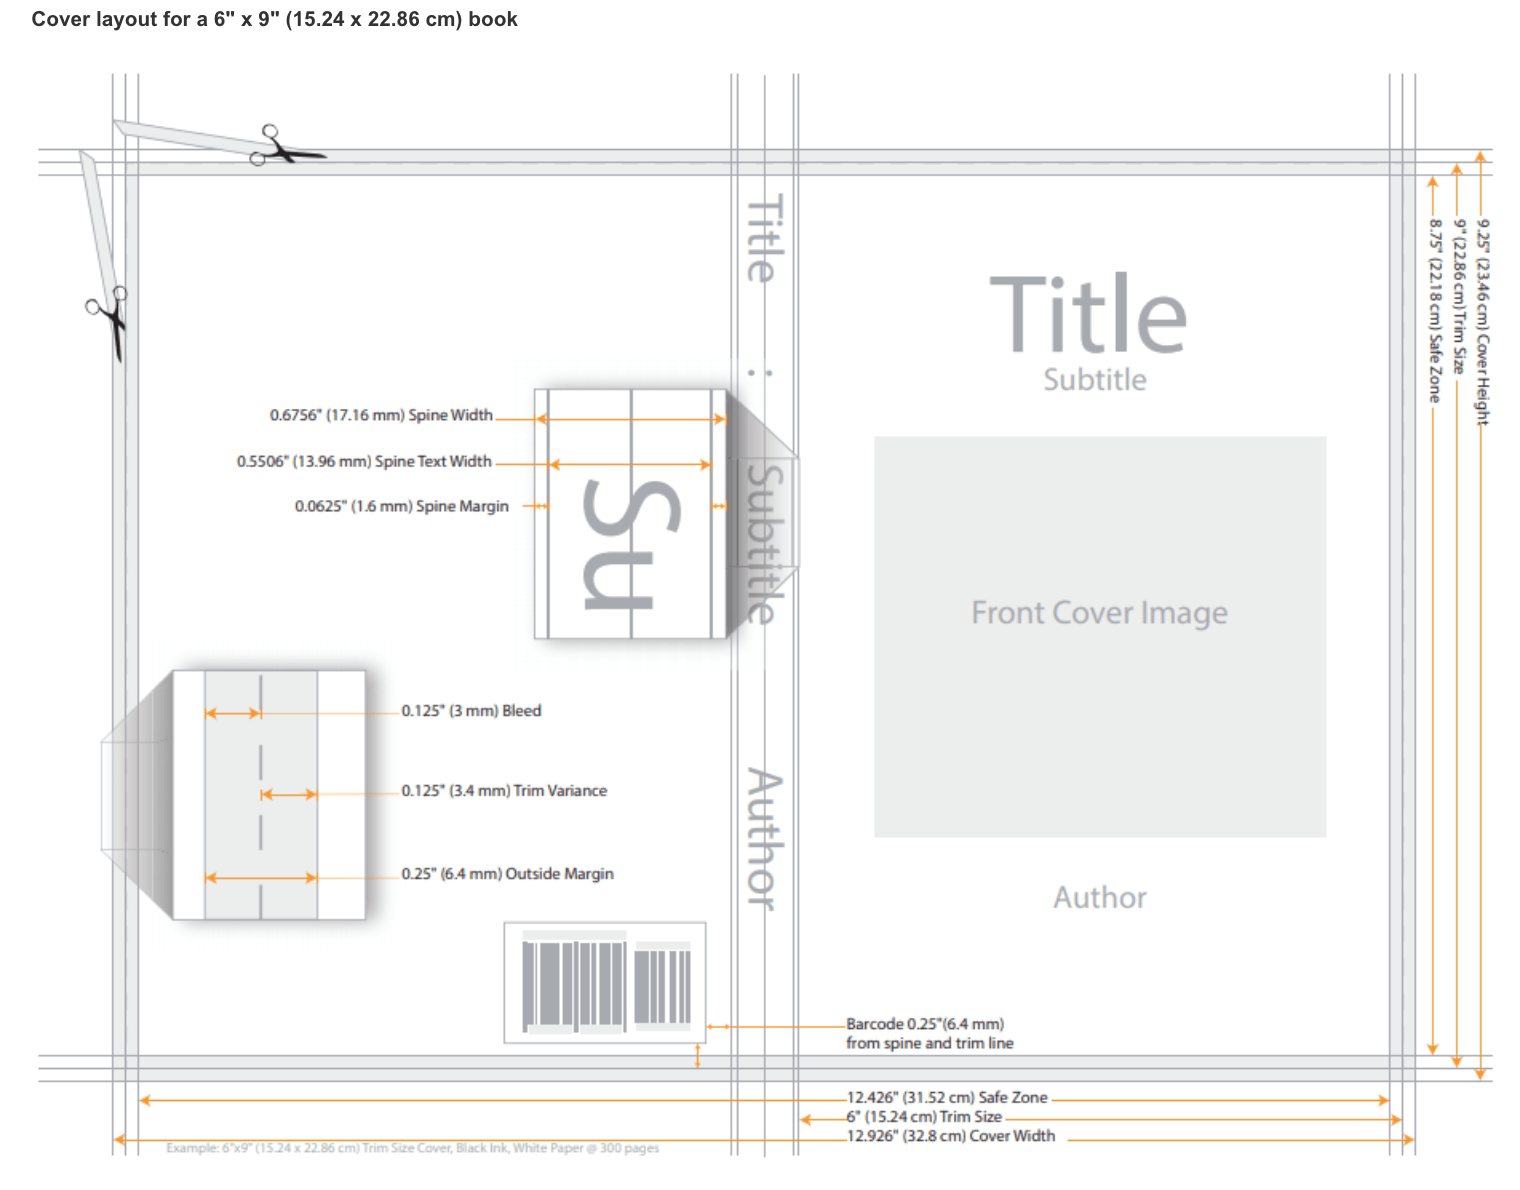
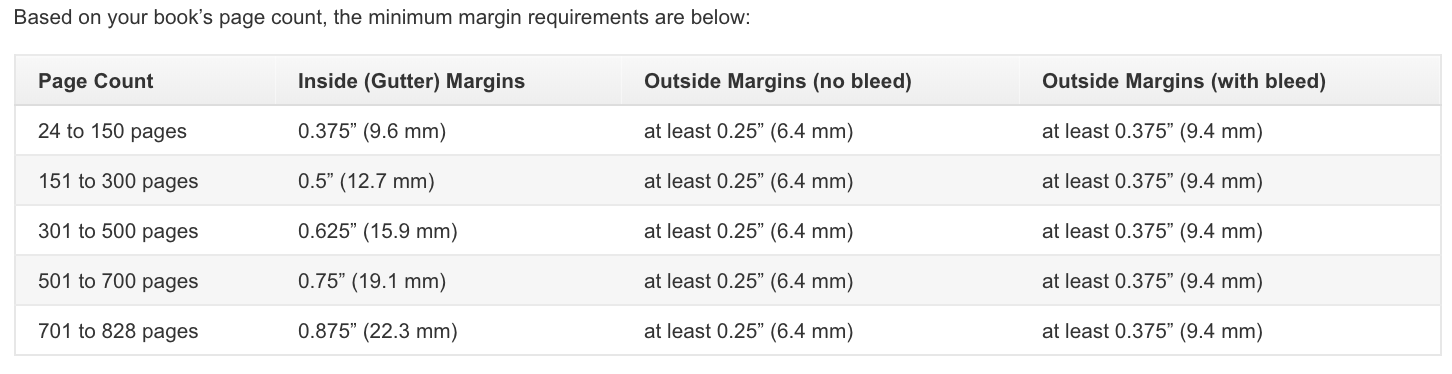
Formatting: Margins & Gutter
Margins
Margins are the padding around the text so that it doesn't get cut off in printing or get too close to the edges.
Amazon requires at least 0.25" (or 6.4 mm).
Gutter
Also called the "inside margin," the gutter is some extra spacing on the inside of the book so that the text is easy to read even though some area is eaten up from where the pages are bound together.
The thicker your book, the bigger the gutter needs to be.
Here is a screenshot from KDP's guidelines:
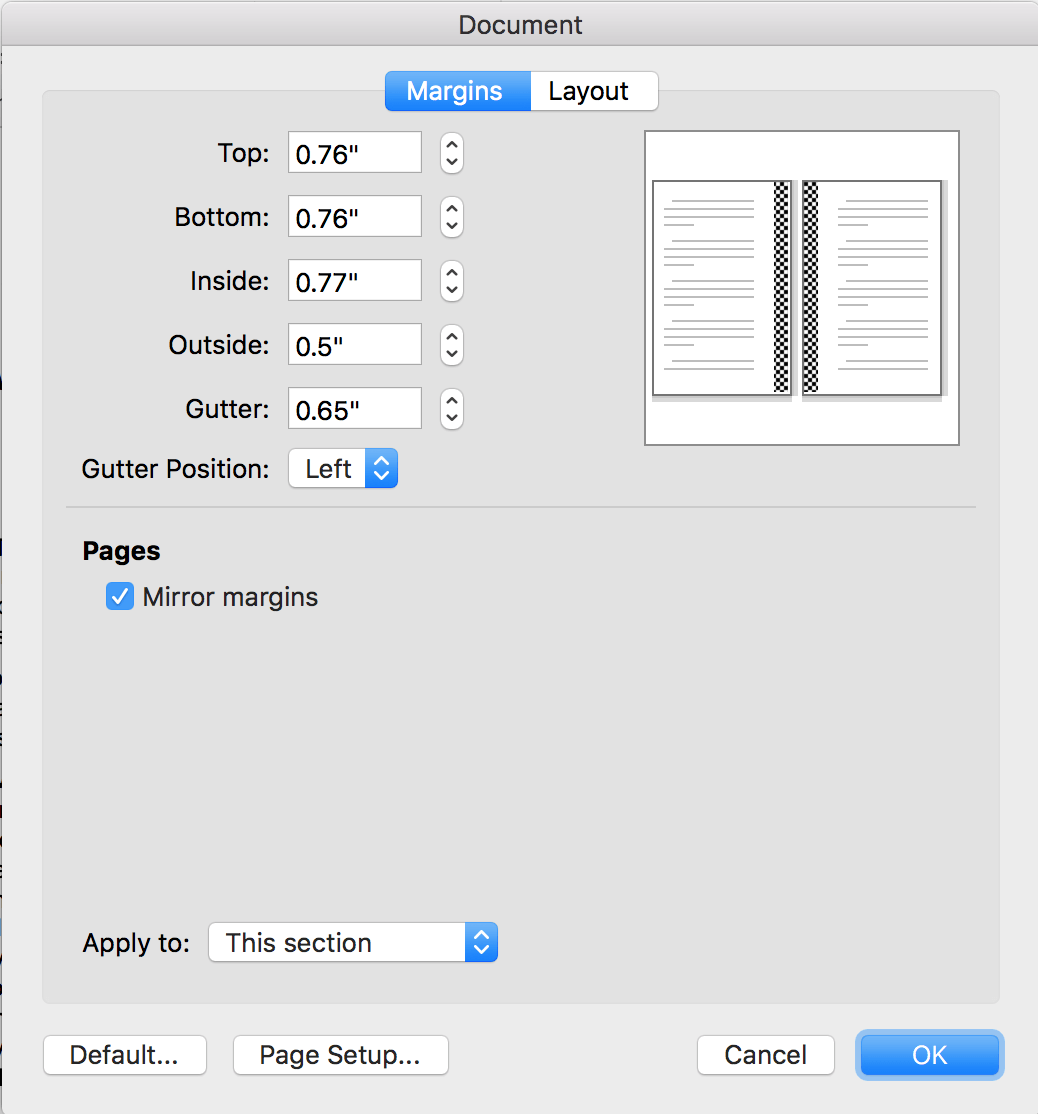
And to give you a concrete example, my book Copywriting for Podcasters is 8.5" x 5.5" and about 360 pages in print.
Here are the settings in Microsoft Word:
ACTION STEP:
Q: How Do I Make a Table of Contents in Scrivener (for Ebook and Print)? [6:31 video]
Creating a table of contents is easy, once you see it done!
Here above is a short video showing you how to do it for Kindle and for print! (They are slightly different). Note that I am working off of a Mac in this tutorial (some things look different on PCs).
Links:
Q: What's Different for the Formatting of Kindle and Print Versions?
Some of these below we have already discussed in other lessons along the way leading up to this. But, we thought it still helpful to call out a few differences between your Kindle and your paperback book in terms of formatting.
Forgive repeats...hope it's helpful! 🙂
Here are a few differences to look out for:
• File type is PDF for print (vs. epub for Kindle)
• Unlike Kindle, you format things for EXACTLY how they will look in the final book. So look through and add page breaks and line breaks where you want to push text visually to the location desired. For Kindle, that doesn't work because each person reading the book is on a different e-reader, so the text will just flow freely and page 30 on your device may be page 51 on mine, so there are no page numbers for Kindle.
• Add page numbers for your print version.
• Add a 'running header' for your print version. To decide what you want, look a few of your favorite books on your shelf to see what they did and model it!
• The Table of Contents for your print version should have page numbers, but not be hyperlinked like Kindle is.
• Any links should not be hyperlinked for print, but rather have the URL written out (either parenthetically or in footnotes so the reader knows what to type in to navigate there -- try to shorten links, if possible).
• Photos should be 300dpi (or as close as possible) so they look crisp when printed
• The paper type, paper color, and printing color (black and white vs. full-color inside) will affect the thickness of the book, so make sure to calculate the spine dimensions properly with for the graphic design of the spine (more on this in previous lessons)
• Give more of a 'gutter' gap on the 'inside' of the pages where the pages come together with glue so that all your words are legible.
• You'll need the spine and back cover designed for printing, but only the front for Kindle.
Q: How Can I Double Check How My Book Will Look in Kindle?
If you want to check how your eBook will look before it goes live to the world, there are three options:
1. Inside your KDP account, you can preview it on the second tab of your book's details with the Online Previewer (we cover more on the three tabs in LEVEL 2)
2. You can download the Kindle Previewer for free and get a few more options with this standalone desktop application. With it you can:
- Preview by device type, orientation, and font.
Change the filters under the "Preview Options" section to see how your eBook will look on tablets, Kindle E-readers, and phones. You can also preview your book in portrait and landscape views in a variety of font types and sizes.
- Check specific elements.
Use the filters in the "View All" drop-down menu to preview particular elements (e.g., images, lists, tables) throughout your eBook. For example, if you want to check all the images in your book, select Images from the menu, and the Previewer will display all pages with images.
- Get a quick, end-to-end preview.
Enable the "Auto-Advance View" option in the "Navigation" section, and Kindle Previewer will automatically flip through your entire eBook. You can pause "Auto Advance" and change the speed.
3. If you have a Mac, you can also preview your book with iBook or other eBook reader applications.
ACTION STEP:
Come and let us know what other questions you have so you never get stuck!