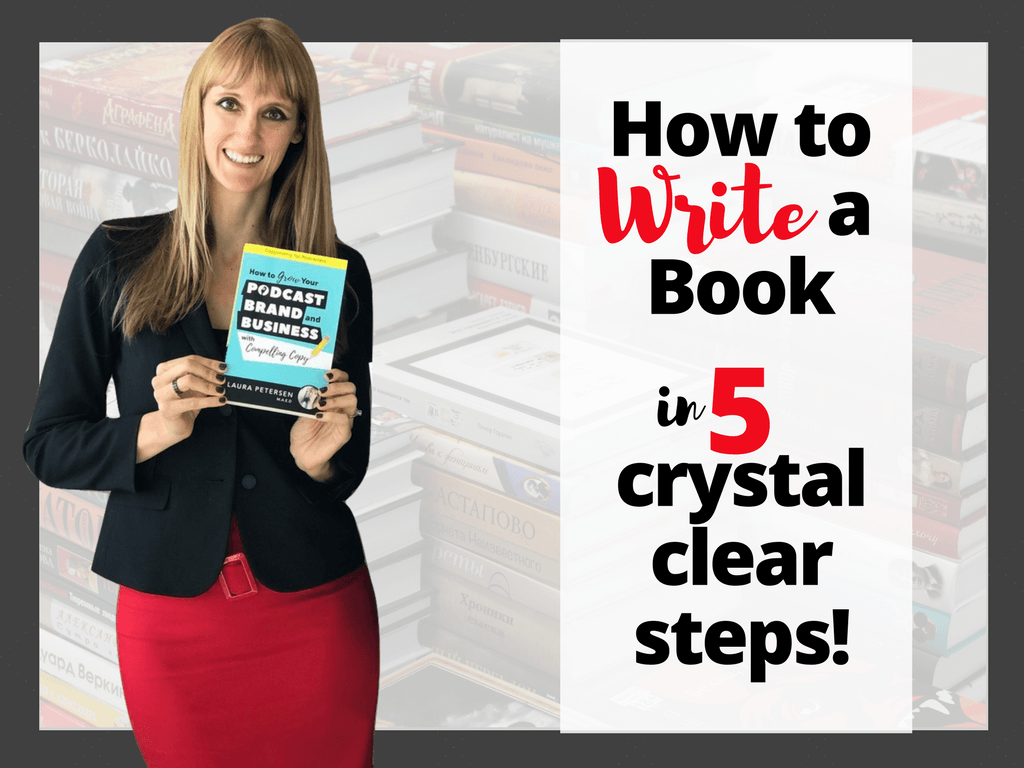
Is writing a book a bucket list dream? A business goal? Great! Here’s how to write a book…
You’re here because you want to help writing a non-fiction book. Congrats! I’m here because I wrote a non-fiction book, and it’s hugely changed my professional life. Hooray!
The short version of my story:
After ‘retiring’ from teaching, I tried for ages to grow my brand and business, but kept hitting dead ends.
I felt invisible.
I felt like I was always chasing when I wanted to be chased. [not literally ;)]
Then, as the stars sometimes align, three different people told me to write a book in a span of a few days–so I did, even though I’d never written one before, and I didn’t really know how to start.
I drilled my idea down, planned out my writing, got it finished and edited, and it went live just 30 days later in November 2016.
It was super niche–all about copywriting tips for podcasters. But then…things took off! So many people started asking me about it. They were amazed I wrote a book in such a short time and hit #1 Amazon Best-Seller in two countries.
(And I know, I know that sentence sounds so spammy, but I promise it isn’t. Learn more in my Free Training.)
")
Now I’m booking speaking gigs and getting interviewed on podcasts like gangbusters. Doors keep opening up in a way they never did before, and I’m giving my secrets away because I want you to get there too.
This blog is the first in a series of 5 that will take you from “Laura, I literally don’t have an idea” to Amazon Bestselling Author. (I KNOW, again, but trust me.)
This one is all about writing, and by the end of this article, you will have the tools to:
- Turn a blank page into a non-fiction book idea that lights you up
- Organize and outline your non-fiction book to make writing as smooth possible
- Plan (and follow through with!) writing sessions, even when it gets tough
- Edit your final non-fiction manuscript (without going broke)

“How to Write a Book” Table of Contents
Writing a Non-Fiction Book – The Definitive Guide
Here’s what we’re going to talk about in this guide…
Step 1: Book Brainstorming
- Do you get nervous looking at a blank sheet of paper?
- This section will talk you through tried-and-true techniques to generate as many ideas as possible, so you’re guaranteed to land on a great one.
Step 2: Deciding On One Topic
- Once you have some ideas, how do you decide which one is book-worthy?
- This section is full of questions you can ask to logically determine which non-fiction book topic you should pursue for the next 150 pages (approximately ;)) — and which ones should stay on the shelf.
Step 3: Outlining Your Business Topic Book
- A strong outline is the key to non-stressful writing!
- This section shows you how to think through all the material related to your topic, organize it, and polish it into an enticing outline–complete with chapters and subsections.
Step 4: Writing Your Non-Fiction Book
- Writing can be the hardest part, because there are no shortcuts.
- This section gives you tools to track your progress and write even when you don’t feel like it. It also talks about setting up reward systems, and using alternative methods to write (like recording your voice).
Step 5: Proofreading & Editing
- Assuming you don’t have the cash to hire a professional, full-time editor, what are your options?
- This section highlights places to find cheap editors, as well as a method to efficiently edit the book yourself.
Future ‘definitive guide’ blog posts will cover formatting your book, all about self-publishing, secrets of the Amazon bestseller rankings, and leveraging your book for more media, brand authority, and sales.
[And get our THREE most popular resources for FREE if you want more right away!]
But before we dive into THIS mega guide, I have one important question for you:
WHY are you writing a non-fiction book?
We’re focusing mostly on nonfiction here, so if you want to write a novel, this isn’t going to be as much help for you. I’m an entrepreneur and love helping other business owners and content creators stand above their competition.
A book is a killer tool for this!
Also, my angle is to look at a book as a means to more opportunities, not a get-rich-quick passive income scheme.
BEST REASONS FOR AN ENTREPRENEUR TO WRITE A NON-FICTION BOOK
- To check off a bucket list item
- To establish your authority in a particular niche
- To have a powerful multi-purpose marketing tool
- All of the above and some!
If any or all of these reasons speak to you, you’re in the right place! Let’s jump into how to write a book!


How to Write a Book Step 1: Brainstorming
Problem: You need an idea for your book.
Solution: Get an idea for your book!
Yeah, I know. “Gee, thanks.” But seriously–”creative thinking” is frequently touted as the tired image of a disheveled genius alone in his or her apartment, whiskey in hand, staring off into the distance and then lightbulb!
He gets an idea and starts scribbling furiously.
But that’s really not how it works. Truth is, there are actual techniques you can use to generate ideas. Like many things in life (dating, job applications, thrift shopping), the idea game for writing a non-fiction book is a numbers game. The more you generate, the better chance you have of landing on something special.
Everyone’s a little different, so I’ve assembled a laundry list of brainstorming exercises, so you can pick and choose the ones that work best for you–or work your way through, top to bottom.
CREATIVE CONSTRAINTS WHEN WRITING A NON-FICTION BOOK
“Deadlines…make you creative. But opportunity and telling yourself, ‘Oh, you’ve got all the time in the world, all the money in the world, all the colors in the palette you want, anything you want,’ I mean, that just kills creativity.”
— Jack White, Musician
For many, many people, it’s incredibly intimidating to sit down for a solo brainstorming session with a blank piece of paper and no foreseeable end time.
So here below, all the scary freewriting exercises come with a timer. Exercises that are longer have their own constraints, like answering specific questions or writing your ideas in the form of a letter.
I know it sounds counterintuitive, but constraints (whether they’re time constraints or content constraints) really do make you more creative.
When you’re forced to think your way out of a box, you’ll come up with ideas you wouldn’t have if you never knew the box existed.
INTUITIVE FREEWRITING EXERCISES: FAST, FURIOUS, AND FOR-YOUR-EYES ONLY
For these exercises, you’ll want a timer, some quiet alone space, and preferably no inhibitions. These are all ways to go from “No, but you don’t understand, I have literally no ideas” to “…hey, that could work!”
Brainstorming Method #1: Blind Writing
Directions:
• Sit down with a pen and a piece of paper and start writing.
• The only rule is that you can’t stop writing.
• Set a timer for 10 minutes, and write down whatever’s in your head, even if it looks like this:
“I don’t know what to write a book about, this is stupid…where did I come up with the crazy idea for writing a non-fiction book anyway?…what can I write about? I would probably just have to write about something that everyone else has already written about.”
…because that’s fine.
If the first 5 pages look like this, eventually, you’re going to get bored, get out of your own way for a minute, and you’ll start to end up with usable material.
For example–
“…probably just have to write about something that everyone else has already written about… like podcasting, marketing, scuba diving… why scuba diving? I don’t know but it’s something I’ve always wanted to do but been afraid to do, you have to get so deep in the water and all you have is an oxygen tank…
… it’s kind of like being an entrepreneur, you’re tethered to a single lifeline and it’s your business, that’s why I like the idea of diversifying your income streams, maybe the idea of being a creative entrepreneur that has a few different income streams so you’re not dependent on a ‘single point of failure,’…
…maybe from the perspective of an artist or a photographer, fleshing out all the ways that being a successful photographer doesn’t necessarily mean that you need to get your photos published in a magazine…”
See?

Brainstorming Method #2: Mind Mapping
Mind mapping is also sometimes called “associative brainstorming.”
And mind mapping is taught as both a note-taking and a brainstorming technique. So it seems like they get mixed together sometimes–and people don’t properly use mind mapping for all its brainstorming potential!
Here’s how to best use a mind map:
1. Start off with a central word.
• Example: fishing
2. What words immediately (no filter!) come to mind when you see that central word?
• Write them all down, surrounding the central word.
• Example: boat, fish, sushi, environment, woods, beach
3. Now move clockwise around the ring of words you just wrote down. What does “sushi” make you immediately think of?
• Draw 2-3 branches and write those words/phrases down.
• Example: Japan, expensive, soy sauce
• Move on to the next word in the inner ring.
• Repeat until every word has 2-3 branches with related words/phrases
4. Let the process take over! Which words jump out at you?
• Start to free-associate, drawing connections between existing branches, or adding words that connect other branches, until you have a spiky mass.
5. Look over everything you’ve written down.
• Grab a highlighter and circle words/phrases (particularly from the outer rings) that you’re drawn to.
• Don’t overthink it–just do a quick gut check.
• Do you notice a word and feel a little tug?
• Don’t ask why (at this stage). Circle it.
6. Flip over to a clean piece of paper. Make a list of the words/phrases you’ve circled.
• Now, with your analytic brain–not your gut–take 5 minutes and mull over some possible combinations of these phrases.
• How could you combine these into one idea?
7. Write out those combinations neatly.
• Then, pat yourself on the back and go make yourself a tasty beverage–you’ve earned it.
(Inspired by Caitlin Kelch’s article on Design Sponge)

Brainstorming Method #3: Word Banks
This is a tried-and-true copywriter technique, particularly if someone calls upon one of us harried wordsmiths to come up with a catchy new slogan.
And you can use it, too, to explore the nooks and crannies of your industry that you might not be thinking about targeting with your awesome non-fiction book right this second.
Directions:
1. Grab a clean piece of paper and a pencil.
2. Write the name of your industry as a big headline across the top of the paper.
3. Set a timer for 3 minutes.
4. In those 3 minutes, write down every word that comes to mind that relates to the industry you wrote down.
• Challenge yourself to fill up the paper–at this stage, you’re going for quantity, not quality.
• When you get to the bottom of the sheet, start a new column.
5. When the timer dings, take a small 5-minute break–push yourself away from the list, have some water.
• Then come back with fresh eyes and a highlighter, and read through the words you generated.
• Which ones stick out to you?
6. Follow steps 6 and 7 of the mind mapping process–that is, write out words and/or combinations of words that intrigue you.

Brainstorming Technique #4: Madlibs-it (How to [verb] a [noun] for [industry niche])
In no other exercise is the timer quite as important as this one.
You’ll want a single sheet of paper for this exercise, and a pencil. (If you have a pen, make sure it doesn’t bleed through to the back of the paper.)
Directions:
1. Fold the paper in thirds–either horizontal thirds or vertical thirds.
• You’re going to write in these columns, so pick something that works for your handwriting.
2. Write the following headlines across the top of the paper–
• ”VERB” in the first column
• “NOUN” in the second column
• “INDUSTRY NICHE” in the third column
3. Fold the paper so only the “VERB” column is visible.
4. Set the timer for 30 seconds.
• Once the timer starts moving, so does your pencil.
• Your goal is to fill the column with verbs.
• Don’t worry about if they make sense. Just write verbs–the weirder the better.
• You’ll make connections later.
5. When the timer dings, repeat steps 3 and 4, but this time with the “NOUN” column.
6. Once you’re done with the “NOUN” column, move over to the “INDUSTRY NICHE” column.
• If you have an idea of the niche you want to write for already, feel free to write down just your chosen niche–or the 3-4 you’re choosing between.
• If you DON’T have an idea of a niche you want to write for, treat this the same as the other two columns. Just write different niches down and don’t worry if it makes sense: (mom bloggers, scuba divers, pop stars, bakers, candlestick makers, high schoolers, entrepreneurs).
7. Unfold your probably-ridiculous chart, read it, and laugh.
• Put stars by things that are funny.
• Put circles by combinations that intrigue you.
• Is there an industry there that piques your curiosity?
• Is there a “[verb] a [noun]” combo that makes your heart race? Write. That. Ish. Down. On a clean sheet of paper.


Brainstorming Technique #5: Write down all the things you’re good at
This method almost didn’t make it into the “Intuitive Freewriting Exercises” section, because it’s different in so many ways–it’s a longer process, it’s more reflective, and it’s not necessarily so unconscious.
But it’s also very similar to the above exercises, in that it’s all about generating two pages full of material and then circling and writing down intriguing connections.
Step 1: Set a timer for 15-20 minutes. Get comfortable. On one side of a blank sheet of paper, write down everything you’re good at. And I mean everything.
Not just “copywriting” or “client follow-up” or “creating organizational methods,” but also all the other stuff you’d probably never say out loud.
- Are you really good at feeding the dog on time?
- Are you great at remembering faces?
- Can you memorize the theme song of a cartoon in a heartbeat?
This is for your eyes only, so there’s no need to filter things out. And you never know what’s going to spark an idea–so really, the more the merrier.
Step 2: Get another sheet of paper. Set the timer for 15-20 minutes–again. Now, write down everything people have told you you’re good at.
And the same rules apply! Not just work-related things, but also, do you get compliments on your outfits?
- Do friends tell you you’re a good listener?
- Do people express awe at your meal-planning abilities?
- Do a weird number of people say you smell really good?
Nothing here is off-limits.
Step 3: Look at the two lists side by side.
• Highlight words/phrases that stand out to you.
• Circle words/phrases that show up on both lists.
What, between the two lists, would make an interesting combination? Write these combinations down.

“Scuba diving, sharks + podcasting…what would THAT look like?”
GUIDED BRAINSTORMING EXERCISES: RELAXED AND REFLECTIVE
So the above exercises were about quantity, not quality–about generating as many ideas as humanly possible in the hopes of dredging up your subconscious and mining it for gems.
These next exercises are more about looking through evidence or answering a prompt and letting ideas come in a slightly more conscious, prompted way.
You don’t need a timer for these.
(Though if you thrive on structure, use the Pomodoro Technique, which is a fancy way of saying “brainstorm for 25 minutes, take a 5-minute break, repeat.”)
Brainstorming Technique #6: FAQ Method
What are questions you’re constantly getting from clients and colleagues? Or, even if it’s not constant, are there questions that keep coming up over and over?
Lucky for you, in this modern era, most of these should be documented (read: findable).
Look through old emails, Slack messages, and texts and write down questions people ask you about your business–or even praise that is phrased as a question.
Examples 1:
- Question: “How in the world do you stay so organized?”
- Possible book idea: “Your-Name-Here Organizational Method for Entrepreneurial Success.”
Examples 2:
- Question: “I always have trouble finding great photos for blog posts–how do you make it look so easy?”
- Possible book idea: “Secret Ways To Have A Visually Stunning Blog–Especially If You’re Not a Photographer.”
Examples 3:
- Question: “Should I file my LLC paperwork before or after September?”
- Possible book idea: “A (Yes, Really!) Fun Guide To Taxes In A Single-Person LLC”

Brainstorming Technique #7: Talk It Out
If you’re more of a talker than a writer, pull a Mad Men maneuver and grab your tape recorder. Well–more accurately, your smartphone and its voice memos app.
Set aside 30 minutes to 1 hour, alone. Get comfortable–have some water (and maybe some granola bars) on hand, just so nothing takes you out of the zone. Then, turn on your recording device and just start…talking.
Talk out your ideas. The first thing that comes to your head. Don’t worry if it doesn’t make any sense or if you don’t see a pattern–wait until you have it transcribed.
Some cheap/free ways to transcribe your audio:
- Use the text-to-speech function in Google Docs or on your phone, so it transcribes while you talk (free, instant turnaround, but not perfectly accurate — must be using Google Chrome browser)
- Get all A.I. up in here with IBM Watson’s Speech-to-Text service (free for 30 days, instant turnaround, accurate)
- Rev.com ($1/minute, 12-hour turnaround, 99% accuracy)
- Trint.com ($12-15/hour, 45-90 min turnaround depending on file length, highly accurate)
- Email Jennifer Peterson (no relation ;)) at one.of.jennifer@gmail.com (and ask for the “Copy That Pops Friends & Family” rate)
Once it’s transcribed, you’ll be able to look over your thoughts with a highlighter, and you can see ideas you kept circling around or unconnected dots that you can now connect.
If you get stuck, pretend someone is interviewing you.
Try answering these questions out loud, and see where the answers take you–
Sample Questions:
- What is the worst part of your job?
- How would you describe your career to your eight-year-old self?
- When you were a kid, what did you love doing?
- What kind of work do you like doing so much, you would do it for free?

Brainstorming Technique #8: Ask “What If…”?
Yes, this is intentionally vague, because that’s where the magic happens.
You can ask “what if” of the industry you’re working with, or of any of the intriguing combinations you generated in the first handful of exercises.
This is the practice of looking at something and saying, “What if this were…[insert word here]?”
- For example: “What if a podcast were… easy / only published once a year / scary / only told in poetry?”
- For example: “What your coaching business were… in-person only / at the bottom of the ocean / recommended by Oprah?”
Some “what ifs” to start you off–choose your preferred level of whimsy.
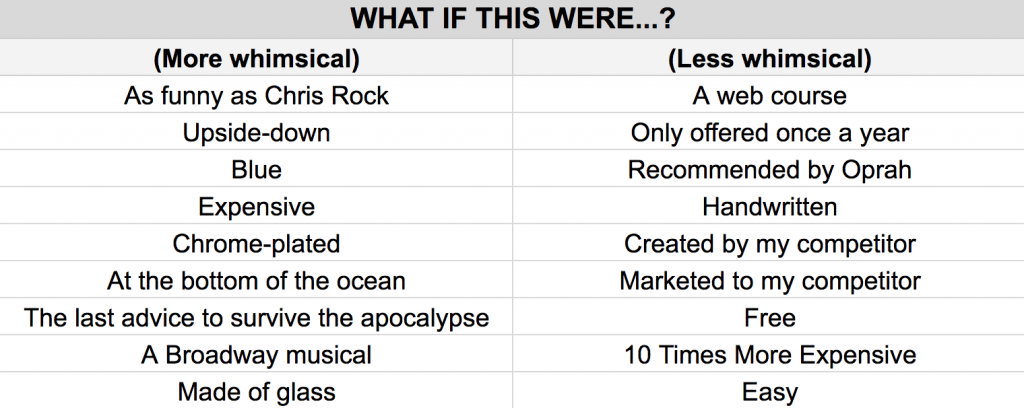
Use the above chart to get to daydreamin’ and let your mind come up with something new and inspiring!

Brainstorming Technique #9: Give yourself advice
“It’s one of my theories that when people give you advice, they’re really just talking to themselves in the past.”
– Austin Kleon, Steal Like An Artist
Let’s say you have a time machine–a one-shot chance to send yourself a letter filled with advice you wish you had when you were just starting out on your career path?
What do you know now that you would tell:
- 19-year-old you?
- Or 24-year-old you?
- Or even 3-months-younger you?
We always say, “If only I knew that when I was starting out!” Write that down.
That’s a book idea!

Brainstorming Technique #10: Write a letter to your hero as your future self (with a best-selling non-fiction book already published!)
Project yourself into the future for a moment with me…just after writing a non-fiction book that is very well-received!
Imagine your book is done…
• It’s published…
• It was a smash hit…
• You ranked on the best-seller list for your categories and all your friends, family, and business associates congratulate you each time you speak.
• You’ve booked speaking gigs and podcast interviews like it’s going out of style.
• You’re getting more clients and sales than ever before and hand-picking who you want to work with.
• You never haggle prices anymore and just shrug your shoulders if someone says, “That’s too expensive!” because they weren’t your ideal client anyway. And there’s a waitlist a-buildin’!
Now, you (your future you) sits down to write a letter.
This time, it’s a letter to your hero or someone you respect or admire. (I don’t really use the word ‘hero,’ myself.)
You’re not going to actually send this letter. And it is not a fan letter–it’s not written in the voice of you, a lowly civilian, gushing about how much you love your hero’s work.
Instead, write it as though you and your hero are good friends.
And you are writing to tell them all about your book writing, publishing, launch, and leverage….
- What obstacles did you overcome in picking a topic and what was the book finally on?
- What was the title of your book you decided on?
- Describe the cover design, colors, and style.
- Describe the fans who showed up at YOUR book signing.
- What podcasts, conferences, and T.V. publications are reaching out to you now?
- What categories was the book released under?
Don’t be afraid to get dreamy–again, you’re NOT sending this. It’s for your eyes only.
Some starter sentences:
- “So glad I ran into you at the panel last week–it was crazy being a keynote speaker, but I guess it’s always wild the first time around! You asked me to tell you more about writing my book and how it came to be. Well, it’s like this, writing a non-fiction book wasn’t easy for me but…”
- “Thanks again for the baby shower invitation; happy we got to catch up before I head off on my book tour. I forgot to tell you the story about the origin of it all!…”
Some really great insights can come from forcing yourself to do this. Even if it feels awkward at first! Give it a try and tell me if it worked in the Facebook Community!


How to Write a Book Step 2: Deciding On One Topic
So now you’ve got some ideas when it comes to the topic of the terrific non-fiction book you’re going to write.
The next step: deciding on ONE topic.
And remember, if you’re looking at your ideas and thinking “But this isn’t the BEST idea in the WORLD,” relax! You’re not trying to create the best book. You’re just trying to create a good book — a solid book — that doesn’t already exist.
Think of it as Seth Godin’s “edgecraft” concept:
“You don’t often create a more popular restaurant by serving better food. You can do it by serving remarkable food, or having a remarkable location or a remarkably famous chef.
You don’t often build a better car by building a faster car. You do it by building the most beautiful car, or the least polluting car, or the biggest car. At least for a while.”
— Seth Godin, Edgecraft Instead of Brainstorming

HOW TO DECIDE ON A TOPIC
Like any big life decision, it feels tempting to say, “When you know, you know!” But that doesn’t always happen…at least not right away!
So, here are some questions to ponder…
1. Which topic keeps coming back to you?
• Through all your brainstorming exercises, there might’ve been one topic that kept showing back up in slightly different forms.
2. What niche do you want more experience/credibility with?
• After all, this is why you’re writing a non-fiction book in the first place–to gain credibility in your specific niche.
• If there’s a topic you’re leaning towards, but it doesn’t get you back to your niche, then put it aside for now. Focus on your niche.
• [There are always future books to be written, but we need ‘the one’ that is going to get you the brand and business growth you need right now first.]
3. What are your clients most into?
• Don’t be afraid to crowdsource, especially if you’re sort of writing this for your clients.
• Use a Facebook poll to ask your trusted clients which topic they’re more excited about. Will it be the one YOU’RE most excited about? Maybe–or maybe not, and you’ll end up writing something you never would have touched initially.
4. What do your friends think?
• If you ask the people who know and love you best, is there a topic off your top 5 list that jumps out at them as a great fit for you?
• You can also come ask the other entrepreneurs and me in our private Facebook Community that’s all about writing, self-publishing, and leveraging a best-selling book for our businesses.

Ask some people who know and love you. They’ll be able to tell if something fits.
5. Which topic–if you’re stuck between two–has the least amount of material already written out there?
A purely practical question–and if you’re equally leaning towards two, it’s a super-important thing to consider.
Let’s say you want to help other businesses with their online marketing and you’re stuck between these two topics:
- Topic 1: How to Run Facebook Ads for Small Business Owners
- Topic 2: How to Run Pinterest Ads for Mompreneurs Who Sell Digital Products
Obviously there’s more written on the first topic. Probably. (We’d need to research it to be sure).
But it’s a good idea to check out your competition! You want to write your book on a topic that, ideally, hasn’t been extensively covered already–that way YOU get to be the expert. You get to fill the need! Which is the whole point.
- BONUS TIP: The more niched down you go, the fewer competitors there!
As of writing this guide, I am still the ONLY person to write about writing tips for podcasters! I combined two passions and niched for success!
6. Which topic are you most excited about?
- Is there a particular book you’re dying to write?
- Pick that one–it’ll carry you through the next couple weeks (or month) of actually writing your non-fiction book.
7. Heads or Tails?
When all else fails, flip a coin.

How to Write a Book Step 3: Outlining Your Book
You have your One True Book Topic, and you’re about to hold hands and go off skipping into the beautiful sunsets of Bookland.
Congratulations!
But before you get there, you’ve got to start planning the wedding, so to speak. In this step, you’re going to take your topic–probably just a phrase or a couple of sentences at most–and turn it into enough material for an outline.
Book Outlining Step #1: Write Down All The Questions You’ve Gotten (or Could Get) About This Topic
This might also require some research:
- digging through forums on Reddit and Quora
- reading article comments
- scanning email backlogs and archives
What are people wondering about? That’s exactly what you want to answer in your book.
Book Outlining Step #2: Get some Post-Its, Yesterday
I cannot sing the praises of Post-Its enough.
Like many things in life, this can be modified if you just cut up some pieces of paper, but the ideal thing is that you are able to write out all your thoughts and move them around.
I personally really prefer hands-on idea organizing, but if you’ve got a thing for screens there are always apps for that:
First, move away from the idea that each post-it is a chapter title. Instead, each Post-It is a phrase, a question, a key thought, something that surrounds your topic.
It doesn’t have to be in order–that’s what the Post-Its are for. Write everything out first, and then, like a puzzle, reassemble it–put questions/phrases/words that go together, together.
You can even stick it up on a wall and color-code it, A Beautiful Mind-style.
You do you.

Book Outlining Step #3: Organize It On A Linear Timeline
You’ve got your Post-It groups covering every possible nook and cranny of this topic–but they’re probably not in order. Now’s the time to put them in order.
What do you mean by ‘order,’ Laura? (You may be wondering).
Think again to your past self…in what order of things SHOULD someone learn and process the information so that it’s most logical? Think like your readers who pick up the book. What will make most sense to them?
1. Out of the Post-It blobs on your wall, which one comes first?
• The one talking about split-testing email headlines or the one talking about building your email list with lead magnets?
• Take a nice, crisp piece of notebook paper (or open a new document) and write it down.
2. Which Post-It blob comes next in line?
• Write that down.
3. Keep going until all the broad topics on the wall have made it onto your list.
• #WerkIt
4. But what if…?
• QUESTION: What if there’s a topic and I can’t figure out where to fit it in?
• ANSWER: Maybe it doesn’t actually fit. Cut it from the outline for now.
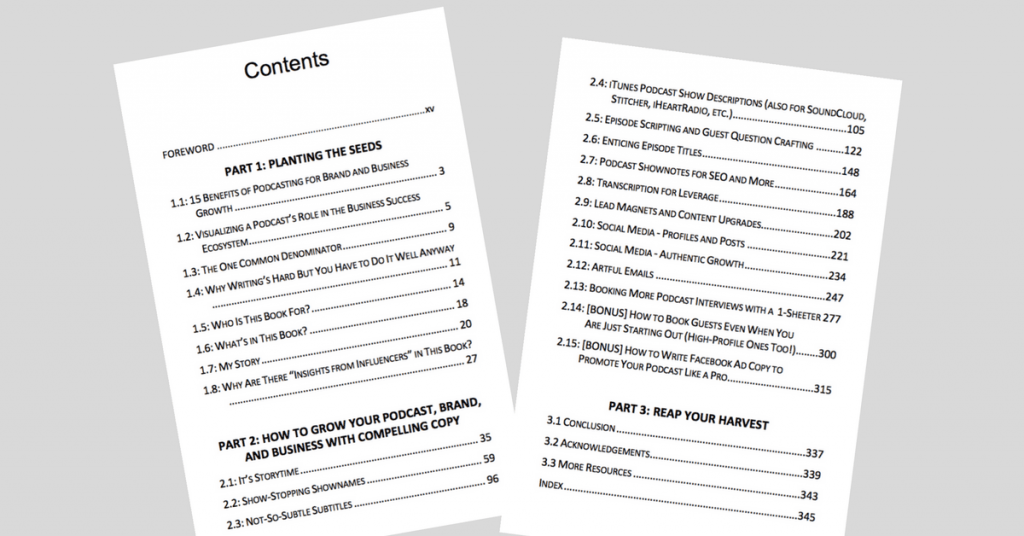
Here are my chapters for the bestselling Copywriting for Podcasters book.
Book Outlining Step #4: Write Out Your Chapters and Subsections
Now all your topics are organized in a linear timeline–time to take it one step further and organize them into actual chapters with subsections.
For my Copywriting for Podcasters book, I decided to cover similar subtopics in each chapter, so that there was consistency from one chapter to the next.
My subheadings were:
- What is it?
- Why should podcasters care? Benefits to your brand and business
- Laura’s experience
- Insights from an Influencer
- How to implement this right now
- Activity
- Pop Quiz (these were short and fun)
- Answers
Doing this helped ME write and make sure I covered what I wanted to for each chapter. Plus, I feel like it communicated clearly to the reader exactly what they needed to know AND how to put things into action for themselves right away.
As you complete this step, keep a few things at the top of mind…
1. Make sure you create a visual hierarchy.
You want it to be immediately obvious whether something is a main idea or a supporting idea.
2. Explain it like your readers are just wee youngin’s
SEO Hacker suggests that when you write out your outline, write it like you’re explaining your content to a kid. (I agree!) This method is also seen in other places, like the Explain Like I’m Five subreddit.
The idea is that you want your information to be communicated as clearly and non-jargon-y as possible. Introduce and clarify all acronyms and industry-specific terms. Don’t assume everyone knows what you know.
3. Also, is this book actionable?
End it with a takeaway, so the reader:
1. appreciates that you’re providing them with great, useful content
2. wants to engage with you further
I’ll talk more about this in the writing section, so no need to get too deep into it here–but just consider here, and write down, what you want your ‘Act-3’ takeaway to be.
You’re welcome to do all this by hand, of course, but if you’re looking for outlining software, here’s a link to Zapier’s list of 20 helpful book outlining softwares.
Their free suggestions are copied below:
- Checkvist
- Toodledoo
- Workflowy
- Little Outliner (requires a Twitter account)
- UV Outliner (Windows only)
- Evernote
- Google Docs (of course!)
You could also use things like:
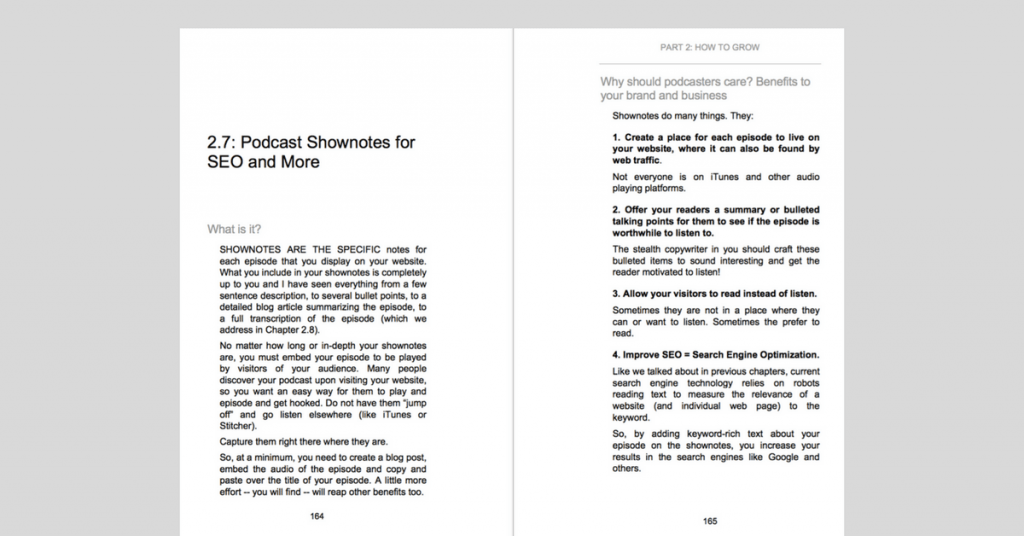
Example of inside my bestselling Copywriting for Podcasters book with subsections “What is it?” and “Why should podcasters care? Benefits to your brand and business” on display.
Book Outlining Step #5: Get Feedback
Everything is outlined. Whew! But now you want to make sure you’re not missing anything!?
Here’s how…
Give your outline to a trusted friend or colleague and ask them to take a look at it.
Some questions for them to answer:
- What’s missing?
- What doesn’t make sense?
- What’s out of order?
- What would you change?
You REALLY WANT your non-fiction book outline to be airtight, because the better it flows, the simpler your book writing process will be in the next stage.

If only you could get advice from dogs. “What do you think of my outline, Tuck?”

How to Write a Book Step 4: Writing Your Non-fiction Book
Actual Book Writing Step #1: BLOCK AND BATCH
You have your non-fiction business book outline! Congratulations–for real.
In my mind, the hardest part of writing a non-fiction book is organizing and planning. And you’re done with that!
You’ve still got a lot of pages to actually produce. But your work so far will pay off.
But if you’re feeling overwhelmed here…remember what my dad used to always say to me when I was stressed (as the overachiever in school that I was)…”How do you eat an elephant?”
Answer: One bite at a time.
“Thirty years ago my older brother, who was ten years old at the time, was trying to get a report written on birds that he’d had three months to write, which was due the next day.
We were out at our family cabin in Bolinas, and he was at the kitchen table close to tears, surrounded by binder paper and pencils and unopened books about birds, immobilized by the hugeness of the task ahead.
Then my father sat down beside him put his arm around my brother’s shoulder, and said, “Bird by bird, buddy. Just take it bird by bird.”
— Anne Lamott, Bird by Bird: Some Instructions on Writing and Life
Get Clear About Your Work Ahead
Because everyone reading this probably has different chapter lengths (and overall book lengths), let’s measure your elephant–er, non-fiction book–by the number of subsections you’ve got listed.
If you have 8 chapters, each with 4 subsections, then you’ve got 32 subsections to write.
In my 8-Week Action Plan [included in the Bestselling Book Accelerator — email us at info@copythatpops.com if you’d like to purchase it without the full accelerator], I give you 23 solid days for writing (that lets you take the weekends off to recoup–OR, if you’re super-ambitious, to get ahead). So if you’ve got 32 subsections to write, divide that by 23, and you get the number of subsections you need to write per day to stay on track:
32/23= 1.39130…

That’s all: 1.4 subsections.
If you round that up to 2 full subsections whenever you can, you’ll stay ahead of the curve, and if you need to take a sick day, you’ll be just fine.
I recommend blocking out 2 hours for writing a day–that’s more than enough time to manage a rough draft of the subsections on tap for that day.
Fit those in whenever you have the most energy. If you’re a morning person, wake up before the sun does and pound out those words. If you’re a night owl, wait till the end of your business day, pour yourself a glass of wine, and get to writing.
Also make sure that when you’re done with writing for the day, you set your intention for the next day so you can get right to work without wasting time on “Wait, what am I supposed to be writing today…??”
Miscellaneous Non-Fiction Book Writing Tips
1. Get a calendar so you can write a big X every time you get your writing done for the day.
This is called “Don’t Break The Chain,” and was allegedly popularized by Jerry Seinfeld, and then Austin Kleon in Steal Like an Artist.
2. Use this word count tracker
If you’ve got a specific word count you’re working towards) to help keep you motivated as the words pile up
3. Make sure to drink water and to take breaks to do carpal-tunnel-prevention exercises.
We want to prevent total burn out during the writing process! 🙂

When You’re Just Not Feeling It
Ugh, it happens to all of us.
You want to write but it feels like dragging petulant words out your fingers.
Here’s what to do when that happens (because Not Writing is, unfortunately, not an option).
Suggestion #1: Use a timer for 10-minute word sprints.
Write as fast as you can, not caring if it sounds stupid or doesn’t make any sense. Remember, this is the writing stage, not the proofreading/editing stage.
Sometimes, knowing you only have to endure something for 10 minutes can get you off the hook, mentally–and it can unblock your flow of words.
When it ends, take a 2-minute break, grab a glass of water, stretch your fingers, and get ready to go again. Try and beat last time’s word count. Ready, go!
Suggestion #2: Have a word-race with a friend or an accountability partner.
These partners can be tricky to come by, but lucky you if you’ve got one! If you happen to be writing your book in November, April, or July, you can find these writing partners at nanowrimo.org, where thousands of writers worldwide jump into the wild world of writing a novel in a month.
(And yeah, writing a novel is not the same as writing a business book–but potato potahto. You’re both trying to write lots ‘o words, so why not do it together?)
You can also come ask around in my free Facebook Community for Best-Selling Authors (and those workin’ on it, of course!)
Suggestion #3: Set up a reward system.
This needs to be something tangible, and something that works for your pace. If you’re having a rough, can’t-hang day, find some little reward to make 10-minute word sprints bearable. And then have a bigger reward once you’ve gotten through all your writing for the day.

Reward System Suggestions
AFTER EVERY 250 WORDS
- Listen to a song off an old favorite album or a new album you’re excited to hear
- Read a short article (2-minute break, remember?); whether your flavor is Buzzfeed, The Economist, or The New Yorker, the internet delivers
- Have a small sweet treat. (Yes, not healthy, whatever. I won’t judge you for a Milk Dud. Or a macaroon.)
- Snuggle your pet (ask be about renting Tuck by the hour ;))
- Set a timer for two minutes, spritz your face with lavender face mist, and lie down on a soft blanket
AFTER YOU KICKED YOUR DAILY WRITING’S BUTT
- Watch a feel-good movie, guilt-free
- Get a cocktail with a friend (bonus if this friend is an accountability partner and knows for sure that you won’t be meeting them if you don’t do your book writing for the day)
- Take a walk near a lovely body of water
- Make yourself a delicious meal (or go out and order your favorite meal – I recommend trying something vegan!)
- Listen to a podcast or an audiobook that has nothing to do with work
- Have a dance party (alone or with friends)

Actual Book Writing Step #2: RECORD YOUR VOICE
This one is done particularly well by Brandon T. Adams.
Despite having a lisp as a kid, Brandon (or BTA as we on the team like to call him) has practiced speaking over the years. So much so, that he is confident on stage, in front of the mic, and on the fly in front of the camera.

BTA and me on set filming the T.V. show Ambitious Adventures!
But he’s not great at spelling or grammar. And this isn’t to be critical of him at all! I just know this firsthand because I edit his content. I’m bringing this up because, yeah, he makes a ton of writing errors, but he’s also written TWO BOOKS (one of them co-authored with Kevin Harrington, an original shark on the hit T.V. show Shark Tank!) and has a third coming out soon.
How?
He had the brilliant idea to follow these fast and effective steps:
- Speak out loud all the valuable stuff he knows about a topic
(e.g. Crowdfunding, Elite Branding, Producing a T.V. show) - Have the recordings of that audio transcribed.
(There are many ways to have this done for a fair price, as we discussed earlier) - Go through and edit the transcription.
(BTA is doing that himself a little bit, but because he’s busy building an empire, he also enlists help from people on his team, a free intern, and V.A.s who love editing and formatting who can be hired at a super reasonable rate)
So if you’re more comfortable talking than writing, follow BTA’s example.
Record your voice!
Actual Book Writing Step #3: PART 2, PART 1, PART 3
Whether you’re writing by hand or you’re speaking into a microphone, there’s always the problem of, “Yeah, but where do I start?”
Start with Part 2: The Meat Of Your Business Book
Here’s something (perhaps) counterintuitive–DON’T start with page 1. Don’t start with the introduction.
Why?
Because the beginning of a business book is a “pitch” to get the reader to read the rest of your book (and maybe even buy your products and services!). And if you haven’t written the rest of your book yet, you have no idea on what to pitch the reader.
Instead, start with the stuff you know–the valuable stuff. What are you teaching? What’s the meat? Dive right into the middle.
Don’t worry about writing in order, either. Your outline gives you a neat list of what you need to write, so dive into the subsection that calls your name and check it off your list.
Circle Your Key Areas
After you’re done with all the “meat” of your non-fiction book, go through with a pen (or a digital highlighter if you’re keen on saving trees) and circle all the key takeaways.
• What are the BIGGEST POINTS of your book?
• What do you NOT WANT THE READER TO LEAVE WITHOUT KNOWING?
Also, what are the juiciest bits? What might you bring up in an elevator pitch to get your reader to say “Ooh, what? Tell me more about that!”
Circle those too.
Write Part 1 (The Pitch For Part 2)
Use the key/juicy parts you circled to guide your pitch. Now that you know what you’re selling them on, work backwards. What can you tease that will get people to keep reading?
Neil Patel does a killer job deconstructing the art of writing powerful blog introductions–and you can apply them to your book intro, too.
“What these oft-repeated phrases boil down to is this: say something unusual. Something unexpected, even.
If your very first sentence is odd enough to make people want to read the next one, then you’ve done a good job. If you start off with something boring or expected, you might lose potential readers.”
–Neil Patel
Write Part 3 (The Pitch To Engage With You Further)
You’re almost done! You have your intro and your meat–so the last part of the book, especially because you’re an entrepreneur, is to pitch the reader to further engage with you.
Remember WHY you’re writing this book?!?
To develop, prove, and/or highlight your incredible expertise in a niche, right? This is your chance to hammer it home with a solid takeaway for your reader.
There’s no magic formula, unfortunately. But here are some tips to get you thinking!
End things on an inspiring note
Generally speaking, you want people to finish your book feeling really good. You want them to associate your non-fiction book with that feeling, and to want to see more of you, and to want to tell their friends about you.
Pull back the curtain a little bit and write about why this book is important to you, and the struggles you’ve gone through to get to this point. Then, talk directly to your reader about all the good things they’re going to accomplish now that they’ve read what you have to teach.
Give out a “bonus” actionable assignment
It’s likely that your whole book was built around learning some sort of concept–but another way to write a fantastic conclusion is to go ahead and answer your reader’s burning “What now?” question.
Austin Kleon does an extremely simple and effective version of this in Steal Like An Artist–he ends the book with a page that says, “What now?” and has a checklist below, filled with next steps the reader can take. It’s a callback to earlier chapters, and it pushes the reader to take the book’s material and make it part of their lives.
Include links to your online spaces
Instagram, LinkedIn, Facebook, your website, your email address–pick a few that you really want your readers to see, and put them on a page at the end.
Consider what you have set up in each place.
• Do you have a blog?
• A free e-course that fleshes out a section of this book?
• A newsletter with built-in sales funnels?
If you like, you can also include a note about how you’d love to hear from them. Remember that your book is a means to other ends beyond just the book itself!

How to Write a Book Step 5: Proofread and Edit

Almost there! Sort of!
Book Editing Method #1: Free: Ask A Nerdy Friend
When I wrote my first book, I didn’t have the money to hire a professional editor. But lucky for me, my talented lawyer BFF Emily Hickok offered to help me out for free.
If you have any friends who:
- Are total writing and grammar nerds
- Love you and want to see you succeed
- Have some extra time on their hands (not to say that Emily did…she was very kind to help!)
…then it’s definitely worth approaching them to see if they might want to edit your book.
My personal suggestion, so it doesn’t come across as “Hey, will you work for me for free?” is to offer them something non-monetary in exchange.
Book Editing Bribe Ideas:
- Do a professional work exchange.
• Is there any work you could do for your friend?
• Do they need help optimizing their email list?
• If you’re a photographer, maybe you could do a free photoshoot. - Put aside a weekend to help them with a big household chore.
• Have they been putting off painting their living room?
• Is there a closet of forgotten sweaters that desperately needs organizing?
• Could they use some babysitting so they can gets something done for themselves?
• Help take something off their shoulders. - Take them out for Starbucks or to a nice meal after all their hard work.
• Or cook them a delicious meal even!
• A gift card to their favorite store/spa/class/etc. would be well received.

I love nerdy friends!
Book Editing Method #2: DIY
Of course, you can edit it yourself, if you already consider yourself a strong writer. And there are a ton of great resources for editing books on your own.
Here’s a link to National Novel Writing Month’s free revision resources–as you can guess from the name, they’re skewed towards novel-writing, but the same principles apply.
One of my favorite tips for editing any giant chunk of words is to do it from big picture to small picture.
In other words, don’t get caught up editing the grammar for a section of the book you might cut entirely.
Here’s the scoop…
Three Rounds of Editing
1. 1st Round Of Edits: Does the book, as a whole, make sense?
- The first time you go through the manuscript, you’re looking to make the tightest book possible.
- Does everything make sense where it is?
- Are there chapters out of order?
- Chapters that don’t actually serve the book?
- Are you missing chapters?
These are the problems to iron out first. This is your continuity edit.
2. 2nd Round of Edits: Could the writing be clearer (and/or more clever)?
- On your next pass-through, edit the writing.
- Are there areas where things are badly explained, or sentences you think could be funnier? Circle those and fix.
This is your personality edit.
3. 3rd Round of Edits: Spell-check and grammar
- Your last pass-through is your spell-check and grammar edit.
- Ideally, at this point, you’re not moving around your chapters or deleting entire sentences/paragraphs anymore, so you’re not wasting time spell-checking words that will go away completely.
- My advice is to run it through a few different spell-checkers, including Grammarly.
This is your small details edit.

The biggest downside to doing it yourself is it’s going to take a LOT more time–especially because you’re going to need breaks from looking at your own work.
You know that feeling where you’re making something, and after hours and hours of the same thing, you’re thinking, “I can’t even tell if this is good anymore”?
That’s when you put your manuscript in a drawer, focus on other things for 3-5 days, and then come back to it with a fresher eye.

Book Editing Method #3: Outsource It
If you’re short on nerdy friends and editing it yourself sounds like a nightmare, good news–there are so many people you can pay to edit your book.
Websites like Upwork, Fiverr, FreeeUp, and Thumbtack let you securely hire freelancers at a reasonable rate–you can read reviews, get matched up with your ideal editor, and get your manuscript back in a timely fashion.

Whew! We just covered a lot.
Let’s review the main points for our how to write a book definitive guide:
Step 1: Brainstorming
- Try timed exercises to get as many words on paper as possible, and spark some unusual ideas.
- Try more reflective, prompt-focused exercises to generate thoughtful ideas.
- When a combination of words or phrases strikes a chord, write it down on a separate sheet of paper.
- Don’t censor yourself.
Step 2: Deciding On One Topic
Ask yourself these questions:
- Which topic keeps coming back to you?
- What niche do you want more experience/credibility with?
- What are your clients most into? (Put it up to a Facebook vote)
- What do your friends think?
- Which topic–if you’re stuck between two–has the least amount of material already written?
- Which topic are YOU most excited about?
Step 3: Outlining Your Book
- Write down all the questions you’ve gotten/heard about your topic
- Use Post-Its to organize all the key ideas of your topic on your wall
- Take your final Post-It configuration and type it up on a linear timeline
- On that timeline, list your chapters and subsections
- Get feedback on your outline before you start writing!
Step 4: Write Your Non-fiction Book
- Divide the number of subsections you listed by the number of writing days you have (I typically suggest 23). This gives you an estimate of how many subsections you need to write per day.
- Block out 2 hours a day to write–no excuses.
- Recording yourself talking is always a “writing” option
- Write part 2 (the meat of the book), THEN part 1 (the intro/pitch for the rest of the book), THEN part 3 (the pitch to engage with you further)
Step 5: Proofread & Edit
3 possible proofreading-and-editing methods that won’t break the bank:
- Ask a nerdy friend who loves you–pay them back with a work trade or a similarly nice favor
- Do it yourself, but take breaks from looking at your own work so you can come back to it with a fresh eye
- Outsource it with a freelancer from Upwork, Fiverr, FreeeUp, and Thumbtack
Great! What should you do now?
- Get a timer and a piece of paper and go through 2-5 of the brainstorming exercises.
- Once you have an idea, flesh it into an outline.
- Figure out how long it’ll take you to write (at around 2 hours a day) and schedule out your writing time.
Want More?
1. Awesome Facebook Community:
• Best Selling Author Posse
• 100% free. Tons of support & accountability through your journey!
2. FREE Training:
• How to Write a Best-Selling Biz Book As a 1st-Time Author, In Under 8 Weeks, & $0 in Ads
• Once you’re ready for more inspiration and details!
—
I’m so excited for you!
Please feel free to drop me a line, always, with questions or stories from your book-writing process.
💕 LaptopLaura